Wednesday, May 27, 2009

Providing Sales Insights into Digital Body Language


There has been so much buzz about Prospect Profiler that I'd be remiss in not talking about it quickly.


Laura Ramos, from Forrester, highlights the fact that Marketing's Number 1 job is sales enablement on B2B Marketing Posts


David Raab from Customer Experience Matrix talks about Prospect Profiler and why Marketing Holds the Key to Effective Selling. He also has a great whitepaper on the subject available.

Our own David Rudolph talks about the symptoms of sales blindness on Funnelvision, his new blog.


Put simply, Prospect Profiler is the most eagerly anticipated release we’ve had in quite some time. It was highlighted when it came out in beta last quarter, and it has been seen fairly widely since then, with many of you using it during the beta process. I did talk about it briefly last release, but a few of the capabilities have been refined, so I want to go a bit deeper in talking about it as it approaches general release.
(*Note after the fact: Prospect Profiler is now, of course, in full general release)

At a high level, Prospect Profiler is an interactive, visual display of each prospect’s digital body language. Embedded in Salesforce.com, Oracle CRM on Demand, or Microsoft CRM, Prospect Profiler allows your sales team to get instant insight into what you as a marketing team are doing to communicate with prospects, and more importantly, what their response has been.

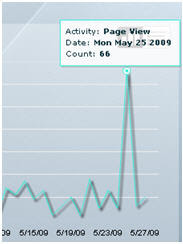
The main screen of Prospect Profiler provides a time chart of outbound communication and inbound prospect interest, and can be broken down by area (email, form, web visit, etc). The top section provides key insights into each area, as well as showing the prospect’s most recent search (on Google, Yahoo, or MSN), to provide crucial insight into their area of interest.

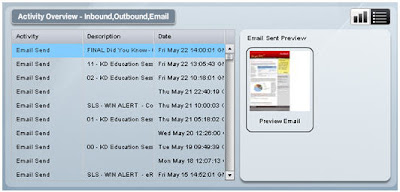
Not to be missed, however, are the secondary capabilities. The Website, Forms, and Emails tabs provide deeper insight into each of those areas. Each form can be presented exactly as the prospect filled it out, and each email can be previewed to gain insight into exactly what caught the prospect’s interest.
For example, when the chart shows a spike in activity for the prospect, a hover-over capability will give you a quick view of what that activity looked like. The spike shown here, for example is 66 page views on a specific day.
When calling a prospect, however, based on that activity, your sales team can benefit from knowing exactly what the prospect was interested in. Guiding the conversation to that interest area is key in engaging them. One click gives your sales team instand access to the details of the web visit and shows exactly what pages caught their interest. This detail of a visit can be very valuable in understanding exactly what each individual is interested in prior to a critical meeting or call.
Similarly, email activity can be viewed in great detail. By clicking on the email activity, your sales team can see the details of which emails have been sent, opened, read, and clicked on. Thumbnail previews give them highlights of the email, and a preview button will show them the exact email that was received, providing unparalleled insights into prospect interest.

Even more interactively, the button at the bottom of the screen, labeled “Setup Web Visit Alerts” allows your sales team to easily set up alerts so that they are notified immediately when a prospect, or even anyone from that company (based on email domain) shows up on your web site. This level of insight into visitor activity has typically been managed centrally by marketing through visitor alerts, but can now be managed by your sales team directly through prospect profiler.

If you are deepening your marketing team’s engagement with your sales team and working to have them better understand marketing’s effect on prospect engagement, and the insights that can be gained from understanding prospects’ digital body language, there’s no better way than through a tool like prospect profiler.

Tuesday, May 26, 2009

Discovering Contacts in Key Roles with Reachforce


We would all like to have perfect data on all the key contacts at the organizations we are marketing our services to. However, this is often not the case in reality as we all know. Even once we have cleaned the data that we do have, often we are missing crucial contacts, or we are unsure of who is responsible for the area of concern. We may have information on individuals’ titles, but often title does not tell us exact responsibilities.

The great news is that this dual challenge, of missing data and missing information on roles can be solved simply.

Through a partnership with Reachforce, Eloqua is able to leverage Reachforce’s role-based contact discovery technology directly. This allows you to specify a company you are interested in and have Reachforce discover the individuals at that organization who perform the role you are most interested in targeting. For example, if you are looking for the individual who is responsible for network security within an organization, they may have a title of “IT Administrator”, “Network Manager”, “Director of IT”, or may other options.

The connection to the Reachforce service is done through the Data Servcies area of Eloqua (go to Evaluate->Data Services->Reachforce). A “Call Project” is built to define the exact individual you are looking for. You may specify a series of titles that are likely to be associated with the role you are looking for. You can also specify titles that, although sounding similar, are not associated with the role you are looking for. To clarify further, you can specify questions to ask to ensure that you are connected with the right person.

With the Call Project defined, you can then specify how you would like to map the outgoing and returning data on a field-by-field basis. For example, if you were going to pass company information across to the Reachforce team in order to retrieve Contact information, you would map both the Company fields required (perhaps Company Name, Address, etc), and the Contact fields expected (name and contact information).

When the Call Project is defined and the data is mapped, it can be used similarly to any other marketing asset with Eloqua. You can run a batch manually to retrieve a list, or, perhaps more interestingly, you can add the Call Project to Program Builder. This is where the options become interesting. By adding the Call Project to Program Builder, you are able to have a marketing automation program automatically leverage a role-based contact discovery process. If you do not have the correct set of contacts at an organization, you can immediately and automatically have the contacts in the right role discovered.

Note that in adding the Call Project to Program Builder, you should be aware of the types of data being sent and returned. For example, if Company records are sent and Contact records are returned, be sure that your Program step allows both Contact and Company records.

As this is a service outside of Eloqua, there is of course a per contact fee for the execution, but if discovery of contacts in the key roles is required, this is a great service to consider.

Thursday, May 21, 2009

Automating the Upload of Picklists


We talked recently about uploading select list values to be used in a form on your website to make the experience easier for visitors. There is an even more powerful technique that can be used to automatically update picklists that are dynamically sourced in another application.

In a similar manner to how we manually updated the picklists, we can use the upload wizard to automatically update the picklists. If, for example, the list of industries you are interested in having in your picklist is defined in a remote system that you want the list in Eloqua to automatically reflect, you can set that up to re-synchronize on a nightly basis.

One of the more common remote sources that is dynamic is a custom report in your CRM system. This creates a .csv export that is current as of the moment that it is called, and can thus be used as a dynamic source. Typical uses might be a list of products, industries, or regions that is maintained in the CRM system.
You can also use API calls to your CRM system in many cases to pull the information you require. In either case, go to Setup->Integration->Inbound and create a new data source. Be sure to check the box for "Can be scheduled for automatic execution", as this is what we'll be doing.

Following the same technique as we did with the manual upload from a .csv file, we’ll pick a source that is dynamic - our recently created source. The upload wizard will pull enough of the report to determine the columns available, which can then be used for mapping into the relevant fields in the select list. You'll likely want to choose the option to delete existing values, or to match on your option value field.

On the last step of the wizard, in the "After Uploading" section, choose that you would like to schedule automatic imports based on these settings. Select the schedule you would like the update to run on. Typically this will be weekly or daily. When the scheduled time arrives, the list will be re-uploaded with the most current version.
That is all that is needed, now your select list will be automatically populated with data from your remote source on a daily basis without you having to do anything.

Tuesday, May 19, 2009

Uploading Select Lists to Save Typing


In putting together landing pages, you’ll often want to use drop-down select lists to allow your web visitors to choose from a number of options. If you have a quick list with just a few options, it’s easy to enter the values manually, but if you are dealing with a list that is longer than 5 or 10 options, it can be much easier to upload the lists.

To edit or create a select list for your form, choose the Manage Select Lists option from the forms menu, and either edit an existing select list or create a new one. The select list editor allows you to edit or create the individual items in a list one by one. Remember that the Option field represents the data that is submitted when the visitor submits the form, and the Value field represents what is displayed in the select list to the visitor.

To upload a larger list of values, such as options for the visitor’s industry or product line of interest, starting from an Excel spreadsheet. The spreadsheet should have two columns, one for the data value, and one for the name that is displayed. Save your list in a .csv format so that it can be uploaded.

In the select list management interface, choose Upload Values. From here the familiar upload wizard will walk you through uploading your data file. Be sure to map the columns in your spreadsheet to the correct columns in the select list.

Within the upload wizard, you can also select whether you would like to delete all existing values, or have your new values added to the values that are already there.

The select list management interface give you a quick preview of your select list so you can ensure that it is exactly how you wanted it. Remember that you may want a blank or default entry at the start of the list in order to correctly handle the situation where a web visitor does not select a value for that field.


With this completed, your select list is ready to be used in your form. When you choose a field of type “Single Select List” or “Multiple Select List”, you will be given an option to choose your recently created select list. When you create a landing page layout for your form, that select list will appear.

Thursday, May 14, 2009

Understanding Buyers Through Internal Search Queries


I’ve talked quite a bit about things you can do with understanding the digital body language of your buyers based on Google search queries. However, there are often internal searches, within your web experience, that can be equally or more valuable. If your website uses an internal search for documents, case studies, or solutions, be sure you are adding the insights that can be gained from that into the view of your visitor’s digital body language.

To do this, there are two possible techniques. Either the search form can be integrated as a normal Eloqua form to capture the data before passing it back to the original search engine, or the search query itself can be captured directly from the query string seen in the URL.

The second technique is more commonly used if there is a hesitation to add an intermediary step between the user and the search results, of if there is a hesitation on the part of the team that owns the search area to make any alterations.

In this case, you can use query strings to track the searches. If the search results are presented in a URL that looks something like:


http://www.yoursite.com/search.php?searchquery=finance+case+studies


you can define a query string to look for the value of “Searchquery”.

With this query string defined, you will automatically capture the search query of each web visitor who performs a search within your site. This can be used individually for lead scoring purposes, or can be looked at in aggregate with reporting to see the aggregate trends in your visitors.

When thinking about understanding your buyers’ digital body language, it’s important not to overlook any potential areas of insight. An internal search engine can be a great source of this insight and it’s easy to track in Eloqua using either form integration or query strings.

This can be used either in overall understanding of buyer trends of the understanding of an individual's digital body language for the purpose of lead scoring or defining of nurturing routines.

Tuesday, May 12, 2009

Take the Eloqua Challenge


I wrote last week about a fun use of Eloqua by the folks at Accela, who had used the platform for internal employee engagement. It turns out that our own Chad Horenfeldt had put together a similar (although much smaller) quiz called the Eloqua Challenge.

Click here to take the Eloqua Challenge


You may have seen it (or taken it) if you're part of the Eloqua LinkedIn Group, but if not, have a look at it. It's 6 quick questions to see how much you know about Eloqua.

Once you have taken the challenge, you'll be taken to a PURL page that shows you what you got right and wrong, and some additional interesting info about that area.

The Eloqua Challenge is all built using form processing, Hypersites, PURLs, and Activity Driven Content. If you're interested in some of the behind-the-scenes details of how it's built, let me know and perhaps a later post can dig into that.

Thursday, May 7, 2009

Experts in the Field: DemandGen


I’m continually amazed at the creative ways I see Eloqua being used. The most common use, in external marketing campaigns, can still be very interesting, but many creative marketers are applying the automation, data, and communication aspects of the platform to various other uses with great effect. A great example of this came up the other day when I was talking with Dave Lewis and Patrice Greene at DemandGen.

They had worked with Accela on an interesting campaign that educated and engaged internal employees rather than external prospects, and in doing so garnered awards and recognition for the campaign's creativeness.

We all wrestle with the challenge of bringing new employees up to speed, educating them on our companies and brands, and getting them focused on core objectives. Accela decided to apply the techniques of nurture marketing to this challenge, and was successful in engaging 90% of their employee base.

The design of the program was quite simple:

- Over 10 weeks, each person in the company received a quiz about one of the 10 internal departments, with questions contributed by the execs in that department

- Each week followed the same pattern, with a Monday invitation, Wednesday reminder, and Thursday announcement of the week’s winner and overall leader board

- A real-time dashboard showed both results and overall participation

Automation allowed the program to smoothly run over the 10 week period with minimal involvement of the marketing team, and the continuous engagement led to 63% of the workforce playing every week.

As with many marketing concepts that show success, this quickly resulted in a copy of the campaign being used, with some modifications, by human resources to onboard new employees.

DemandGen’s work with Accela is a great example of how the capabilities that a marketing team has with Eloqua can be extended into novel and interesting areas. The goals, techniques, and approaches of nurture marketing are just as valuable with internal marketing campaigns that drive employee engagement as they are with external marketing campaigns that increase engagement within a prospect base.

The details of the Accela case study are available here on the DemandGen site.

Tuesday, May 5, 2009

Security Popup - Get Rid of It


We've all seen the popup that appears whenever you edit any marketing content in an email or landing page editor. It adds an unnecessary click to your day as you allow it to display the non-secure content that you are editing.

The great thing is that there is a quick and simple setting you can use to get rid of it entirely.

Before I start, I should admit that I am borrowing this tip from the folks at Astadia, who came out with it in a Tip of the Week a few months back. However, it's too good not to repeat.

Simply go to the Tools->Internet Options menu in Internet Explorer, and choose the Security tab. For each of the "Internet", "Local Intranet" and "Trusted Sites" zones, go through the following process:

Select the zone

Click "Custom level..."

Scroll down to the setting for "Display mixed content"

Choose "Enable"

Click "OK"

That's all you need to do - but remember to do it for all the zones, and be sure to add https://secure.eloqua.com as one of your trusted sites.

You may need to close and restart Internet Explorer before the changes take effect, but once you do, you will no longer see the security popup when you edit content.