
Ahh…the dreams of youth; so full of hope for the future. This holiday season, we invite you to view the Eloqua Holiday Cinema eMovie special release, ‘Career Day’ for a glimpse into youthful aspirations.
This eMovie was inspired by a scene from the award winning romantic comedy, Annie Hall, which was directed by Woody Allen in 1977.
Watch ‘Career Day’ by clicking the player below.
(if the above doesn't show up, or does not load, please go to http://service.twistage.com/plugins/player.swf?v=2ef00dd466a83&p=xmas-vid&a=1109433&autoplay=false)
Happy Holidays from all of your friends at Eloqua!
Tuesday, December 22, 2009
Wednesday, December 16, 2009
Filtering IP Addresses from Marketing Analytics
 Today's post is a guest post from Leigh Oxley, Team Lead in Eloqua's product support group. She has been a part of the Eloqua Product Support team since 2006, supporting marketers in their quests for marketing automation excellence.
Based out of Eloqua’s Toronto office, she is currently focusing on high-priority initiatives to improve the support organization, as well as working directly with our partner eco-system by providing dedicated support to certified partners. Not only that, but she's great to work with, so if you want ideas, insight, or help on your next campaign, data project, or lead scoring initiative, give Leigh or her team a call, and they are always glad to help.
================================
I think we can all agree that testing is an important part of any project – ensuring that everything will work as expected from start to finish. One thing we often don’t consider though, is how the test data will affect our reporting metrics once the campaign goes live. For example, if you run an email campaign driving visitors to a brand new landing page, and you have a team of internal people testing all of the pieces, you will want each of those people to click-through from your email to the landing page. Once your campaign goes live, you will have a set of visitors who are only testers, and likely shouldn’t count towards your marketing metrics once you go live – you don’t want to report inflated numbers to your executive team!
A quick and simple way to avoid this is to setup an IP filter within the Eloqua application, so that internal IP addresses are filtered from your analytics. As a Customer Administrator-level user, you have the ability to tell Eloqua “I don’t want to see visitor reporting on anyone coming from these IP addresses” through Setup -> Management -> System Management. This will simply disable tracking for anyone who visits your site from a list of IP addresses you define so that no web visitor information will be tracked. By setting this up for your organization, you can ensure that internal testers won’t be tracked and count towards your campaign metrics.

One question that clients often have when setting this up is how the functionality actually works. Essentially, when the website tracking scripts on your website pages see a visitor from an IP address you’ve configured to be filtered, they will ignore this visitor’s data. That means that if you later decide you want to track information for this IP address, you can simply remove it from the list and tracking will begin to take place. Something important to note is visitor data is removed on an ongoing basis while the IP address filter condition applies, but that existing data is not affected.
If I have a visitor profile with website visits reported from yesterday, and my IP address is added to the list today, then removed tomorrow, there will be a one-day gap in the reporting for my visitor – while I’m on the list, no web activity will be tracked. Another important point is that this does not affect other reporting for the contact, only visitor website activies are affected; all form submissions, program history, email sends, email opens, are still tracked as normal, but email click-throughs (as these are web activity) will not be tracked.
Hopefully this helps you to maximize your reporting efficiency in Eloqua and ensure you’re reporting the truest information to your teams. If you would like to set this up for your organization, there is a step-by-step interactive checklist available here in Customer Central to walk you through.
Monday, December 14, 2009
In-PDF Form Submission: Bridging the Social Media-Lead Generation Gap
 I'm thrilled to have another great guest post on Eloqua Artisan, this time from Patrick Woods (no relation), who I've come to know well and respect greatly over the last year while talking about the evolving social media landscape and what it means for B2B marketers. In this post, Patrick shares one of his interesting techniques - PDF integration of Eloqua web forms - and in doing so, reverses the typical trust relationship for web forms.
Patrick is a Marketing Associate at Profiles International (http://www.profilesinternational.com/) where he explores new ways to use Eloqua for building demand for his company’s employee assessments and talent management solutions. He resides online at patrickwoods.com.
==================================
Talking shop with other marketers at this year’s Eloqua Experience in San Francisco will go down as one of the highlights of my year. One topic that came up in almost every conversation was what has become the quintessential gray area for all B2B marketers: how do we generate leads using social media?
Marketers seem to love discussing social and its implications. Eloqua has even added some handy share-to-social functionality to its email system. But we marketers have found difficulty in moving from theory to practice, from how social may be leveraged to actually experiencing positive ROI from our social marketing efforts.
The tried-and-true method of generating leads from white papers and reports has failed to establish itself as a source of leads on the social sites. The traditional tactic of exchanging contact information for a deliverable often produces less than desirable results when promoted through social sites because this tactic fails to abide by the rules of the social space. User expectations are different on social media sites. In particular, everything is expected to be free.
In the rapid-fire universe of Twitter, no one wants to spend 5 minutes with your form.
A proposed solution
While I have by no means uncovered the Holy Grail of social media lead generation, I have developed a technique that I think will begin bridging the gap between your social assets and your lead gen efforts.
This method relies on forms built into your white papers, reports, or eBooks that, when submitted, integrate with Eloqua just like a typical HTML-based form. So users can click your bit.ly link on Twitter, access your content without jumping through the traditional hoops, and opt-in to your database on their own terms.
Here’s how to try in-PDF form submission yourself.
Create the backend in Eloqua
1. 1. Create a form in Eloqua as you would for any new campaign and click the Yes radio button that denotes your form as a non-Eloqua hosted form.

2. Clicking Yes will cause the Integration Details button to appear. Click it to get the necessary hidden fields for integrating your PDF-based form with the Eloqua backend. Copy this data for use in your PDF JavaScript.

3. .Create the processing steps to handle the incoming data and to redirect the user to the desired location
Create the PDF form
1. Because the Acrobat editing environment is clumsy at best, I recommend building the structure of your form directly onto the PDF page in your page layout program. Save it as a PDF and open it in Acrobat Professional.
2. You’ll want to use the Forms toolbar, so if it’s not open, click View -> Toolbars -> Forms. To add your first input field, select the Text Field Tool from the Forms palette and double click on your PDF close to where you want your first field to be located.
3. Doing so will open the Text Field Properties dialogue box:

Name the fields to match the HTML field names Eloqua will capture when the form data passes through your update rules. For example, my form will record “Fst” for First Name, so I’ve named my field accordingly. If you aren’t sure how to name your fields, either reference an existing form or click Fields à List Fields in your Eloqua Form Details view.
4. After closing, you’ll be able to position and size your text field. Repeat the steps for each field you’d like to capture.
5. To capture any hidden data, including elqFormName and elqSiteID and any other values you typically capture behind the scenes, add a text field as you did in previous steps, but select “Hidden” from the Form Field dropdown box. To insert the default value, click the Options tab and insert your value in the Default Value field. The data will pass to Eloqua with all the user-submitted values.

6. To add your Submit button, double-click the button tool on the Forms toolbar:
7. When the dialogue box appears, click the Actions tab. Choose “Submit a form” from the action and click “Add…” When the box appears, add the Form Integration Destination URL (from Integration Details from the earlier step) and choose HTML from the export format.

8. At this point, your form will submit the data. However, without additional JavaSciprt, error handling is clunky at best. For example, the only data validation method available is to determine if a field is empty or not. Keep reading to learn how to implement JavaScript for a richer user experience.
Adding the JavaScript
This is the last and most challenging phase of the project. Acrobat’s development environment is awkward, and apparently its usage of JavaScript isn’t as robust as what is available in typical browser cases.
The benefit of digging into the JavaScript functionality is to enable inline form validation, which is good for the user and good for your database.
The best way to insert your JavaScript is to attach it to your Submit button. Refer to Step 7 above. Instead of “Submit a Form,” choose “Run a JavaScript” then click the Edit button. Doing so will open a blank screen for typing your code.
Considerations
Be careful, however, since the editing environment only allows one level of undo. You may want to consider writing the code in a separate program, such as DreamWeaver or Coda, and copying it into the Acrobat box when ready for testing.
At this point, you can add all the desired functionality. There are some differences between real JavaScript and Acrobat JavaScript you should be aware of.
For example, for an alert box, your code would typically look something like this:
alert(Please enter your first name.');
But in Acrobat, you must prepend the app object thusly:
app.alert("Please enter a First Name.");
Also, I haven’t found a way to use event handlers, such as onClick, so you’ll want to consider building your validation into a chain of if…else statements, with the final else submitting the form. To submit form data in Acrobat JavaScript, you’ll want to use this method:
this.submitForm({
cURL: "http://now.eloqua.com/e/f2.aspx",
cSubmitAs: "HTML"
});
Hopefully this basic info will open a new world of PDF form interaction for you and your team. A good place to start exploring even further is Adobe’s PDF JavaScript Reference.
Final Thoughts
On a philosophical level, this technique completely reverses the trust relationship experience in the traditional model. Formerly, a lead would surrender their contact information and hope, based on a few summary bullet points, that your content would be worth the sacrifice of their data.
By allowing users to read first and opt-in later, you enable a more trusting first-date type of interaction with your content. Potential leads can mingle with your brand in a risk-free environment before committing.
Some marketers will criticize this approach because it’s entirely possible that most people will read the report and never contact you again. They would rather get a bit of contact info and let sales pound the phones until people give in.
Buying patterns, however, no longer follow this model. So the impetus is placed on marketers to create valuable content that connects with their target audience. The question now is will you create content so compelling that readers will willingly give up their personal information to learn more about your offering?
Friday, December 11, 2009
Grow Your Database Organically with Eloqua ‘Refer a Friend’

Today's post is a guest post from our own Amber Stevens, Marketing Programs Manager. In this post, Amber looks at ways of encouraging sharing that seamlessly complement the social sharing features of Eloqua.
Amber is focused on our SMB account base, and as such is always looking for new ways to help small and mid-sized companies get the most out of Eloqua and connect with their peers. Connect with her at amber.stevens@eloqua.com with ideas, suggestions, or comments.
Amber is focused on our SMB account base, and as such is always looking for new ways to help small and mid-sized companies get the most out of Eloqua and connect with their peers. Connect with her at amber.stevens@eloqua.com with ideas, suggestions, or comments.
==========================
Many marketers are enabling content sharing with Eloqua’s Social Sharing features - a great way to expand reach beyond traditional channels. But, did you know that Eloqua ‘Refer a Friend’ allows your prospects to share valuable content among their networks without requiring Twitter, Facebook, LinkedIn or any other active social media accounts? ‘Refer a Friend’ allows recipients to recommend content to a friend and automates a personalized request encouraging opt-in from the “referrals”. This is a great way to grow your database organically and ultimately drive more leads to the top of the sales funnel. The process works best when combined with internal contests or external incentives in order to increase the likelihood of friend referral.
You only need to complete the four step set up process once – then, you’ll be able to quickly add to any email header and start capturing new referred contacts. The amount of time to do this will vary depending on whether you use existing templates or create custom content. I used existing forms and layouts and was able to complete the process in about fifteen minutes on my first try.
Overview: in six steps, you’ll create a web profile field to capture the ‘Refer a Friend’ information, create the actual ‘Refer a Friend’ form (from an existing template), create a query string to capture unique email forwards, insert the form into a hypersite, insert the hypersite URL into an email header, and finally, insert the header into an email to put ‘Refer a Friend’ into action.
Here’s how it is done step-by-step:
First, you’ll need to create a *Profile Field to collect the Refer a Friend ID.
*This method requires the use of Web Profiling Fields to be created and modified, so check with an administrator to ensure you have access to these fields.
1) Navigate to Automate -> Web Profiling. Click on Profiling -> Profile Fields -> Expand Query Strings and then select the drop down next to Query String – Most Recent Choice, New Profile Field.

Enter a display name and under parameter, and make sure the ‘Force Profile Update’ is checked. Click on New. This will open the parameter detail window.
In Parameter Details, enter a display name, and set the parameter as “RAF”. Leave the rest other options as set by the default and save and close the window.
Next, create the Refer a Friend Form – there is pre-created form you can use to save time!
2) Navigate to Automate -> Forms -> Generic -> Refer a Friend (Save Referrer and Friend) -> Select Form Details.
From the task bar, select Fields and New Profile Field.
Enter a display name and select your Refer a Friend profile field that you created in the first step. Save and Close.
Then, publish the Refer a Friend Form to a hypersite
3) From the Layouts menu on the Task bar, select New Layout (Custom or Standard). (If using a New Standard Layout, in the bottom menu bar, select ‘Add Existing Form Field’ and then click All Existing Form Fields – this saves loads of time).

Enter a form layout name and then save the layout. Save and close the dialog box.
Select Layouts and List Layouts. Locate your saved layout, then click the arrow next to it and select “Publish Layout”.
Finally, choose the hypersite that you would like the form to be published on, enter the name of the page, the title that you wish to have display in the web browser and then click publish.
Create the Master ‘Refer a Friend’ URL with a query string
4) Your ‘Refer a Friend’ form is available for use immediately after you publish it. However, to ensure that each email can be forwarded from many users, you need to identify each unique email to be managed by the single form. To do this, you’ll create a query string.
Our sample ‘RAF’ form URL is:
http://trainingservices.eloqua.com/forms/02RH_RAF
A query string adds tracking parameters to a URL starting at a “?”, followed by identifying characteristics. Our query string is:
?RAF=elqReferFriendID
The complete URL for this example would be:
http://trainingservices.eloqua.com/forms/02RH_RAF?RAF=elqReferFriendID
NOTE: When adding this link to an email, do not make it a redirect link. This link is trackable.
Save this query string somewhere, we’ll use it in the next step.
Now that all of the set-up work is complete, we’ll add the ‘Refer a Friend’ functionality to an email header. This is the step that you will follow for all future uses of ‘Refer a Friend’ – the hard work is now done.
5) Navigate to your headers Communicate -> Email Marketing -> Email -> Tools & Content Components -> Headers and create a new or modify an existing header. Once you have identified your header, click “insert hyperlink” and select a “Text Link” as the type.
Set it to Send to Hypersite/Hosted Forms
Select Area Editor > Source Editor
After the first “?” in the URL, add the query string:
RAF=elqReferFriendID&
Click Save.
The last step is to configure the ‘Refer a Friend’ Details and Insert into your email
6) From within your email, select Refer Friend -> Refer Friend Details
The from email address and name will be auto-populated with the contact information of the person who is referring. However, in the event that their information is not available, you need to set default information. Save Details.
Insert Refer Friend Content into your Email from the Refer Friend menu.

Load the ‘Refer a Friend’ content into your Email. It will show you the preview, and no save is needed.

THAT’S IT! You’ve created the ‘Refer a Friend’ form, enabled unique tracking with query strings, and added the functionality into an email.
Note: The referred friends email is saved into a “friend” table, which is kept separate from the contact table so you cannot market to “friends” until after they’ve opted in. This allows you to remain CAN-SPAM compliant.
For more information and advanced tips on using ‘Refer a Friend’ forms as well as testing, reporting and tracking, view these related materials:
Subscribe to “Did You Know” for Eloqua How-To’s Like This One
Customer Central – How To Set Up Refer a Friend
Customer Central - Viewing Refer a Friend Reports
Wednesday, December 9, 2009
Email Deliverability Health Check
 Today's Eloqua Artisan post is a guest post from Sweeney Williams, Eloqua's Deliverability & Privacy Specialist. As a resident guru of email deliverability, Sweeney is responsible for managing Eloqua's network sending reputation, as well as providing deliverability and privacy consultation to Eloqua clients.
====================
We all talk about Digital Body Language in the Eloqua world, but there is an aspect of the digital body that is rarely discussed – the health of your IP reputation. As many are aware, the chief determining factor of where your email will end up (Inbox, Junk filter, or SPAM filter) is the reputation of your sending IP. If your data and data management practices are healthy, your IP reputation will be healthy too. If they are out of shape, your IP will be as well and those email metrics will follow suit. How can you keep things in tip top shape? Here are a few easy guidelines to follow:
1 Checkup:
Yes – this is basic but much like the yearly trip to the doctor most put it off due to time constraints, or for fear of what they might find out. Not to worry; this should be painless and relatively brief.
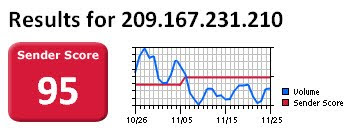
Visit http://www.senderscore.org/. Sign up for a free account and plug your dedicated IP(s) into the search bar. You will see the current score, risk rating, accepted rate and problem areas. Note that you can also see this information from right within Eloqua with our Boost package.
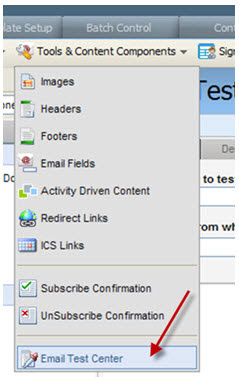
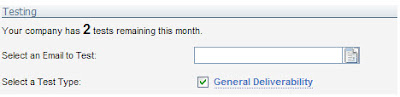
Test campaigns before deploying. Navigate to Communicate->Email Marketing->Email->Tools & Content Components->Email Test Center and click the Deliverability tab. That handy General Deliverability option will show you how your campaign will perform in the real world and is a reflection of IP reputation, authentication, and content.
If your Inbox rate at a particular provider is sub par, check into the symptoms and remedies below.
2. Symptoms:
Don’t ignore those test results. If your checkup didn’t go well, you have to get to the root of the problem and take some good, strong medicine. The two most common maladies are:
Complaints – The cough, the sneeze, the chest congestion. These are the loud and painful signs that something is amiss. Complaints primarily arise when contacts have been sent email that they have not opted in to receive, or have opted in to previously but have not been sent in a long period of time (4+ months). Complaints carry a very high weight when it comes to IP reputation and as a result the threshold is very low. In fact, if complaints amount to more than 0.01% of your total sends, your IP will take a hit. You can see your complaints in Eloqua via the ‘SPAM Unsubscribe List’ report (Evaluate->Reporting->Report Console->Find a report).

1 Checkup:
Yes – this is basic but much like the yearly trip to the doctor most put it off due to time constraints, or for fear of what they might find out. Not to worry; this should be painless and relatively brief.
Visit http://www.senderscore.org/. Sign up for a free account and plug your dedicated IP(s) into the search bar. You will see the current score, risk rating, accepted rate and problem areas. Note that you can also see this information from right within Eloqua with our Boost package.

Test campaigns before deploying. Navigate to Communicate->Email Marketing->Email->Tools & Content Components->Email Test Center and click the Deliverability tab. That handy General Deliverability option will show you how your campaign will perform in the real world and is a reflection of IP reputation, authentication, and content.


If your Inbox rate at a particular provider is sub par, check into the symptoms and remedies below.
2. Symptoms:
Don’t ignore those test results. If your checkup didn’t go well, you have to get to the root of the problem and take some good, strong medicine. The two most common maladies are:
Complaints – The cough, the sneeze, the chest congestion. These are the loud and painful signs that something is amiss. Complaints primarily arise when contacts have been sent email that they have not opted in to receive, or have opted in to previously but have not been sent in a long period of time (4+ months). Complaints carry a very high weight when it comes to IP reputation and as a result the threshold is very low. In fact, if complaints amount to more than 0.01% of your total sends, your IP will take a hit. You can see your complaints in Eloqua via the ‘SPAM Unsubscribe List’ report (Evaluate->Reporting->Report Console->Find a report).

Take a good look at the contacts in there. Did they come from a purchased list? You should consider segmenting all contacts from the list source if they have caused your complaint rate to rise above that 0.01% threshold. Are most from a particular ISP? If they are largely from, say Hotmail, that could be the reason for bad performance at Hotmail in the General Deliverability test you ran during your checkup. Did they complain about that concert email when their opt in was for a sporting event? Time to use Subscription Management and better segmentation.
Bouncebacks- Bounce messages provide a wealth of information about the health of your list, DNS setup, and IP reputation. Hard bounces let you know that your lists have quality issues, and if you are seeing a hard bounceback rate over 4% you have either acquired a list of questionable origin, or you have activated an old house list. Either way, segment contacts from the problem list source so that they do not continue to generate bounces and harm your IP reputation. Soft bouncebacks on the other hand do not impact your reputation, but they can provide you with details about other issues. If, for example there is a problem with your branded domain and it is not publishing your Eloqua SPF record, you will see information about this in your soft bounce messages. If your IP has a bad reputation at the receiving network, you will often see a soft bounce message stating that. If you are blocked as SPAM, the soft bounce message will provide you with a web location where you can remediate the block. Take some time out every week to check into your Bounceback History report (Evaluate->Reporting->Report Console->Find a report) and take careful note of the information provided in the Message column. If you need help, there is a handy guide in Customer Central called ‘Auditing the Bounceback History Report’ which can help you make sense of the data.
3. Prevention:
We have all heard the saying that an ounce of prevention is worth a pound of cure. This holds true here as well, as preventing issues is much easier than correcting a full blown crisis.
Authenticate – The first thing a receiver will look at is whether authentication is enabled, and of what type. With Branding & Deliverability, Sender Policy Framework (SPF) authentication is required as part of the setup process. This tells the receiver that the IP you are sending from is authoritative to send on the behalf of your branded domain. Branding & Deliverability also provides Reverse DNS authentication which allows a receiver to validate the IP against its domain name. A third level of authentication which is NOT provided by default but can be requested is DKIM signing. DKIM (Domain Keys Identified Mail) verifies the sending domain through encryption and is rapidly gaining popularity at ISPs such as Gmail and Yahoo!. In fact, your email is not eligible to be added to the Yahoo! feedback loop without it.
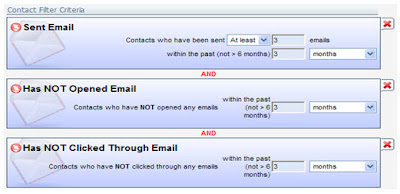
Segment Inactives – Our Chief Privacy Officer, Dennis Dayman brought the concept of the ‘Emotional Unsubscribe’ with him when he started here at Eloqua. This is the theory that if someone is continually being sent email and is never opening or clicking through, they have unsubscribed without taking the time to physically click the Unsubscribe link. These individuals pose a significant complaint risk (at some point, they will flag the email as SPAM out of annoyance). Inactives can also be SPAM Trap addresses. Either way – it’s best to get them out of your general marketing sends before they cause problems. To do this, use Inactivity Based Filters to check for contacts that have been sent a certain amount of email over a set period amount of time and have not opened or clicked through. My standard recommendation is three emails over three months. Navigate to Communicate->Email Marketing->Contacts and select New Contact Filter from the Contacts dropdown. Choose the Inactivity option.

Then set your filter criteria
The resulting contacts can be sent a re opt in or manage subscriptions campaign to re-engage them or allow them to explicitly unsubscribe. If that fails, they should be added to a group and the group added to the Master Exclude list. They can also be exported and vetted via an outside service such as those offered by Eloqua referral partner Fresh Address http://biz.freshaddress.com/.
Cheers to your good health!
Sweeney
Deliverability & Privacy, Eloqua Corp.

Then set your filter criteria

The resulting contacts can be sent a re opt in or manage subscriptions campaign to re-engage them or allow them to explicitly unsubscribe. If that fails, they should be added to a group and the group added to the Master Exclude list. They can also be exported and vetted via an outside service such as those offered by Eloqua referral partner Fresh Address http://biz.freshaddress.com/.
Cheers to your good health!
Sweeney
Deliverability & Privacy, Eloqua Corp.
Monday, December 7, 2009
Divide and Conquer

Today's Eloqua Artisan post is a guest post from colleague and friend, Amit Varshneya. Having worked with him a fair bit over the past year as he built out his vision for marketing, I am excited to have him share a piece of that vision in today's post.
Amit is VP, Marketing at Hexaware Technologies (http://www.hexaware.com). In this role he oversees the company's marketing initiatives globally to create a preference and demand for Hexaware's service offerings. Amit is the driver and evangelist of the sales marketing funnel measurement process at Hexaware and is a passionate champion of Eloqua.
====================
Divide and Conquer
Separating (and linking) Company and Contact data for best results.
Contact Filters are a very powerful way of dynamically segmenting your database for campaigns. You can filter out contacts based on the attributes that you store in the database or on the basis of their activity (through Activity Filters). In addition you can run filters on combinations of fields/attributes from contacts, companies and data cards
It is the latter that I think is a very powerful Eloqua feature and one that has proved immensely useful for us at Hexaware.
Before I proceed further, a little about Hexaware’s business. Hexaware is an IT services company and specializes in services around Enterprise Applications (SAP, PeopleSoft, Oracle eBusiness, CRM or Business Intelligence applications) for certain industries – Banking, Financial Services, Insurance; Travel, Transportation, Logistics, Manufacturing, Media. The typical targets of our campaigns are IT Executives, Managers, Architects in mid-large organizations. We would therefore need to segment our data atleast along the following parameters:
- Technology (whether the company uses SAP, Oracle eBusiness, PeopleSoft, IBM Mainframes, or what CRM or Business Intelligence platform they are on)
- Revenue of company
- Industry
- Region/Country
- Title of the contact
The first three parameters are company-specific while the last two are contact-specific. It was therefore clear for us that we needed to capture this data separately under companies and contacts (we looked at combining all information in just the contact table but that had serious drawbacks). And because our segmentation is on a combination of these parameters, we needed to still link contacts and companies together. Both of these are easily possible in Eloqua.
The linking part is relatively easy – data manipulation gives you an easy way to do that. The key however was determining a robust method that would find accurate matches between a contact and company. After evaluating multiple approaches we finally identified the web domain (hexaware.com, eloqua.com or in our IBM example – ibm.com or ibm.co.uk etc) as the match candidate.
The benefit of going with a web domain is that it is unique for a company and its employees irrespective of legal entities and names. It can also be easily identified and automatically generated from incoming data in excel sheets (IP lookup tables, email addresses and from website address). This leads to identification of web domain for each company and contact record with minimum maintenance effort.

With the unique match field identified, we modified our contact and company tables to include a field in each for domain name (contact domain and company domain). As a first time activity, we had the dedicated data desk in our BPO subsidiary identify domain names for each company through research. And for the contacts, a simple excel formula generated the domain names (these two activities are now done as a routine monthly activity as part of our Data Washing Machine setup. More on the DWM in a separate blog post).
Finally, the linking – we put in place a nightly program that collects all linkable contacts and runs a dedupe rule against all linkable companies (only those records where the domain has been identified are linked).

For each match, it does the following:
- creates a link between the contact and company,
- sets a “Linked” flag on each record (helps report linked records) and,
- copies some field values (company name, industry, salesperson) from company record to contact
- creates a link between the contact and company,
- sets a “Linked” flag on each record (helps report linked records) and,
- copies some field values (company name, industry, salesperson) from company record to contact

With this linking in place, we now have the ability to create some pretty cool segments. We have filters by Enterprise Application, by Region, by Title, by Activity levels. And then by combinations of these. The contact filter below for example, filters out all CxO level contacts in the US at Manufacturing companies that have some module of SAP.

Our email campaigns now use ADCs and personalization to deliver a much more targeted and “custom” message to each segment of our audience.
Wednesday, December 2, 2009
Quick Tip: Auto-Shutoff on Marketing Automation Programs
Often, when setting up a marketing automation program, such as one that invites people to an event or webinar, you will know in advance when it needs to end. Perhaps three weeks after the event, when the final "thanks for attending" email has been sent out, you want to shut off the program. There's an easy way to do that with Eloqua. 


On the main menu, select Program Details to see the overall settings for your program. About half way down the page there is a setting for "Automatically disable program on a specified date". Check the tick-box, and enter the date you are interested in having the program disabled on. That is all you need to do, and the program will be shut off on that date.

Although there is nothing terrible about having a program running beyond the date it's no longer needed, shutting them off keeps your system organized and makes it clear that the program is not currently being used for any marketing purposes.
Subscribe to:
Posts (Atom)

