Tuesday, January 26, 2010

Email Marketing and the Preheader


In this week's guest post, Sweeney Williams, Eloqua's Email Deliverabilty and Privacy Specialist looks at another great topic around email marketing - the preheader, and what it can do for your open rates. If you haven't already, be sure to also look at Sweeney's last guest post on doing an Email Deliverability health check.

==========================

I spent the latter part of 2009 with my agent looking at homes in downtown Toronto (glad that’s over) and I thought to myself; what better way to kick off my posts for 2010 than with a discussion about real estate. Specifically, that nice little piece of land right at the top of your email called the preheader. This area, usually reserved for your “View as a webpage” link is actually a powerful venue for increasing open and click rates if used correctly. Marketers who have placed their call to action in the preheader have seen response rates increase dramatically.

Consider this; popular email clients such as Gmail, Outlook (with autopreview enabled), and even the iPhone display preheader information BEFORE the email itself is opened.

Here’s how one looks in the Gmail preview:


In Outlook:


And on the iPhone:


As you can see, even with limited space you can get valuable information across without the email being opened, or having images displayed if it is. Note that in the Gmail example above, the amount of preheader text that is displayed depends wholly on the length of the subject line. Take a look at the difference with a longer subject line:


In Outlook, the display of preheader text is altered based on the justification used. The original example used left justify. Here’s how the same email displays if the text is centered:


So, adhere to these best practices to ensure your preheader is optimized:

• Left justify
• Keep subject lines short to maximize the area available for your preheader in clients like Gmail
• Place the most pertinent information in the first few words since those are the ones which will display in preview
• Ensure it is no longer than two lines, without extra line space
• Reinforce the main message of the email, and add a call to action. Most people just want to go straight to your site and skip the rest of the email (if the call to action is compelling enough)


Where can you set them up in Eloqua? In your predefined Headers. Navigate to Communicate->Email Marketing->Tools & Content Components->Headers. Create a new header or copy an existing one, then place your preheader message before the “view as a webpage” text:


Keep in mind that unlike the usual scenario these headers should NOT be reused as the message likely would not pertain to future emails. Name them appropriately so that they are not reused by others in your organization who may mistake them for reusable headers.

That’s your real estate tip for today. See you next time.

Thursday, January 21, 2010

Five in 5: Reporting Fundamentals


To help you get the most out of Eloqua, we're launching a series called Five in 5. These are five very quick tips on how to get the most out of Eloqua - small features or settings you may not have known about, quick tips, and ideas.

The first of this series is Reporting Fundamentals: Accessing Data for Insight, and highlights five reporting tips and tricks you can get started with today.

Each of the tips leads back to a more detailed overview of how to go about doing what is described. Either click on the links in the Brainshark presentation, or download the Five in 5 Reporting Fundamentals PowerPoint.

I hope you get a few good ideas out of this one:


(if this does not load, the original Five in 5 Reporting Fundamentals presentation is here)

The topics covered on Eloqua Artisan are both for you, as users, and from you. Please keep the ideas coming.


Tuesday, January 19, 2010

Astadia's Proper Pasting Party


Our friends at Astadia have maintained a great series of Eloqua tips, based on their work with 1000s of great marketers around the world. They covered a very important topic - Pasting in order to avoid Microsoft Word formatting - and I wanted to share that tip with you as it is a quick win that can save a lot of time and headaches.

I encourage anyone interested to sign up for Astadia's tip of the week, view all the past Eloqua tips, or visit their marketing best practices blog.

==============================

You're invited to the Proper Pasting Party!
Where: Your Eloqua install
When: Now and Forever
Why: To avoid looking like you lack attention to detail by blasting out emails from Eloqua that look unclean and unprofessional because of your bad, improper pasting habits.
BYOC (Bring Your Own Content or Cocktail if you'd like)

There's an often-overlooked button in Eloqua's email editor toolbar: Paste:

In this Tip of the Week, we're going to show you how to make use of this unsung hero to avoid pasting bad content into your Eloqua emails.

Your usual workflow probably goes something like this:

1. Write the text for your email in Microsoft Word and receive revisions and approval from your team.
2. Create a new email in Eloqua.
3. Open your Word document and select all of your text. Click CTRL+C (or right-click and select "Copy") to copy all of the text.
4. Click over to Eloqua and click CTRL+V (or right-click and select "Paste") to paste all of the text into your email. NOTE: DO NOT DO THIS! Read further to learn why...

But when you run the email checker in Eloqua, you get this annoying error:


You may also notice some strange characters or empty boxes in a few places in your email when you test it on a non-Microsoft email client. Not testing on multiple email clients? Well saddle up cowgirl/boy and get 'er done! It is a best practice to test your emails in various email clients since your readers are not likely to be using the same one (no, not everyone uses Microsoft Outlook). The ugly email content is caused by some of the HTML formatting in Microsoft Word which is not compatible with all email clients.

But fear not friends – there's a solution!

Steps 1 through 3 above are all the same. But when you get to Step 4, you need to make a small yet muy importante change (that's very important for you non-Spanish readers):

In Eloqua, click the small black arrow next to the Paste button on the email editor toolbar.
From the menu for Paste Options, select Paste Plain-Text.


Now, all of your text will be dropped into your email, but without the problematic Microsoft Word formatting. If you choose Paste Formatted Text, it will continue to create the problematic Microsoft formatting.

Party on, Pasters!

Wednesday, January 13, 2010

After the Call... sales lead disposition and marketing automation


Today's Eloqua Artisan post is a guest post from Mike MacFarlane, our own marketing operations manager. Mike is responsible for our own internal use of Eloqua, and as such he understands the detail needed in managing the full lifecycle of a lead, from scoring, to sales handoff, and back again.

In this post, Mike explores how to handle what happens after a salesperson calls a lead. As calls are completed, the custom sales/marketing business process for handling each possible sales outcome is managed by Mike's Program Builder workflow.

======================

I previously blogged about how you can use Eloqua to create Custom Activity Tasks through your CRM integration. Here at Eloqua, we use this ability in help drive efficiencies within our 
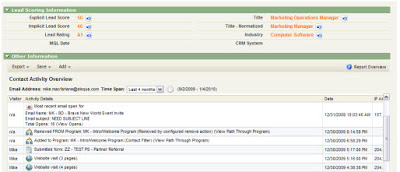
Lead Scoring program by creating custom tasks in Salesforce.com (our CRM system) whenever a lead is scored. Within these tasks, we pass over all the explicit information that was used to score the lead and also show the Contact Activity Overview (which is generated by Eloqua) so that they can see the implicit activity that assisted in the prospect’s score.


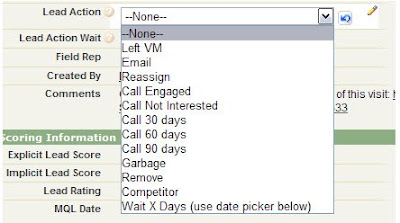
From a marketing standpoint, we have taken this process one step further by adding what we have called a “Lead Action” field on the task. This field is used by the sales team to provide an outcome to the follow-up on the scored prospect. We created a field on the lead scoring as a single select field so that there is consistency in terms of what the action was:


This information works in two ways:

1. Marketing can run reports within the CRM system to see how many prospects became “engaged” with the sales team after being scored
2. We can automate post-scoring processes within Eloqua to help limit the amount of reminder work that sales team needs to do

For example: a prospect is scored and a lead scoring task is generated within the CRM software from Eloqua. The sales rep follows up with the prospect but is only able to get their voicemail. The sales rep would then mark the Lead Action field within the task as “Left VM”. Once this Lead Action has been set within the task, using Eloqua’s Data Import functionality, we can pull this information back into Eloqua.

In this case, we have setup our import to pull in the Email Address stored on the task (this is what is used to uniquely identify the contact record within Eloqua), the Lead Action value populated by the sales rep and the Lead Action Wait field (which I will discuss below). The associated Eloqua contact is then pulled into a marketing automation program that we have created within Program Builder. From there, we have a series of decision rules setup to evaluate what Lead Action was selected within the task in the CRM. This is where it get REALLY powerful.

In the scenario above, the sales rep has chosen a Lead Action of “Left VM”. Based on that value, we have setup a series of post-scoring processes that will help the sales rep follow up with prospect (note that the processes shown below are based on our own internal business requirements, but you have the flexibility within Marketing Automation/CRM integration to customize this for your own internal processes):

1. Create a closed task indicating that the rep left a Voicemail for the prospect after being scored (this is done using the processes outlined in the Custom Activity Tasks in CRM Integration blog post)
a. This is done by setting the status in the task as “Completed” (or whatever value is used to indicate a closed activity within your CRM)
b. We customize the subject line of the task to “Voicemail” to help with reporting


2. Once the closed task has been created, we then take the original task that was created and do one of two things:

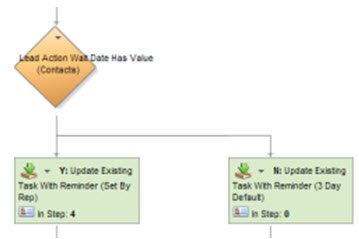
a. By default, we will place a 3-day reminder on the task for the sales rep to follow up on the voicemail (this reminder will automatically pop up on the 3rd day when the sales rep logs into the CRM software). We also customize the subject line of the task so that when it pops up within the CRM system, the rep knows exactly what the reminder is for.

b. If the sales rep wishes to wait a little longer than 3 days to follow up, we have given them the option to select their own follow up date. We have called this field “Lead Action Wait”. This field within the CRM platform is set as a date field so that the sales rep can choose a date in which they want to be reminded to follow up with the prospect after leaving the voicemail:


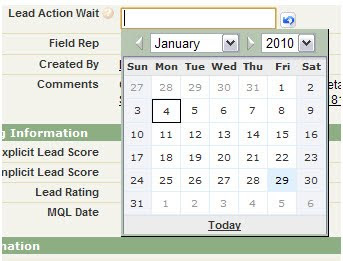
3. If the sales rep has chosen to pick their own date for follow up, instead of setting a 3 day default reminder date, we will use the date as selected the sales rep. This option is really helpful if the 3rd day of the reminder happens on a Saturday/Sunday.


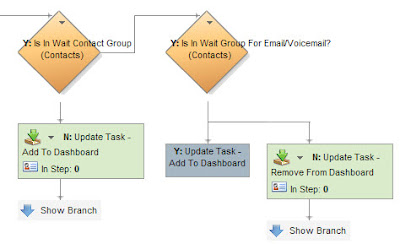
4. Once the reminder task has been set, we will remove the task from the reporting dashboards that we have setup. This is important because it helps keep the reports populated with prospects that need to followed up on.

After this new reminder task has been created, we then place the scored contact into a contact group that we have called “Lead Action Hold” and hold them in this contact group for either 3 days or until the date that they have selected in the Lead Action Wait field within the Lead Scoring task. The purpose for this is so that if the prospect is scored again before the reminder date, we can evaluate this within our Lead Scoring program and add this prospect back to the sales rep’s dashboard in Salesforce.com. This lets them know that there has been more activity from the prospect since their first follow up.


This entire process that we have setup within Eloqua and our CRM has truly allowed us to do data driven lead scoring. We can now make confident decisions on who and what we want to score as well as determine what changes we need to make to our scoring matrix. Having the flexibility within your Marketing Automation system is crucial for a process like this to work and Eloqua’s Marketing Automation and CRM Integration capabilities allow us to do that quickly, confidently and successfully.

Monday, January 11, 2010

Who didn't submit the form?


Today's guest post is another from Joel Rothman, one of our Senior Product Consultants. In this post, Joel looks at landing page to form submit conversion rates, and how to understand who showed up, but did not submit. It's one of those little techniques that make the difference between just doing okay and truly seeing success in a marketing automation initiative.


===============


Who landed on the form page but didn’t submit the form?

So, you crafted a campaign to drive people to submit your form, but they did not? That’s ok. Within Eloqua, you can easily set up a follow up email to target people who landed on a specific page, but did not submit a form. In fact, there are several ways to do this, but I like the way I am about to outline below. This way allows someone to click onto the page from multiple sources. It requires 2 activity filters, and a program for automation.

For this example, lets use the following URL:

http://www.eloqua.com/contact/

And we’ll call the form “Contact Us”.

First, create 2 Activity Filters.

For the first one, select “Visited Website”. In the “included in” section, choose “specific URL”, and select the URL of the landing page (remember to click “Add”):


This will display everybody who has visited the specific URL in question.

For the second Activity Filter, select “Submitted Form”. For this one, select “Individual Form” for the “included in” criteria, and select the form (again, click the “Add” button):


Now that we have the filters, we need an easy way to overlap them. I like to create a simple program. This allows for automation to be built on top.

See the screencap below for the simple program:


The nice thing here is you can now follow up in 3 different ways! For people who have submitted the form (step 300 above) you can send follow up information, such as event information. For people who have not clicked through on your offer (step 200 above), you can send them a follow up email. For people who viewed the offer, but did not submit the form (step 400), you could follow up through another channel, such as a print mail piece, or a phone call.

As well, you could include other events, such as opened email, did not click through etc…

Thursday, January 7, 2010

Hexaware's Data Washing Machine


Today's Eloqua Artisan post is a a second guest post from colleague and friend, Amit Varshneya. In this post, he looks at a topic we've touched on very generally - the contact data washing machine - and shows specifically how he has configured it for his company, Hexaware. As part of his contact washing machine, he also uses a third party service provider to perform some manual steps, which adds an interesting dimension to the process.

Amit is VP, Marketing at Hexaware Technologies (http://www.hexaware.com). In this role he oversees the company's marketing initiatives globally to create a preference and demand for Hexaware's service offerings. Amit is the driver and evangelist of the sales marketing funnel measurement process at Hexaware and is a passionate champion of Eloqua.

====================

Aah! The unmistakably fresh scent of neatly scrubbed data!

It’s an accepted fact that data management is an important requirement to be able to run proper segmenting and targeting for marketing campaigns - unclean data reduces the effectiveness of marketing campaigns. Recognizing this, and taking cue from Steve Woods’ concept of the Data Washing Machine, the marketing organization at Hexaware took a comprehensive approach to cleaning our data and then keeping it clean. And what a difference that has made! We have improved:

• Our ability to reach prospects with highly targeted campaigns
• Our time to put together these customized campaigns
• Our relationship with our sales teams

What is clean data? Chris Petko explains this very well in his vlog post with the 3C framework – clean data needs to be Consistent, Complete, Correct.

The Hexaware Data Washing Machine is a mix of automated and manual steps (well, you do need to give the cuffs and collars some extra attention!) that ensures that our data is Consistent, Complete and Correct. Let me share briefly how we did this:


  • Identified a list of required mandatory fields – we laid a scope for ourselves; what fields do we absolutely need for good segmenting? These fields need to be filled in; no matter what the source of data – form submittals, list uploads, CRM integration - these fields need to be complete. Once this is done, it becomes a lot easier to measure “completeness”.

  • Decided on a standard list of values for some of these fields - Industry, Country, Salutation, lead source etc. These fields can have only one of the standard values. We then published these. (When Marketing Managers request segment lists, campaigns or reports they can check off the published values they need). Consistency

  • Data Templates with these required mandatory fields and standardized values were also defined and published – this helped guide all incoming data uploads, as well as form creation and CRM integration activities. Consistency.

  • We then put in place an automated Program that helps us manage completeness and correctness of data. This program runs on the 4th of every month and does the following:

    • Identifies data modified or added in the last month

    • Isolates into a bucket all incomplete data. This was a more important step for the very first time; now this step helps us identify any faulty imports and take corrective action.

    • Isolates competitors and ISP emails (we only correspond with corporate email addresses). This helps us keep our data fresh and relevant. These records are deleted from the database.

    • Isolates bouncebacks. These records are deleted after a check for obvious typos.

    • Isolates unsubscriptions. No action is taken on these records – however this is reported to indicate overall health of the database.

  • Once this program successfully runs, these buckets are handed over to our dedicated data desk. The data desk is manned by trained data experts and has been setup in our offshore BPO subsidiary – CaliberPoint (CaliberPoint specializes in data management processes and being an India based offshore setup, affords us significant cost savings). This data desk does the following:

    • Scans through records for any data consistency issues (like where the data is all Uppercase, or where conversational name of company is not being used. This can be a substantial challenge for personalization)

    • Scans through email bounceback records for typos (eg. Any email addresses that have a comma (“,”) etc)

    • Scans and identifies any bad/dummy data (Mickey Mouse records, asdfs, abcs, etc)

    • Scans through any incomplete records (as mentioned earlier the numbers in this bucket have progressively reduced in every run as expected)


This washing machine has been in place the last 5 months and in that time has tremendously improved our segmenting and targeting capability and effectiveness. We’re still learning and making adjustments to it along the way. If you have any suggestions, I would love to hear them. Thanks!

Monday, January 4, 2010

Customize your Real-Time Web Visitor Alerts


Alerting your sales team that their prospects are online is one of the easiest and quickest ways to add value to sales and enable sales to sell better. A real-time view of prospect activity gives sales insight into which accounts are active, who at those accounts is doing the investigation, and what conversation starters might engage them in a discussion right now.

However, having the content come labeled as "Eloqua Notifications" may confuse your sales team unless you have a chance to educate them on what to expect. Luckily, you don't have to. The notifications can be completely customized to your exact needs.


To begin configuring notifications, go to Setup->Management->User Management and select the user you want to configure the visitor alerts for. Select "Visitor Notifications" from the drop-down next to that user, and you can see any notifications that are already configured.


The section of "Who Triggers this Notification" allows you to configure exactly when an alert is sent out. Usually, you will configure it to match the salesperson's territory (by industry, ownership, or geography), and a minimum bar of activity (a few visits, viewing specific areas of the website, etc).


With that configured, your salesperson is able to receive alerts, but they will be generic in formatting. Use the "Notification Content Configuration" setting to select a new look and feel for them, and you can configure any area of the content you wish.


One of the most interesting areas to configure is the subject line. This will provide an at-a-glance view of who the person is and whether they are worth connecting with. Usually, inserting an email address in the subject line is worth doing, as it provides that instant recognition. Also, depending on your sales team's familiarity, you may need to have the subject line provide insights as to the purpose of the email, such as "Hot Lead Alert:".


The data shown in the visitor alerts is, of course, completely configurable. Just choose (or create) a Contact View in the "Data/View Shown in Notification Email" and that will be the exact set of data shown to the sales person. Usually a minimal set of information is best - anything extraneous tends to lead to distraction.

Usually you will want to have your corporate headers or standard messaging to again help the sales team understand what it is they are receiving. Do this under the "Email Header for Top of Email" section once you have selected the "Customize Branding" option.

You can also select whether you want to provide your sales team with a direct link to the visitor activity overview, and whether they should be allowed to configure which notifications they receive.

With that complete, you are ready to go. Your email notifications to your sales teams are completely configured; what triggers an alert, the data in the alert, who it comes from, and what the look and feel of the email is:


As one of the quickest, but most valuable things to set up, I would encourage everyone to set these up for your sales team.