Friday, May 27, 2011

Integrating Eloqua With Slideshare - Making it Easy


It's no secret that Eloqua is a big fan of Slideshare (allows you to upload power points and other docs to the web). It's not just that we create a ton of presentations (which we do) and need some place to store them but we've achieved some great results. This includes Greg Thorne of JMP Securities publishing an article on Revenue Performance Management based on something he downloaded from our Slideshare site. I also recommend checking out "4 Reasons B2B Marketers Should Love SlideShare" to get a better understanding of the benefits of Slideshare.

Example of a form in Slideshare
How can you make Slideshare even better? Integrating it with Eloqua of course! What does this mean? It means easily passing leads that are generated from forms on Slideshare back to Eloqua. This saves you time as a marketer and gets your leads to sales faster.

Now that they're in Eloqua, these leads can be sent a follow up email, entered into a nurturing campaign, scored and/or sent to sales for follow up. This post assumes that you have set up a Pro Slideshare account.

Integrating Eloqua with Slideshare - Step by Step
  1. To get started, you’ll need an Eloqua user account that is API enabled. This is very easy to do, see the post on Cloud Connector Installation instructions and follow the first step only.

  2. The Slideshare Cloud Connector we’ll be looking at here is available on our repository of interesting connectors: cloudconnectors.eloqua.com. They are free to use, just create an account and login. Please note: This account is different from your normal Eloqua login. Under Products > Feeder, select the Slideshare Lead Query option.

  3. Enter in your credentials: In the first step, enter in your Eloqua login credentials and keep going

  4. Configuration: Enter in your Slideshare username and password, the Slideshare CampaignID (it's the number at the end of the URL. For example: http://www.slideshare.net/business/lead_campaigns/12928) and the Eloqua Contact Group / Shared List that you want to add the contacts to (you'll want to pop into Eloqua and create a Contact Group / Shared List).
  5. Field Mappings. Map the fields from your Slideshare form to Eloqua fields. You may want to create some new Eloqua fields that you can pass the Slideshare Campaign ID to. Make sure you click on Save Settings.
  6. Test it. Fill out the form on Slideshare and then in the Run Step tab, click on "Full Run". Run a few tests to see if it's working. When you're happy with the results, just go to the Credentials tab to click "Enable Step" to enable it to run automatically. That's it!
You can also go into Eloqua and see if a contact has been added to the Contact Group / Shared List. To pass these contacts to your CRM, you can add this Contact Group / Shared List as a feeder into your CRM integration program. You can also create a Program or a Campaign and feed in these contacts to a nurturing program - the sky is the limit.

Monday, May 16, 2011

ReadyTalk and Eloqua Integration


The vision of revenue performance management is one that we've been talking about for a while now, and I often find myself in conversation where people are asking what it means tactically. What needs to change in the day to day world that we're used to if we are to drive towards the strategic vision of RPM. One of the easiest examples there is webinar integration. Webinars are a core part of most B2B marketers' daily activities. More importantly, however, engagement in an webinar provides very relevant digital body language on buyers throughout their education process.

If you use ReadyTalk as your system for webinars or virtual events, you will be happy to hear that it is the latest addition to our suite of webinar cloud connectors. Now, Eloqua can be used as your marketing automation platform to promote and drive attendance for events, while ReadyTalk is used to run the event itself. The data on who registered and who attended can be seamlessly and automatically moved between both systems.

A prospect who registered but did not attend can be sent a “sorry we missed you” rather than a “thanks for attending” email, while a prospect who dropped off after only 5 minutes might respond well to a follow-up proposing a different set of topics that might be more appealing. Similarly, lengthy attendance combined with engagement such as asking and answering a number of questions is a great indicator of high interest and likely purchase intent.

Specifically, to integrate Eloqua's marketing automation capabilities with ReadyTalk's webinar capabilities, you now have 3 cloud connector steps to use at your convenience:

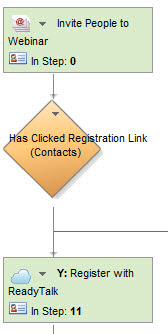
- Register Attendee: Registers a contact who is in that step of a program with a specific event in ReadyTalk.

- Query Attendance: Looks at each contact in that step of the program and queries ReadyTalkto see if they attended the event and for how long.

- All Attendees Feeder: Automatically pulls a list of all people who attended a particular ReadyTalk webinar and feeds them in to Eloqua as contacts and places them into a group (where of course they can be fed automatically into a program for follow-up nurturing). Again, for each attendee, the information captured includes how long they attended the event.

To get started, you’ll need the Cloud Connector installed in your Eloqua instance. This is very easy to do, see the recent post on Cloud Connector Installation instructions for how to add a new Cloud Connector to your install. The Cloud Connector we’ll be looking at here is available on our repository of interesting connectors: cloudconnectors.eloqua.com. They are free to use, just create an account.

Under Communication, you'll find ReadyTalk: Register, and Query Attendance, while under Feeder, you’ll find ReadyTalk: All Viewers – those are the connectors we’ll be working with, and the ones to install.

Once you have them installed, you can begin using them within your webinar invitation and management program. The cloud connector steps for ReadyTalk integration can be plugged into your marketing automation program at whatever points make sense, so be sure to whiteboard what you want to have happen and use the steps accordingly.

Likely, you’ll want to use a ReadyTalk: Register step when the buyer has indicated that they are interested in attending, perhaps by clicking a link or submitting a form.

You’ll want to run the ReadyTalk: Query step after the event has taken place to see who attended and for how long. That data can be used to guide prospects down unique follow-up paths depending on their behavior.


Now, for each step, you’ll need to configure the Cloud Connector to do what you need. Each connector is roughly the same, but with slightly different options, but once you have one figured out the rest will be simple. For the sake of simplicity, we’ll walk through the ReadyTalk: Query step. Choose Cloud Connector as a step type, and pick ReadyTalk Query from the drop-down below (if you have installed the connector in your Eloqua instance as we discussed earlier). Click the Configure button to launch the configuration UI.

The connector will need to be configured with your ReadyTalk credentials, including the Toll free number, Access Code, and PIN. These are the same credentials that you would use to access your ReadyTalk account normally.

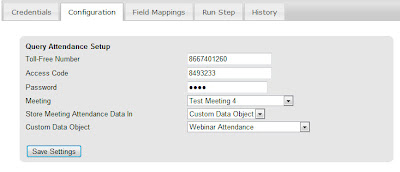
A final setting is where you want to store the returned information, in the contact record or in a custom data object (data card). If you're running many events, you'll want to use custom data objects to keep a full history of attendance.

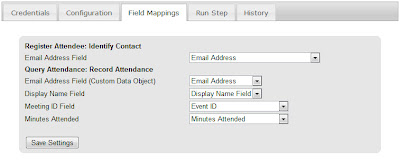
With that configured and saved, move to the field mappings tab, and choose the contact fields or custom data object fields that you want to read data from or write data to.

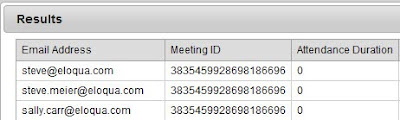
That's all that's needed to have full integration between your ReadyTalk webinars and your Eloqua marketing automation. You can go over to the Run Step tab to run the integration manually a few times to make sure it's all working. This shows you the results you will be pulling back into Eloqua or lets you manually run the step to check that it's all configured correctly.


When you're happy with the results, just go to the Credentials tab to click "Enable Step" to enable it to run automatically.


We'd love to hear your feedback on this connector, what can be improved, and what else you need it to do.

Tuesday, May 3, 2011

Math Equations within Marketing Automation


When you begin to build a high performance revenue engine for your business, you can often run into situations where you need to do a little bit of basic math with your lead data. Perhaps it’s a lead scoring algorithm that needs to find the maximum score across a few sub criteria. Perhaps you want to find the revenue per employee for a business by dividing one number by another. Perhaps you want to analyze your leads based on an average score across 5 product lines. Perhaps you want to calculate the distance from a store location to a contact’s location by looking at their longitude/latitude. Whatever the case, having access to a completely generic set of math functions that you can run against your contact data is valuable in many ways.

Now, with a new Cloud Connector, Eloqua makes that possible. As the first marketing automation platform to offer a completely generic mathematical expression language that can be used to create any formula you want, you can now do the nurturing, analysis, and scoring that you want by creating exactly the mathematical expressions that you need.

To get started, you’ll need to snap the Math Function Contact Cloud Connector into your install. This is available on the cloudconnectors.eloqua.com library, and you can snap it into your Eloqua install using the standard Cloud Connector installation steps that we covered earlier.

With the generic Math Function Cloud Connector installed, you can then add any step you’d like to any program you are running. The Cloud Connector will run any mathematical equation you specify against the data in any contact that flows into that step and return the result to another field within the contact.

Within the step in your marketing automation program, choose Cloud Connector as a type and then select the Math Function connector from the dropdown list. This will then show a configuration button that you can then use to configure what fields the connector uses for input data and the output result, and what the function is that will be run on the steps.

Once you have input your credentials and created the step, the configuration screen is very simple. It provides you with a text box to define any math function you want. Use any combination of basic or advanced mathematical operations (you can access a full list from this screen using the help link), including +, -, *, /, and ^ for simple math, any type of parenthesis for grouping, Boolean operations <, >, =, &, |, !, trigonometry functions like SIN, COS, and TAN, logarithmic functions and many more.

Write out the expression that you want using A, B, C, D, and E to represent up to 5 variables that will be input from the contacts in the step, and then move to the field mappings page to select those fields.

On the field mapping page, select the contact fields (must be numeric fields) that these variables will be populated from. If you need less than 5, just leave the values blank. Also select the field that the result will be written back to.

You can use the “Run Step” tab to experiment with the contacts in your step and ensure that you’re getting the results you expected. If there are any errors in the formula that you keyed in, they will show up in the error field of the results page.

When you are ready, go to the Credentials tab and check off the “Enable” checkbox to allow this step to run automatically.


That’s all you need to do to have immediate access to a completely generic set of mathematical expressions within your marketing automation programs. Please keep the feedback coming, and I look forward to seeing at least one creative use of advanced math expressions being celebrated at next year’s Markie gala.