Showing posts with label web analytics. Show all posts

Wednesday, December 16, 2009

Filtering IP Addresses from Marketing Analytics


Today's post is a guest post from Leigh Oxley, Team Lead in Eloqua's product support group. She has been a part of the Eloqua Product Support team since 2006, supporting marketers in their quests for marketing automation excellence.

Based out of Eloqua’s Toronto office, she is currently focusing on high-priority initiatives to improve the support organization, as well as working directly with our partner eco-system by providing dedicated support to certified partners. Not only that, but she's great to work with, so if you want ideas, insight, or help on your next campaign, data project, or lead scoring initiative, give Leigh or her team a call, and they are always glad to help.

================================


I think we can all agree that testing is an important part of any project – ensuring that everything will work as expected from start to finish. One thing we often don’t consider though, is how the test data will affect our reporting metrics once the campaign goes live. For example, if you run an email campaign driving visitors to a brand new landing page, and you have a team of internal people testing all of the pieces, you will want each of those people to click-through from your email to the landing page. Once your campaign goes live, you will have a set of visitors who are only testers, and likely shouldn’t count towards your marketing metrics once you go live – you don’t want to report inflated numbers to your executive team!

A quick and simple way to avoid this is to setup an IP filter within the Eloqua application, so that internal IP addresses are filtered from your analytics. As a Customer Administrator-level user, you have the ability to tell Eloqua “I don’t want to see visitor reporting on anyone coming from these IP addresses” through Setup -> Management -> System Management. This will simply disable tracking for anyone who visits your site from a list of IP addresses you define so that no web visitor information will be tracked. By setting this up for your organization, you can ensure that internal testers won’t be tracked and count towards your campaign metrics.
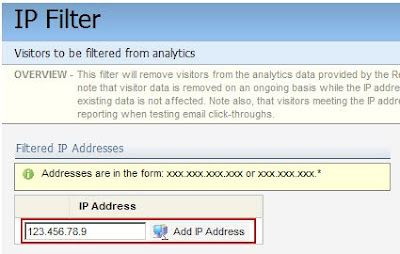

One question that clients often have when setting this up is how the functionality actually works. Essentially, when the website tracking scripts on your website pages see a visitor from an IP address you’ve configured to be filtered, they will ignore this visitor’s data. That means that if you later decide you want to track information for this IP address, you can simply remove it from the list and tracking will begin to take place. Something important to note is visitor data is removed on an ongoing basis while the IP address filter condition applies, but that existing data is not affected.

If I have a visitor profile with website visits reported from yesterday, and my IP address is added to the list today, then removed tomorrow, there will be a one-day gap in the reporting for my visitor – while I’m on the list, no web activity will be tracked. Another important point is that this does not affect other reporting for the contact, only visitor website activies are affected; all form submissions, program history, email sends, email opens, are still tracked as normal, but email click-throughs (as these are web activity) will not be tracked.

Hopefully this helps you to maximize your reporting efficiency in Eloqua and ensure you’re reporting the truest information to your teams. If you would like to set this up for your organization, there is a step-by-step interactive checklist available here in Customer Central to walk you through.

Wednesday, November 18, 2009

Easy Integration with Existing Web Forms


Chances are, if you are implementing marketing automation software like Eloqua, you already have a number of existing web forms, landing pages, and registration forms that are working well the way they are. Whereas you can certainly build forms within Eloqua to capture data, it is just as easy to use the existing web form, and therefore save yourself effort in rebuilding the form.

For web forms that are part of an existing process, this is even more valuable, as you can leverage the ability to do multiple actions with one web form. The capture of fields from an existing web form is incredibly easy, and just requires the URL of the form in question.

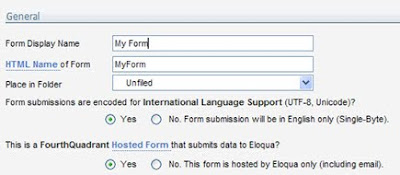
Start by creating a form in Eloqua, but set the option that "This is a [your company] hosted form that submits data to Eloqua" to Yes. This means that the form resides somewhere on your website, or even in a Flash file, and you would just like to capture the data.


Further down the main settings page, you will see the "Field Definition" section. If you select "Yes" under "Capture form fields...", and type in the URL of the form you are interested in capturing, you will begin the process of capturing the fields in that form.

With the URL entered, click the "Capture Form Fields" button, and the page that the form is on will be loaded and examined. Note that you can refresh the fields in the form at any time after this initial capture by following the same sequence of steps.

If multiple forms exist on the page you have selected, you will be prompted to choose which form is the one that you are interested in. Usually, the names of the forms should make this obvious.

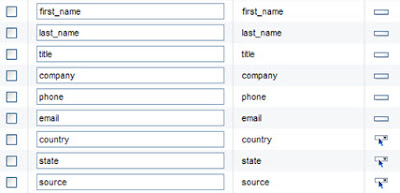
From here, you will be presented with a list of the fields that were discovered in that form, along with which type of form field they are.

You can either capture all fields in the form, or select which fields you are interested in. This will then create those form fields for you automatically, and allow you to begin configuring what you want to have happen when the form is submitted.

Quick capture and setup of existing web forms, without requiring any scripts or changes to the forms, lets you get up and running quickly and started with your lead generation efforts.


Tuesday, June 16, 2009

Tracking of your own Social Media Properties


Tracking social media is key to understanding its effectiveness as part of your overall marketing strategy.


Part one of understanding social media's effectiveness is to understand what is driving traffic to your online properties. Tracking inbound referrals gives us a great sense of the flows of inbound web traffic and whether Twitter, Facebook, Digg, Delicious, or LinkedIn are driving traffic. It also gives us a great sense, at an individual level of what brought each person to our online properties.


However, part two of understanding social media's effectiveness is understanding how effective your own social media properties are. Tracking of these online properties is a very valuable extension to your ability to understand the digital body language of your prospects across all of your web presence. With many social media sites, however, such as blogs, you often do not have the ability to build a sub directory system to place the scripts into.

In order to get around this, from the standard installation of web scripts, it is possible to rework the tracking scripts to look at a static URL for the rest of the scripts. The scripts will look like they do in the image above, where http://www.yourmainsite.com/ is a static URL that you put the script files on.

With that in place, you then need to put the links to those tracking scripts on your blog. Each blog platform is slightly different, but generally they all allow adding HTML and scripts inline. I use blogger, and the scripts are easily placed inline just before the close of the BODY tag.


I look forward to hearing your comments on how this has worked for you.


Thursday, June 4, 2009

Who's on the Website? New way to see Company Visitors


With the upcoming release on June 14th, a new and very powerful report will be available. It's called the "Top 50 Visiting Companies", and it shows you what companies are on your site showing interest and activity, but may not yet be known to your marketing efforts (search for "Visiting Companies" in the report console to find it).


Much like the account selling report in your CRM system which shows you the activity, rolled up by company, for known leads, this report shows you a stage further up the funnel.


By aggregating all the visitors at a company, and excluding any visitors that show up from an Internet Service Provider (from home, or from small businesses), this report lets you know where there is buying interest that you're not currently engaged with.

This insight can be invaluable for a field sales team working to understand which companies may be responsive to an invitation to a conversation. The total visitors, total visits, most recent visit, and most recent search terms, can give you insight into the area, depth, and recency of that interest, and gives you a great cue to engage those companies in a conversation. When combined with Prospect Profiler for added insight into each individual, this forms a powerful combination.

If you are wondering what to do with the list of companies who appear to be showing interest, one of the best options is to use the embedded Reachforce capabilities within Eloqua to find a list of names (in the key role) within those organizations to begin communicating with.

Wednesday, May 27, 2009

Providing Sales Insights into Digital Body Language


There has been so much buzz about Prospect Profiler that I'd be remiss in not talking about it quickly.


Laura Ramos, from Forrester, highlights the fact that Marketing's Number 1 job is sales enablement on B2B Marketing Posts


David Raab from Customer Experience Matrix talks about Prospect Profiler and why Marketing Holds the Key to Effective Selling. He also has a great whitepaper on the subject available.

Our own David Rudolph talks about the symptoms of sales blindness on Funnelvision, his new blog.


Put simply, Prospect Profiler is the most eagerly anticipated release we’ve had in quite some time. It was highlighted when it came out in beta last quarter, and it has been seen fairly widely since then, with many of you using it during the beta process. I did talk about it briefly last release, but a few of the capabilities have been refined, so I want to go a bit deeper in talking about it as it approaches general release.
(*Note after the fact: Prospect Profiler is now, of course, in full general release)

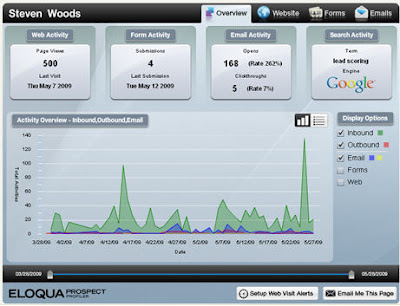
At a high level, Prospect Profiler is an interactive, visual display of each prospect’s digital body language. Embedded in Salesforce.com, Oracle CRM on Demand, or Microsoft CRM, Prospect Profiler allows your sales team to get instant insight into what you as a marketing team are doing to communicate with prospects, and more importantly, what their response has been.

The main screen of Prospect Profiler provides a time chart of outbound communication and inbound prospect interest, and can be broken down by area (email, form, web visit, etc). The top section provides key insights into each area, as well as showing the prospect’s most recent search (on Google, Yahoo, or MSN), to provide crucial insight into their area of interest.

Not to be missed, however, are the secondary capabilities. The Website, Forms, and Emails tabs provide deeper insight into each of those areas. Each form can be presented exactly as the prospect filled it out, and each email can be previewed to gain insight into exactly what caught the prospect’s interest.
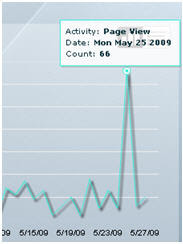
For example, when the chart shows a spike in activity for the prospect, a hover-over capability will give you a quick view of what that activity looked like. The spike shown here, for example is 66 page views on a specific day.
When calling a prospect, however, based on that activity, your sales team can benefit from knowing exactly what the prospect was interested in. Guiding the conversation to that interest area is key in engaging them. One click gives your sales team instand access to the details of the web visit and shows exactly what pages caught their interest. This detail of a visit can be very valuable in understanding exactly what each individual is interested in prior to a critical meeting or call.
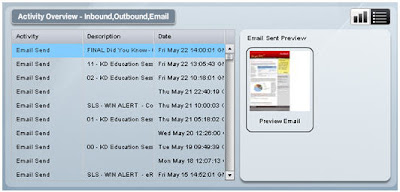
Similarly, email activity can be viewed in great detail. By clicking on the email activity, your sales team can see the details of which emails have been sent, opened, read, and clicked on. Thumbnail previews give them highlights of the email, and a preview button will show them the exact email that was received, providing unparalleled insights into prospect interest.

Even more interactively, the button at the bottom of the screen, labeled “Setup Web Visit Alerts” allows your sales team to easily set up alerts so that they are notified immediately when a prospect, or even anyone from that company (based on email domain) shows up on your web site. This level of insight into visitor activity has typically been managed centrally by marketing through visitor alerts, but can now be managed by your sales team directly through prospect profiler.

If you are deepening your marketing team’s engagement with your sales team and working to have them better understand marketing’s effect on prospect engagement, and the insights that can be gained from understanding prospects’ digital body language, there’s no better way than through a tool like prospect profiler.

Monday, January 12, 2009

Analyzing a Blog or a Subsidiary Website


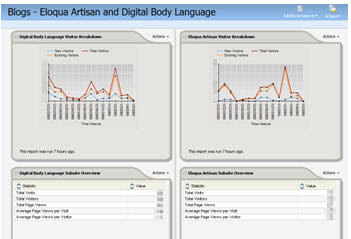
As part of running this blog, I wanted to be able to separate my traffic on this area of the site from the main Eloqua.com web traffic. Separating it lets me dashboard it, build rules specific to the site and better understand what is happening.


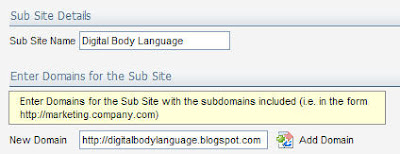
The first step in working with a blog or a subsidiary website (either for a specific campaign, for a product, or for a subsidiary company) is to define a Sub Site. This is a domain name, or a few domain names, that define the Sub Site to be analyzed. It is still part of the main web analytics, but can also be analyzed as a stand alone entity.


In Eloqua, in the Web Integration tab under Web Profiling, create a new Sub Site, and add in the domain you want to track separately. I'm creating a Sub Site for the Digital Body Language blog, and another for the Eloqua Artisan blog, so I'll create a new Sub Site for each.


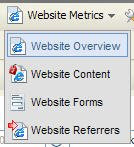
That is all you need to do to create a Sub Site. Now it can be analyzed, and added to a dashboard. In the Report Console, go to the Website Overview section and you'll see a list of reports that relate to analyzing your Sub Site.


For each report that you want to use, click the Add to a Dashboard menu item to add it to your dashboard. This will give you a configuration screen where you can configure the options for how this report is shown on your dashboard. I usually would use a relative time range of last 14 or 28 days to give a recent history of the performance of the Sub Site.


Select the dashboard you want to add the report to (I'm assuming you've created a personal dashboard earlier - if not you'll want to do that). The dashboard will be available from your Eloqua Today page, and can be shared with your colleagues if appropriate.


If you're using this technique to track traffic on a blog, you'll probably notice that I didn't cover adding the tracking scripts to the blog itself. Not hard to do on any of the standard blogging platforms, but I'll cover that in a separate post.