Showing posts with label Program Builder. Show all posts

Monday, December 6, 2010

Generic Web Forms from Program Builder


As your marketing automation programs become increasingly advanced, there is sometimes a need to tie into remote systems from half way through a program. Perhaps a lead needs to be created in an proprietary, custom CRM system, or a demo account needs to be registered if a person reaches a certain threshold.

With Eloqua, you can now accomplish this by triggering a generic form submit from any step in Program Builder. Whether the step contains contacts, companies, or prospects, the data on those individuals can be packaged up and submitted as a web form (http Get or Post). Simply create a step in your program, and choose "Cloud Connector" as your step type to access Cloud Connector functionality.


The Cloud Connector step type we'll use for this is Form Submit Contact. If you haven't done this before in your install, you won't see that connector in the drop down list. That's okay, it's really simple to add them. See the recent post on Cloud Connector Installation instructions for how to add a new Cloud Connector to your install.

To find the Cloud Connector for submitting a form, go to cloudconnectors.eloqua.com and create an account. Under Contact Data, you'll find Form Submit (Contact). That's the connector you need, and follow the instructions to install it. (similar connectors are available for Prospects and Companies).


With that installed, you now can select it, and you will see a "Configure" button beside the dropdown that allows you to access the configuration screen.


The first thing to configure is the destination form. Input the form URL on the site you are targeting. (note, that to perform some interesting creative scenarios, you can also point this right back at Eloqua web forms...).

Choose whether you want http Post or Get as your method, and then add any form variables that are submitted with every form regardless of the person.


Then, to configure the set of fields that are submitted from each contact, prospect, or company, click the Edit Fields button. You will see a simple UI that allows you to choose the fields you are interested in, and then provide the HTML name for those fields in the web form you want to submit.


Click the "Set Values" button, and don't forget to hit save on the configuration screen to save these values, and you're all set. Use the "Run Step" tab to do a test or two to make sure that you've set everything up as intended. You'll be able to see what the forms that are being submitted will look like and what data is retrieved for each contact in the step.


When you're ready to go, go back to the "Credentials" tab and check off the "Enabled" checkbox to have this step run automatically.


Now as anyone flows into that step within Program Builder, a form is automatically sent on their behalf exactly as you specified.

Hopefully this capability is useful for you, don't be shy about feedback, we look forward to hearing from you. For those of you who are inspired to do so, please find the instructions to build your own Cloud Connector here. We look forward to seeing what you create.

Tuesday, November 9, 2010

Cloud Connector Installation, Step by Step


(guest post by Dave Seaton)

An exciting new capability within Eloqua that you may have heard mention of a couple of times is the Cloud Connector concept. Essentially, Cloud Connectors allow anyone in the Eloqua community to build their own steps within Program Builder. If you're interested, the instructions for building Cloud Connectors are here, but for now, we'll focus on installing one that's already built.

Here's a step by step guide to getting your first Cloud Connector installed and ready to go.

1) Enable Account

First you need to have your account set up correctly. Please ensure that your company is enabled for API usage and that the user account you plan on using is enabled as an API user. To confirm your company has the API enabled please contact an Eloqua Product Specialist at 1 866 327 8764. If you are a customer administrator for Eloqua you can go to the user management tab and ensure that the user has the API User role enabled as well as one of Advanced User - Marketing or Basic User - Marketing User Role. Please feel free to contact an Eloqua Product Specialist if you require assistance setting up an account.


2) Find A Connector

With an API-enabled, account, you're now ready to set up a connector. If you have built one already, or have a third party you're working with, great. For this example, we'll use one of the connector prototypes that Eloqua has built, available at cloudconnectors.eloqua.com, but the same sequence of steps is used for whatever connector you're looking to install.

Each connector is identified by a unique code, and a URL. These should either be displayed in the connector's setup screen, or provided to you by your Cloud Connector provider. You will need to copy the Unique Code and Configuration URL into Eloqua.


3) Install Connector In Eloqua

To install this Cloud Connector in Eloqua go to System Management and you will see the Cloud Connector Manager on the left side. (Setup -> Management -> System Management -> Cloud Connector Manager)

Name your Cloud Connector in the service name field, copy the Configuration URL from cloudconnectors.eloqua.com into the service URL field and copy the Unique Code from the provider into the Unique ID field. Click add - you have now created a Cloud Connector!


4) Implement Connector

With this Cloud Connector installed, it will now be an available option within a step in Program Builder. You can use it once, twice, or as many times as you like, as you would a normal Program Builder step. To implement the connector go to the Program Builder module in Eloqua. In a program you need only create a new step and set the default action to Cloud Connector. Then use the drop down menu to select the Cloud Connector you have created.


5) Configure Connector

While editing the default action of your cloud connector step you will need to configure the external program that the Cloud Connector connects to. Simply click on the configure button, login and a window will open that connects you to the login for the Cloud Connector's configuration screen.


You have now installed and configured your first Cloud Connector!

Tuesday, August 10, 2010

How Event Automation Saved My Marriage


(guest post from Joe Gelata, of Sybase)

We’re all in the same boat - we need to run successful campaigns but we’re tight on time. It comes down to two choices; work around the clock building and managing campaigns or don’t run them at all. The former will put stress on your personal life and marriage while the latter will have you looking for a new job. Luckily, Eloqua offers us a third option: Automation!

I was recently tasked with building a registration system for a seminar series that had some ambitious requirements:

• Manage registration for 45 different seminar sessions in 12 cities across North America and Europe over the span of several weeks

• Support for communication in 3 languages

• Target email content to each contact (e.g. send 350+ unique emails)

• Schedule communications differently for each geographical region

• Prep leads for Sales so they have accurate data on each lead

To make it interesting we only had 1 ½ people and 2 ½ weeks to design, build, test, and launch the system. This was a challenge in itself but the real kicker was that we had next to no resources to manage the system once it was running. The only way to meet these challenges was to dig deep into our Eloqua toolbox and automate everything. Here’s how we did it and what we used...


Program Builder
Program Builder was our saving grace when it came to scheduling emails and preparing leads for sales. The former was done by segmenting our lists by geography. We used decision rules to determine if each contact was in a contact filter for each region. Once segmented they were sent to one of several programs that automated the sending of invitation emails based on the schedule for that particular region. Since each of the regional invitation programs was identical (with the exception of the email dates) we were able to build one and copy it for the rest making this a quick and easy process.
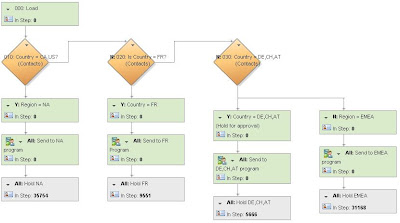


Preparing leads for sales was slightly more complex. Aside from a campaign, we wanted to tag the contacts with the city they registered for, the session they registered for, and their attendance status. This adds up to 96 different combinations of information. To automate this we used Program Builder, Contact Groups, and Update Rules. In a nutshell, the program:

• Accepted all contacts from the ESM (more on ESM later)

• Segmented the contacts based on their session using a Contact Filter

• Added a campaign association

• Added product information

• Grouped all contacts together again

• Segmented the contacts based on their attendance status using their membership in an ‘Attended Contacts’ group

• Added an “Attended” or “Did Not Attend” status

• Sent contacts to the CRM integration program

The only manual piece of the process was uploading our attendee lists. The rest was pure automation.

Activity Driven Content
Activity Driven Content (ADC) is perhaps the most underrated component in Eloqua. Not only is it extremely easy to use, but it can drastically cut the development time of your emails while helping you increase click-throughs, lower opt-out rates, and take your targeting to a level you never thought possible. This is the kind of automation that may actually put your marriage in jeopardy. You know what I’m talking about: “Honey, I did the coolest things with Eloqua today…” Unless you’re married to a marketer this conversation always end with someone falling asleep. It’s only cool to us!

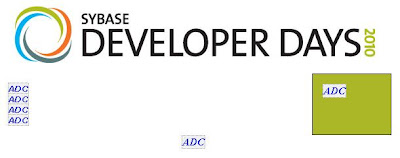
With three languages and information on 45 different sessions, we had a lot of content to deliver to registrants. Our goal was to keep emails as short and to-the-point as possible. After all, no one wants to ready a 7’ email with information on 44 sessions they didn’t register for. Lucky for us, Eloqua offers Activity Driven Content which dynamically serves up content based on data in a contact record or data card. To do this you build ADC pieces which are essentially fragments of HTML for each version of content you will be sending. You then setup ADC Rules to determine which piece should be sent to each contact. For example, you can create the introductory paragraph of your email in multiple ADC fragments each in a different language. Next you can create an ADC Rule that looks up a contacts country and pulls the ADC in the appropriate language. The final step is to insert the ADC into your email. The email itself basically serves as a shell for the ADC:


When you send the email to a specific contact, the ADC is populated:
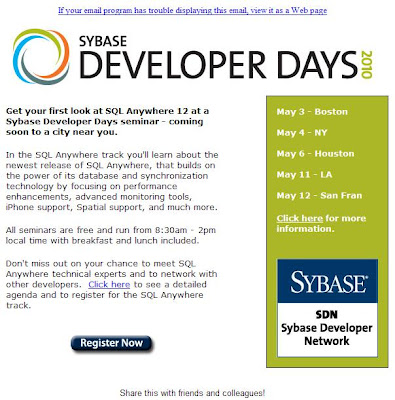


ADC is an extremely powerful tool. It did a great job customizing language and location info for this seminar series but the possibilities are endless. You can target content based on any standardized contact or data card field you have in your database. Industry, title, interest, buying stage, company size…the list goes on and on. Just think what it can do for your newsletters. And don’t forget to add in a personalized signature from your sales reps while you’re at it.

Event & Survey Manager
Event & Survey Manager (ESM) is a wonderful tool for managing multi-session events. It has three basic parts:

Registrant Info

This is the Data Card Set and its associated fields. It works with the individual Data Cards which store all of the registrant information collected on the form (form data can also be saved to contact records at the same time). Each Data Card is associated to a contact. The Data Card Set is a table separate from the contact table and can be used for events and surveys.

Event Details
These fields are specific to your event and can include date, time, location, session name, presenter, etc. Each session has its own record. Each Data Card will be associated to one of these sessions.

Event Actions
Think of this as program builder for events. You can do all the regular stuff such as send emails and add contacts to a program step. The big difference is Event Actions are triggered based on dates relative to the session date each contact has registered for. For example, where Program Builder can be setup to send an email to everyone on January 1st, Event Actions can send an email two days before the session a specific contact is registered for. It makes setup a dream and allows a customer centric email schedule.

For our seminar we created a Data Card Set with fields that matched those on our form, loaded info for all 45 sessions into the Event Details, and scheduled our emails in Event Actions. For example, a ‘Registration Confirmation’ email was sent each time a new contact was added to ESM, a ‘Seminar Reminder’ email was sent 5 days before their session, and they were added to our follow-up program one day after their event. Building this in Program Builder would have been a mammoth task. However, building it in ESM took 15 minutes of training and a few hours to setup. And of course, it required no management whatsoever.


Results

The major accomplishment with this project was simply that it was completed successfully. Given the scarce resources available to build and run registration, it was a huge challenge. However, automation allowed us to come out victorious. Throughout the process we were able to offer registrants completely customer centric communications – from the content to the delivery date. Even with very little management, this massive seminar series ran smoothly.

Beyond the event itself, building this system forced us to dive into new areas of Eloqua that we have never explored before. This learning experience has sparked new creative ideas on how to use these tools and address other problem areas we had previously written off.

Wednesday, June 23, 2010

Eloqua Cloud Connectors


For those of you who are either a bit technical, or who have technical folks on your team, there is now a very interesting opportunity for you to extend the capabilities of Program Builder in any way you choose. The capability is called Eloqua Cloud Connectors, and it is very simple, but incredibly powerful.

If you want to connect to your own custom systems (a free trial system to grab a token, an event registration system, etc), build custom logic (scoring leads based on unique criteria), or run custom rules (determining whether a person lives within a 100 mile radius of a certain city), you can now build that quickly and easily by building your own Cloud Connector.

Essentially Cloud Connectors, available today in your Eloqua instance, allow you to build any step you want in your marketing automation workflow within Program Builder. To do so, there are three simple steps:

- Define the Step in your program as a "Cloud Connector" step. This means that whatever happens in that step will be run by your service, rather than natively within Eloqua.

- Configure the Step with whatever rules, credentials, and configuration you need. This is configured and saved within the service that your build.

- Run the Step have your service call into the Cloud Connector API, find the members of the step, run whatever is needed, and then tell Program Builder that it is complete

It's as simple as that. You can build whatever marketing automation capabilities you need quickly and easily. Here's a quick diagram of how this might work connecting with a Hoovers database as an example:


To begin building your own Cloud Connector, all you need is a user account with access to the Eloqua API, and a creative idea. Here is an Eloqua Cloud Connector development sample guide to give you a walkthrough of how to get started, and sample code for all the steps you'll need to take in building one.

I look forward to hearing what you've built, and if you build something that is available to the Eloqua community, I would be glad to highlight it here.

Monday, December 7, 2009

Divide and Conquer


Today's Eloqua Artisan post is a guest post from colleague and friend, Amit Varshneya. Having worked with him a fair bit over the past year as he built out his vision for marketing, I am excited to have him share a piece of that vision in today's post.

Amit is VP, Marketing at Hexaware Technologies (http://www.hexaware.com). In this role he oversees the company's marketing initiatives globally to create a preference and demand for Hexaware's service offerings. Amit is the driver and evangelist of the sales marketing funnel measurement process at Hexaware and is a passionate champion of Eloqua.

====================

Divide and Conquer

Separating (and linking) Company and Contact data for best results.


Contact Filters are a very powerful way of dynamically segmenting your database for campaigns. You can filter out contacts based on the attributes that you store in the database or on the basis of their activity (through Activity Filters). In addition you can run filters on combinations of fields/attributes from contacts, companies and data cards
It is the latter that I think is a very powerful Eloqua feature and one that has proved immensely useful for us at Hexaware.

Before I proceed further, a little about Hexaware’s business. Hexaware is an IT services company and specializes in services around Enterprise Applications (SAP, PeopleSoft, Oracle eBusiness, CRM or Business Intelligence applications) for certain industries – Banking, Financial Services, Insurance; Travel, Transportation, Logistics, Manufacturing, Media. The typical targets of our campaigns are IT Executives, Managers, Architects in mid-large organizations. We would therefore need to segment our data atleast along the following parameters:

- Technology (whether the company uses SAP, Oracle eBusiness, PeopleSoft, IBM Mainframes, or what CRM or Business Intelligence platform they are on)
- Revenue of company
- Industry
- Region/Country
- Title of the contact

The first three parameters are company-specific while the last two are contact-specific. It was therefore clear for us that we needed to capture this data separately under companies and contacts (we looked at combining all information in just the contact table but that had serious drawbacks). And because our segmentation is on a combination of these parameters, we needed to still link contacts and companies together. Both of these are easily possible in Eloqua.

The linking part is relatively easy – data manipulation gives you an easy way to do that. The key however was determining a robust method that would find accurate matches between a contact and company. After evaluating multiple approaches we finally identified the web domain (hexaware.com, eloqua.com or in our IBM example – ibm.com or ibm.co.uk etc) as the match candidate.


The benefit of going with a web domain is that it is unique for a company and its employees irrespective of legal entities and names. It can also be easily identified and automatically generated from incoming data in excel sheets (IP lookup tables, email addresses and from website address). This leads to identification of web domain for each company and contact record with minimum maintenance effort.


With the unique match field identified, we modified our contact and company tables to include a field in each for domain name (contact domain and company domain). As a first time activity, we had the dedicated data desk in our BPO subsidiary identify domain names for each company through research. And for the contacts, a simple excel formula generated the domain names (these two activities are now done as a routine monthly activity as part of our Data Washing Machine setup. More on the DWM in a separate blog post).


Finally, the linking – we put in place a nightly program that collects all linkable contacts and runs a dedupe rule against all linkable companies (only those records where the domain has been identified are linked).


For each match, it does the following:
- creates a link between the contact and company,
- sets a “Linked” flag on each record (helps report linked records) and,
- copies some field values (company name, industry, salesperson) from company record to contact


With this linking in place, we now have the ability to create some pretty cool segments. We have filters by Enterprise Application, by Region, by Title, by Activity levels. And then by combinations of these. The contact filter below for example, filters out all CxO level contacts in the US at Manufacturing companies that have some module of SAP.


Our email campaigns now use ADCs and personalization to deliver a much more targeted and “custom” message to each segment of our audience.

Wednesday, December 2, 2009

Quick Tip: Auto-Shutoff on Marketing Automation Programs


Often, when setting up a marketing automation program, such as one that invites people to an event or webinar, you will know in advance when it needs to end. Perhaps three weeks after the event, when the final "thanks for attending" email has been sent out, you want to shut off the program. There's an easy way to do that with Eloqua.
On the main menu, select Program Details to see the overall settings for your program. About half way down the page there is a setting for "Automatically disable program on a specified date". Check the tick-box, and enter the date you are interested in having the program disabled on. That is all you need to do, and the program will be shut off on that date.


Although there is nothing terrible about having a program running beyond the date it's no longer needed, shutting them off keeps your system organized and makes it clear that the program is not currently being used for any marketing purposes.

Monday, November 30, 2009

Alerting Sales via a Marketing Automation Program


We've talked a lot about getting real time information to your sales team, and the value of the insight that provides. There are a number of easy ways to do it within Eloqua, each of which fits a specific situation.

The easiest is to set up a real-time web visitor alert for when key buyers visit your website. This triggers automatically off of web behaviour and known data.

Another way is to send lead alerts based on web form submits by looking at the data in the web form and alerting the appropriate salesperson.

A third way is to set up daily or weekly lead reports to be emailed to each salesperson based on all the configuration options available.

In this post, I wanted to introduce another way - based on the configuration of a marketing automation program in program builder. This technique is useful if you want to define specific, and deeper, rules to define when a sales person is alerted - such as only alerting when a certain lead score is reached, or based on more detailed territory assignments.

To do this, set up a step in your marketing automation program to Send Process Member Report to Owner. This will send an email to the "owner" of the contact as they pass through that step. We'll get to how "owner" is defined in a second.


In the configuration options, you have a few different Report options you can choose from, each of which sends a slightly different type of Report. If you just want the details of the contact (your most likely option), just select "Contact Details". Other options send information on the contact's membership in programs and groups, their known colleagues, or other history information on them. A topic for another post (or exploration if you're interested).


To define the "ownership" of the contact, you can build an ownership rule based on any data you have available. In a decision rule prior to the alert step, edit the ownership rules for whichever path leads to the alert step. In this case, it would be the "Yes" path.


You'll then want to either build a new ownership rule or use an existing one. Ownership rules take data that you have available, such as territory, field sales owner, industry, or revenue range, and map it to individual users. The user it is mapped to will be the one receiving the alert.
With this set up, you are all ready to go. When a contact reaches that step, an alert will be sent to them with the information in the default contact view. Very useful for knowing when a lead passed a certain threshold, or a person made it to the end of a lead nurturing routine.


Wednesday, November 25, 2009

High-Value Content as a Feeder for Nurturing


Today's post on Artisan is another guest post from Ben McPhee, on our Product Management team. In his last guest post on checkbox confirmations on web forms, Ben brought some of his insights from his work with sports marketing organizations to Eloqua Artisan.

This time, Ben looks at how to flag high value content - such as a season schedule - and then use the viewing of that content, at any point in time, from any source, as a feeder to a very targeted nurture program. This technique is a very useful one, and can be used in any situation were high value content (a webinar, a product demo, etc) should be used as a trigger for a nurture program.


=================================


Do you have high value content that when downloaded or accessed by a web visitor, you know means that they're more likely to purchase or at least be receptive to future offers? Do you want to offer that download opportunity through one or more emails or web links, and then capture those visitors that downloaded the content so that you can add them to an automated nurture & upsell campaign? Well, in several easy steps you can do that using:


  • Content Assets uploaded to Eloqua

  • Query Strings to track links wherever they are used

  • A Saved Report to identify who clicked on those links

  • A Marketing Automation Program with Program Feeder to grab those people


In this example, let's say you want to kick off a campaign that allows your fans to easily download your team's schedule from an email, which would trigger a number of benefits for them (perhaps being added to a "Tell Me About Special Offers" distribution list) and a number of benefits for you (knowing who is interested in timing of games and events for better segmentation for upsell).

First, go to the Content Asset area (Setup -> Content Assets -> Content -> Upload Web Content) and upload your schedule (or whatever high value content you have in mind). This uploads the content and allows you to track the links to it.


Once you have uploaded the schedule, you will be provided with 3 links to the doc - one of them is called "Email Redirect Link" - copy that link and paste it somewhere for the time being, as you will eventually be inserting that link into your email.

Next, go to the 'Web Profiling' area and create a new Query String Parameter:


You can think of this query string parameter as a bucket, for identification purposes, for all the content you will ever offer to your fans for download. So we recommend you name this in a generic manner - like, "Content Item". That way when you are deciding upon WHICH content item you would like to use / report upon for different campaigns, you will be thinking in terms of, "Content Item = Event Schedule" or "Content Item = Player Profile Sheet". Give it a name, and don't worry about the rest of the settings.

The advantage of doing it this way - with Query Strings - is that you can use the content, with the Query String in the link in any email or any link on your website, and the rest of the process will automatically pick it up. Regardless of how you promote your team schedule or other high value content, if the link contains the Query String, the visitors who click on the link will be added to the nurturing program.

Now we'll move on to your email - design the email containing the free download offer and insert the hyperlink - when you paste in the link to your schedule (the link we told you to hold on to a few steps back), you will be editing the end of the URL to add the query string parameter you just created AND the name of the content, in this case "Event Schedule", to record the fact that anyone who has clicked on this link has done so to request your Event Schedule (you might need to click on this image to see it clearly):

The content element of your campaign is done! Now when people click on this link, they'll download your team's schedule! The next part is setting up the reporting and the automation to capture those people and add them to a marketing automation program.


Go to the Report Console and search for a report called "Visitors by Query String Value". Then select the query string parameter you created earlier and enter in the ID/name you gave your content (in this case "EventSchedule") - run the report:


You can see that this return a list of people on your website who viewed your schedule (ie, clicked on a link containing the Query String you specified). Save this report and give it a more specific name - like "Schedule Downloaders" - and make sure you are using a relative time range for the report so that it is continuously filtering in your newest downloaders:


Now, create a marketing automation program that is going to manage the people that have downloaded your schedule - we won't get into the details of the actual program, but let's just start by creating it with the first step to get you going. For the program details, don't allow members to enter the program more than once, and set the default member type to contacts so that we can market to them.

Add a first step to your program to act as the entry point for your schedule downloaders. As an action for this step, we recommend having them added to a Contact Group so that you have more flexibility in how you manage and report on the fans that have downloaded the content (e.g., when put in a contact group it becomes easier to add them to a future email campaign distribution list):


Then, once that first step is saved, go to the "Members" menu and add a Feeder to the program - this is the item that actually defines how fans will be added to this automated progam - so to tie everything together, you'll be telling to system to add to the program all the fans that show up in that report you saved a few steps back - worded differently, anyone who downloaded your schedule will be added to this program:

Save this feeder and YOU'RE DONE!!

Now everyone that downloads your schedule from the email you send out will be automatically added to a program through which you can:

- Send them follow-up emails with further promotional offers
- Add them to other lead nurturing campaigns
- Notify your sales team to contact the fans
- Update their profiles to indicate their activity or change their lead score

Wednesday, October 28, 2009

Custom Activity Tasks in CRM Integration


Guest post by Mike MacFarlane


Recently, Steve wrote about the various options for marketing automation/CRM integration – the integration between marketing and sales data. This got me thinking about how we at Eloqua use our integration capabilities with various CRM systems to help enable our sales team by passing over relevant, actionable information that we as a marketing organization can report on. One of the things we take a lot of advantage of are "custom activity tasks" that I can configure to do, or write, anything I need into Salesforce.com, our CRM system.

A while back, I wrote about setting up your Social Media GPS – showing a salesperson if a visit to your website (or Eloqua tracked page) was a result of click through from various social media sites, like Twitter, Facebook, LinkedIn, etc. This process was built on Eloqua’s ability for a marketer to create a simple activity task that fires over to the CRM once the activity occurs. This has been a great win for us at Eloqua, as we can now report and track social media activity within our CRM system in combination with what we are already reporting on in Eloqua (check out how to track Inbound Referrals in a past Artisan post). But this process can be used for many other functions in relation to what activities/action someone takes.

At Eloqua, we use this process in combination with our Lead Scoring program. Whenever someone is fed into our scoring program (either through a form submission or a website visit), they are scored and we will automatically create a task that is assigned to the appropriate salesperson that contains all the scoring details and explicit information.

To access the often called “Integration Tab” in Eloqua, simply click “Setup/Integration”


For the sake of keeping this brief and to the point, I am purposely by-passing a few steps here, but you can find all the documentation you need to do this within Eloqua’s Customer Central.

Simply select if you want to create/update an object in your CRM, then select the object you want to use (note that if you are “creating” an record within an object in your CRM and you want to update that record later on from Eloqua, you will want to store the CRM ID within a dedicated Eloqua contact field):


Next, you will need to choose which fields from your Eloqua database you would like to use to populate fields within the task record in your CRM. Notice that the mappings screen is broken out into two sections: the left hand side are the fields that reside on the object in the CRM – the fields on the right are the fields that exist in your Eloqua database. Simply drag the Eloqua field you would like to use and drop it into the object field on the left hand side. This screen will also highlight fields that are “required” in your CRM (if you have fields that are required to create a record in an object) and alert you if you have not mapped values to those fields.


If you have done this successfully, you will see the Eloqua field name show up in red and in italics:


Another option that you have is to hardcode values into specific fields OR you can combine hardcoded values with Eloqua fields. A really good example of this would be in the Subject line of the task (this is what the salesperson would see initially when they receive the task). In this example, I want to make it obvious to the salesperson that this task is related to lead scoring, so I am going to construct my subject line to read “FIRST NAME LAST NAME just went through our scoring program”. Here is how it would look in the field mapping screen:


So when this call fires to the CRM, the task will pre-populate with the first and last name of the person that just went through the lead scoring program.

Once I have completed my mappings, I can then use the built in External Call tester which allows you to test the call you just made before you decide to push it live. Eloqua will show you the data that exists in the object before the call fires and what data exists after the call fires.

Once you are fully satisfied with how your new External call works, you can add it into Program Builder as an Integration Action to fire when someone hits that specific program step.

Tuesday, July 28, 2009

Optimizing your Marketing Automation: Tips from the Guru


This week's post is a guest post from Andrea Corey, our VP of Systems Architecture, and the guru of Program Builder optimization. She and her team are responsible for all the scale and speed initiatives behind Eloqua's architecture, and were the key folks behind the work that was highlighted in the recent Dell case study on Eloqua's marketing automation platform performing at one billion transactions per day.


In this post, Andrea offers a number of great tips on how to think about your programs so that they operate as smoothly as you need.
Enjoy,

Steve


====================================


Program Builder offers two main processing modes: Regular mode and Batch mode. Each can be effective at enabling many Marketing Automation needs; what follows are some helpful explanations and suggestions for optimizing your programs.

Regular mode, the default mode, is ideal for lead nurturing, free trial follow-ups, event follow-up and similar processes where you wish to send out communications or evaluate contacts over the course of a period of time. Regular mode programs process program members at 15-minute increments. In case you are new to Program Builder, this means that every 15 minutes, program members will move from one step to the following step in the program (assuming they are not waiting in a step due to a time-based rule).


Whether there are one or more decision rules between the two steps, all decision rules are evaluated in sequence in the same cycle. Therefore, to optimize your programs, you may wish to employ decision rules in sequences, rather than placing steps between the decision rules.
You will also want to avoid “empty steps” such as the first step in the program – many new users don’t realize that the first step in a program can in fact perform an action.

Now you’re wondering how to avoid that first empty step if your first operation is to run a decision rule in order to branch the records… A tip to consider is to have your members enter the program at different steps – based on what you know about the records when you add them to the program. For example, if your members are flowing into the program from a form, consider multiple conditional steps that push members into specific program steps.
Alternatively, you can establish several feeders, instead of just one, in order to optimize where the members start in the program. These are advanced configurations, and may require extra planning and design consideration, but they can be useful for decreasing the time it takes to run your automated processes.

If you find that program members are taking longer than you would like to progress through to the end of your program, you may want to consider doing your marketing automation in Batch mode. Batch mode is often suitable for lengthy or complex workflows and for bulk data processing such as data normalization. In this mode, members are fully processed from the start of a program through to the end of the program every two hours.
Even better, you can prioritize Batch mode automation programs such that they are evaluated in a specific sequence. Some customers have set-up several programs sequenced in batch mode – very complex and granular lead scoring, lead rating, lead assignment programs that are modular, yet process this entire set of processing every two hours. You can see how this enables far more complex logic to be efficiently leveraged.


I must add a disclaimer regarding Batch mode. When running in Batch mode, marketing automation programs do not maintain the detailed step-by-step history that can be useful when initially building and testing programs, so I recommend that you enable Batch mode once you are satisfied with your program’s configuration.

I’d love to hear feedback on how we can improve Program Builder to make you more effective in your marketing automation.