Tuesday, August 31, 2010

Win a Free Ticket to Eloqua Experience!


(guest post from Adrian Chang)

Are you Eloqua's biggest fan? Share why on our Facebook Fan page and you can win a free ticket to this year's Eloqua Experience in San Francisco from October 18-20.

We are looking for you to share 10 Reasons why you are Eloqua's biggest fan. Be creative

- write a poem, create a YouTube video, or use photos to craft your submission. You will post your entry on our Eloqua's Facebook Page - www.facebook.com/eloqua.

Rules
· One entry per Eloqua Fan - make it count!
· You must be a fan of Eloqua on Facebook (Go to www.facebook.com/eloqua and "Like" our page)
· This contest is for Eloqua customers only
· You may use Twitter to promote your entry and link to our fan page - please use #1EloquaFan for the contest.

Also, if you want to make mention of this year's Eloqua Experience, please use #EE10SF.

Judging

The winner will be selected by a committee of Eloqua employees. The committee will review entries based on creativity and response from the Eloqua community (Likes, Comments).

Duration

Starts September 1st through the 15th (ending at 11:59pm PT). Winner will be announced on September 17th.

Prize
One (1) free ticket to Eloqua Experience. Current registrants may still apply - you will be reimbursed in the event that you are selected as the winner. Also, the winning entry will be featured during the conference.

Eloqua Employees, Customers and Partners – How can you participate?

1. If you are a Facebook User, please ensure that you are a Fan of Eloqua. Go to www.facebook.com/eloqua and
"Like" our page

2. Highlight the entries that you like by commenting or click on the "Like" button for any entries

3. For general guidelines as to how you can participate in Social Media - http://blog.eloqua.com/eloqua-socialplaybook

Any questions? Please contact me Adrian Chang at 416.642.7586 or at adrian.chang@eloqua.com

Tuesday, August 24, 2010

Content is King, but sometimes we need to replace the King


(guest post from Ben McPhee)
We all know how important content is. It didn’t just rise to the throne à la nepotism like the rest of the kings with which we are familiar. No – content is legit. Content can make or break a campaign, a quarter or even a job.

Now while content in and of itself is critical to pushing out information and pulling in prospects, what is just as important is the ability to manage content in such a way that it is always where it needs to be when it needs to be there. Pretty straight forward, but examples never hurt.

Everyone knows that overwhelming sensation of dunce after sending out a work email to 5 executives reading, “Please see the attached deck . . .” and then shortly thereafter realizing that you either didn’t attach anything but your recently crippled pride or that you actually attached the first draft of the presentation you whipped up 3 months prior on 4 minutes of sleep.

That kind of sucks – but now imagine you actually sent a link to the wrong presentation or an outdated rate sheet or a promotional flyer sporting a decimal place two digits too far to the right . . . to 50,000 of your prospects . . . yikes . . . would be nice if there was an easy way to stuff that one under the rug.

But it’s not just about putting out fires – it’s also about having a scalable, manageable method of pushing out regular content updates to your prospect and client base. You may have the same email going out every week with only minor updates within the content to which the central link in the email directs your audience - do you really want to have to edit that email every single time you send it out? Or have to make changes to HTML or jump through any hoops whatsoever? If the execution and process management suffers from confinement and complexity, ripples can extend from poor content, to lost content to late content and beyond.

Because we recognize the important of a clean and quick content delivery and update process, a while back, we implemented a Replace Content tool that makes it super-easy to swap content to which you are linking in your emails and landing pages - WITHOUT having to actually go into those emails and landing pages! Now, we want to make sure you remembered that it’s there!

1. Uploading your content is easy – just go to the Content Asset area and upload:


2. Then, to insert a replaceable link to the content, copy and paste either the Email Redirect Link (for emails, so that you can track clickthroughs AND ensure that your branding is properly injected into the URL, assuming you have either the Silver or Gold Branding & Deliverability package) or the Trackable URL (for landing pages):


3. Once you have inserted your replaceable content link into your email or landing page, it’s a breeze. Whenever you want to update the content to which the link points, simply go to your content asset, click the dropdown next to its name and select, Replace Content:


4. Then select the file with which you want to replace the content and hit Replace:


You’ll get a warning to verify that you in fact want out with the old and in with the new:


Once you hit ok, the system will begin the replace process and then when it’s done, you’ll see the green bar of success and you’re done!


Now anyone who clicks on the link you inserted in your email or landing page will be automatically redirected to the new content – and you barely had to do ANYTHING!

Go ahead and test it – send an email out with a replaceable link in it, click it, see the first round content, replace the content, go back to the email, click the link again, check out the new content - takes a few minutes and you can see just how powerful this feature really is.

So remember the next time this saves your organization either time or embarrassment – Eloqua’s got your back!

Tuesday, August 17, 2010

Adding and Tracking Facebook ‘Like’ buttons in Eloqua emails


(Guest post from Vince Lockyer, Demand Gen Specialist, Avid)
vince (d0t) lockyer (at) avid (dot) com

There have been a lot of blog posts recently about Facebook ‘Like’ buttons and how to use them in marketing emails.

While it’s easy to add a link to a Facebook group or page from an email, it’s not been so easy to integrate a fully working ‘Like’ button into an email in a similar way it works with a webpage – and also accurately track who’s clicking it and what they are ‘liking’.
So far only one or two vendors have come up with an embedded solution to this – which of course only works with their platform. Now using the method described here you can get the same functionality for your Eloqua emails. This solution requires a bit of HTML tweaking in the final step.

How it works
From your Eloqua email, a blind form-submit sends the email address of the recipient, the URL, and the name of the webpage being ‘liked’ to an Eloqua form. After logging and tracking these details the form confirmation page then displays the webpage overlaid with the Facebook Like Button Social Plug-in.

Try it out!
Try out this example form with your own data to see how it looks.

How to build it

Create two new contact fields:
• Facebook – Last Like URL
This will contain the URL of the last thing that the contact liked. It’s required also because the form confirmation page will need the URL to display the webpage in the final step.

• Facebook – Last Like Name
(Optional but highly recommended.) Contains the name of the last thing that the contact liked. Required to make the reports more readable and also to be displayed in the form confirmation page.

Create a new form with the following fields. Keep the form name and the HTML names of the fields short as they will be used in the blind form submit URL. Try something like ‘fb’ or ‘like’ for the form name.

• ‘e’ – Email Address
• ‘l’ – URL
• ‘n’ – Name

Add a ‘Update Contact Data’ processing step to update the two Facebook fields from the form submissions.

Add a confirmation page processing step. Here you will need to build the HTML for displaying the webpage overlaid with the Facebook Social Plug-in.

Confirmation Page HTML
The confirmation page displays the webpage being ‘liked’ in an iframe embedded in the Eloqua confirmation page. A semi-transparent layer is overlaid on top with the Facebook Social Plug-in contained in another layer (see image).

A close button is included in the top-left that hides the overlaid layers and reveals the webpage beneath.

Download the HTML for the confirmation page, you can use it as-is or customise it to your requirements. Note: you will need to edit it to update the field merges and locations of the graphics files in your Eloqua instance.

To add-in your own field merges for the ‘Facebook – Last Like URL’ and ‘Facebook – Last Like Name’ use the Insert Contact Field option in the Eloqua Confirmation Page editor. To upload the images use the Upload Images tool under Hypersites or Email Marketing > Tools & Content Components. You’ll need to copy the URL of the hosted image once uploaded and paste that into the HTML.

Adding the Like button to an email

Once the form fields, form and confirmation page is setup you can add the ‘Like’ button to your email. The button will trigger a blind-form submission in this format:


Make sure “?elqFormName=” equals the HTML name of the form you created and “&elqSiteID” equals your unique Eloqua site ID. “&l=” is the URL of the webpage being liked and “&n=” is the name.

Reporting

To get a report of who is liking what, view the Form Data report:


Liking or Recommending

The code described here will allow you to add a ‘Like’ button. You can also add-in a ‘Recommend’ button using the same code – you’ll just need to change the ‘action’ parameter in the Facebook Social Plug-in to ‘recommend’:
“&action=recommend”

Wednesday, August 11, 2010

Drake Has a New Contest For You


(Guest post from Eloqua's Drake)

This is Drake, Eloqua's Success Tour Ambassador and I'm kicking off another round of Customer Success Tours beginning today in Austin, TX. Our theme for the events this quarter is "sales enablement", but actually the goal is to make you, the marketer, a hero to your sales team. Envision them giving you accolades at the next company-wide meeting...

In honor of this theme I've cajoled the folks at Eloqua into letting me host another contest on Facebook. Here's the scoop: post a picture on my Facebook wall (facebook.com/eloquadrake) that depicts marketing and sales being aligned. Think "lock-step" and "BFFs" (or whatever kids these days are saying). And most importantly, think creatively, because that's what will win the prize. You can post up to three times, so make 'em count. The deadline is September 6 (Labor Day) so you have a little time to strategize.

What's the prize? Your personal reward is a $100 iTunes or Amazon gift card (your choice) and your company reward is 10 licenses of the Eloqua Sales Toolkit which contains Eloqua for Microsoft Outlook, Eloqua Prospect Profiler and Eloqua Discover. What's Eloqua Discover? Come to a Success Tour to see a live demo of this great new tool. So it's a win-win for both you and your company.

Get started by friending me on Facebook so you can see all the postings and scope out the competition. I'm looking forward to seeing what you come up with.

(Oh – my Eloqua friends asked me to remind you that this Friday, August 13th is the early bird deadline for Eloqua Experience. You can attend for $999 if you sign up by this Friday, so what are you waiting for? After that the price goes up to $1350 – is there really anything to think about?)

Tuesday, August 10, 2010

How Event Automation Saved My Marriage


(guest post from Joe Gelata, of Sybase)

We’re all in the same boat - we need to run successful campaigns but we’re tight on time. It comes down to two choices; work around the clock building and managing campaigns or don’t run them at all. The former will put stress on your personal life and marriage while the latter will have you looking for a new job. Luckily, Eloqua offers us a third option: Automation!

I was recently tasked with building a registration system for a seminar series that had some ambitious requirements:

• Manage registration for 45 different seminar sessions in 12 cities across North America and Europe over the span of several weeks

• Support for communication in 3 languages

• Target email content to each contact (e.g. send 350+ unique emails)

• Schedule communications differently for each geographical region

• Prep leads for Sales so they have accurate data on each lead

To make it interesting we only had 1 ½ people and 2 ½ weeks to design, build, test, and launch the system. This was a challenge in itself but the real kicker was that we had next to no resources to manage the system once it was running. The only way to meet these challenges was to dig deep into our Eloqua toolbox and automate everything. Here’s how we did it and what we used...


Program Builder
Program Builder was our saving grace when it came to scheduling emails and preparing leads for sales. The former was done by segmenting our lists by geography. We used decision rules to determine if each contact was in a contact filter for each region. Once segmented they were sent to one of several programs that automated the sending of invitation emails based on the schedule for that particular region. Since each of the regional invitation programs was identical (with the exception of the email dates) we were able to build one and copy it for the rest making this a quick and easy process.
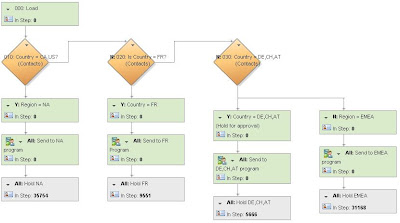


Preparing leads for sales was slightly more complex. Aside from a campaign, we wanted to tag the contacts with the city they registered for, the session they registered for, and their attendance status. This adds up to 96 different combinations of information. To automate this we used Program Builder, Contact Groups, and Update Rules. In a nutshell, the program:

• Accepted all contacts from the ESM (more on ESM later)

• Segmented the contacts based on their session using a Contact Filter

• Added a campaign association

• Added product information

• Grouped all contacts together again

• Segmented the contacts based on their attendance status using their membership in an ‘Attended Contacts’ group

• Added an “Attended” or “Did Not Attend” status

• Sent contacts to the CRM integration program

The only manual piece of the process was uploading our attendee lists. The rest was pure automation.

Activity Driven Content
Activity Driven Content (ADC) is perhaps the most underrated component in Eloqua. Not only is it extremely easy to use, but it can drastically cut the development time of your emails while helping you increase click-throughs, lower opt-out rates, and take your targeting to a level you never thought possible. This is the kind of automation that may actually put your marriage in jeopardy. You know what I’m talking about: “Honey, I did the coolest things with Eloqua today…” Unless you’re married to a marketer this conversation always end with someone falling asleep. It’s only cool to us!

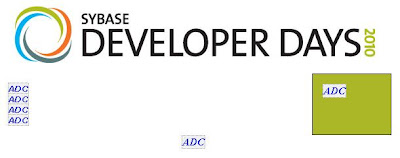
With three languages and information on 45 different sessions, we had a lot of content to deliver to registrants. Our goal was to keep emails as short and to-the-point as possible. After all, no one wants to ready a 7’ email with information on 44 sessions they didn’t register for. Lucky for us, Eloqua offers Activity Driven Content which dynamically serves up content based on data in a contact record or data card. To do this you build ADC pieces which are essentially fragments of HTML for each version of content you will be sending. You then setup ADC Rules to determine which piece should be sent to each contact. For example, you can create the introductory paragraph of your email in multiple ADC fragments each in a different language. Next you can create an ADC Rule that looks up a contacts country and pulls the ADC in the appropriate language. The final step is to insert the ADC into your email. The email itself basically serves as a shell for the ADC:


When you send the email to a specific contact, the ADC is populated:
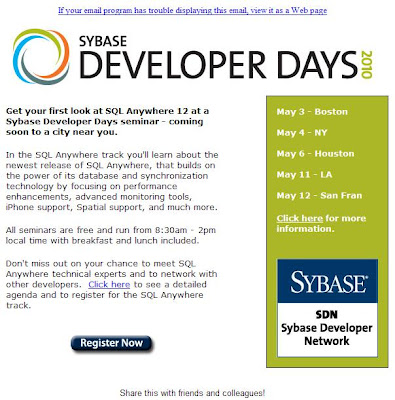


ADC is an extremely powerful tool. It did a great job customizing language and location info for this seminar series but the possibilities are endless. You can target content based on any standardized contact or data card field you have in your database. Industry, title, interest, buying stage, company size…the list goes on and on. Just think what it can do for your newsletters. And don’t forget to add in a personalized signature from your sales reps while you’re at it.

Event & Survey Manager
Event & Survey Manager (ESM) is a wonderful tool for managing multi-session events. It has three basic parts:

Registrant Info

This is the Data Card Set and its associated fields. It works with the individual Data Cards which store all of the registrant information collected on the form (form data can also be saved to contact records at the same time). Each Data Card is associated to a contact. The Data Card Set is a table separate from the contact table and can be used for events and surveys.

Event Details
These fields are specific to your event and can include date, time, location, session name, presenter, etc. Each session has its own record. Each Data Card will be associated to one of these sessions.

Event Actions
Think of this as program builder for events. You can do all the regular stuff such as send emails and add contacts to a program step. The big difference is Event Actions are triggered based on dates relative to the session date each contact has registered for. For example, where Program Builder can be setup to send an email to everyone on January 1st, Event Actions can send an email two days before the session a specific contact is registered for. It makes setup a dream and allows a customer centric email schedule.

For our seminar we created a Data Card Set with fields that matched those on our form, loaded info for all 45 sessions into the Event Details, and scheduled our emails in Event Actions. For example, a ‘Registration Confirmation’ email was sent each time a new contact was added to ESM, a ‘Seminar Reminder’ email was sent 5 days before their session, and they were added to our follow-up program one day after their event. Building this in Program Builder would have been a mammoth task. However, building it in ESM took 15 minutes of training and a few hours to setup. And of course, it required no management whatsoever.


Results

The major accomplishment with this project was simply that it was completed successfully. Given the scarce resources available to build and run registration, it was a huge challenge. However, automation allowed us to come out victorious. Throughout the process we were able to offer registrants completely customer centric communications – from the content to the delivery date. Even with very little management, this massive seminar series ran smoothly.

Beyond the event itself, building this system forced us to dive into new areas of Eloqua that we have never explored before. This learning experience has sparked new creative ideas on how to use these tools and address other problem areas we had previously written off.

Tuesday, August 3, 2010

SmartXchange - Installing a Template


(Guest post from Miles Thibault, Product Manager for Eloqua's SmartXchange)

Eloqua's SmartXchange template library became available today. SmartXchange templates are marketing assets, such as emails, forms, and even programs; that have been refined and tested by Eloqua and other marketers. They give you better performance in less time.

The rest of this post will walk you through installing one of the Eloqua Best Practice email templates.

1. To access SmartXchange, go to: Setup | SmartXchange


2. This example uses an email template called "BP - Product Offer with CTA, 1 column." Once you've found it, click Use Template


3. Since an email is made of several smaller components, you should give each of them a descriptive name. Once that's done, click Finish. The template is now installed.


4. As an optional step, some templates have tasks that you can complete on the tasks page. Complete as many tasks as you need and click Done.


That's is! In only a few minutes you're ready to use on of Eloqua's best-practice emails.

Wednesday, July 28, 2010

Getting Bachelorette’s Attention


Today's Guest Post is by Meagen Eisenberg, Director of WW Programs and Marketing Automation at ArcSight.

What does ABC’s The Bachelorette have to do with sales enablement? Getting Ali’s attention on this season's The Bachelorette has some great parallels to successful sales enablement. We can apply a few tips from the bachelors.

Do you Accept this Rose?


We, as marketers, play the wooers to sales mindshare and attention. We want to get noticed, we want to be selected for the date, we want them to fall in love with us (or at least our programs), and we are competing against 25 other guys (well at least 25 other distractions). We want our programs leveraged to further the business. How do we get our sales team's attention and get noticed through all of the noise? Do you run the Roberto (the good-looking one), the Ty approach (the funny charming one with a Southern accent), the Craig (the "bring home the bacon" lawyer), the Jonathan (one-of-a-kind), or the Frank (the intellectual)? I am going to argue that you need all styles to be irresistible. A healthy mix at the right time seems to attract my Bachelorette sales team.

To get my sales team's attention, we started with a program that had sex appeal and charm that targeted their top 100 green field accounts. We created a multi-touch program to make prospects Flip for our campaign, a high-end highly-targeted program with a goal to set up in-person meetings (think 1-1 date with a rose). We knew that an email alone was not going to get sales' or our targets' attention, which led us to use Eloqua's multi-capability software with email, phone, direct mail (FedEx package), PURLs (personalized hypersites) and in-person meetings. We designed a catchy tagline and offer, hot graphics, video and personalized URLs for each recipient. The microsite displayed content based on the recipient's industry, sales rep, and company. We went as far as to include an auto-generated email with copy included to make it extremely easy to reach out to their rep. Click on the "Click to schedule meeting" on the PURL site to see for yourself. Every touch made it as easy as a click to work with a personal sales rep. We got sales excited when they saw the ArcSight branded Flip cams and the response rates! We loved the results we saw in the U.S. and decided to roll the program out worldwide.

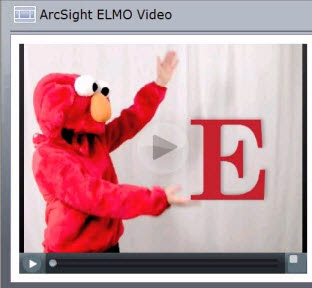
What Do Sesame Street and Sales Have in Common? ELMO!

The Flip program was sexy and got sales' attention, but we needed to keep our appeal and get them to use our other available marketing assets – webinars, whitepapers, and events. So we laid on the humor with an ELMO video to get them excited about the power of Eloqua for Microsoft Outlook (aka "ELMO") and all of the marketing templates we had available for them to engage with and nurture their prospects and customers. Just to give you a sense of volume for ELMOs, our largest month was March, and we as a company sent 1,850 marketing created templates and used the tracking feature to send 3,041 emails. You can find the number of marketing emails sent for your own company under menu Evaluate > Reporting > Report Console at Templated Email for Microsoft Outlook Usage, and the number of auto-tracked emails at AutoTracker Emails Sent. And if you want to see which marketing templates are getting the most play, run the Templated Email for Microsoft Outlook Overview report.

For our one-of-a-kind approach, we designed personal daily reports for each of our sales reps. (Everyone likes to feel special and unique.) By creating daily emailed reports for our sales and inside sales team, we give them visibility into the activity in their territory. We also show them the quality of the leads in their region based on what the leads are looking at and how often they are on our website. They can even see what Eloqua terms as the "Unknown" visitor, companies on your website that have not filled out a registration form. Our inside sales team loves to catch the "Unknown" visitors, look the company up in Salesforce.com, and call into the contacts to see if they can find the person with the need we can fulfill - catch them while they are hot. You can find how to create daily reports for your sales team on page 27, and best practices for creating daily reports on page 28 from my February San Francisco Success Tour presentation.

Targeting Your Top Accounts

Do you have sales reps that don't cover a specific territory, but specific accounts instead? For our Strategic Account Managers, we create real-time individual company alerts through Eloqua's Visitor Notification tool (learn more on pages 10-12). Basically, daily reporting and alerts show sales what leads and companies are actively pursuing our programs, what products they are investigating, and how to track, contact and (with the help of ELMO) come across as a thought-leader in the space to our clients.

Show Me the Metrics!

And just when sales think we Marketers are all make-up and glam, we showed off our intellectual side. We hit them with Eloqua's reporting and campaigns module –providing reporting and insight into their territory with daily lead activity reports, the Integrated Marketing and Sales Funnel with stage health (All Responses by Lead Stage [see graphic]), and ROI information, such as Top Campaigns by Opportunities Generated/Revenue report and Influenced/Attributed Revenue and Cost (CPL, CPSO, etc). It shows our organization what programs and campaigns are effective, how we are building out their pipeline, and why we invest our dollars in some areas and not others.

With Eloqua capabilities, you get to be the best of all the bachelors – attracting your sales team's attention and enabling them to find and close the deal – sales and marketing alignment at its best. Our sales team has been very responsive to our multi-touch programs, the use of ELMO, and the daily reports. We have their attention and they engage with us on a regular basis to build pipeline and accelerate the closing of deals. With a multi-style strategy, your sales team can't resist and you will get the rose every time!


Tuesday, July 27, 2010

Quick Tip: How to Organize Your Email Templates in Outlook


Here's a quick tip for those of you that use Eloqua's plug-in for Microsoft Outlook to provide email collateral for your sales team. Make it easy for your sales reps to choose the correct template by organizing your folders by sales stage (you may also refer to this as "opportunity stage"). By grouping your messages this way, the rep can easily send the right message at the right time and then quickly move on to their next prospect.

Here's an example of how this might look:

Tuesday, July 20, 2010

Using Eloqua emails as social media content


(Guest post from Joel Rothman)

Out of the box, Eloqua allows you to create a link that will send someone to a Social Media site, such as Twitter, Facebook or Linked In. This functionality is great, and very easy to use. But, I have been asked a couple of times how we can create a link to the actual email itself that can be placed used for twitter etc… and there is a pretty easy way to do this, assuming you are just a little bit comfortable with HTML.

Most social sites have a specific URL type that can be used to push someone to the site, and prepopulate the content box with the text that you want. For example, for twitter, it’s this format:


Where you substitute what’s in the “content” are for what you want to pre-populate, with + signs instead of spaces in your text. So, what you need to do is come up with a line, such as “Check out this Newsletter for valuable B2B tips”, that would look like this:
(click for larger image)


But wait, it’s missing the URL! How do you get that, you might be asking? Simple, insert this code:
(click for larger image)


So, you’ll end up with a link that looks like this: (click for larger image)


And Voila:

Now, a couple of notes. Any personalization in emails will not show. In fact, it will just be blank (ie if you have Dear Joel, it will say just Dear). Also, these links expire after a few weeks.

Now, that URL says now.eloqua.com.. what’s up with that? Can you change that? Stay tuned…

Wednesday, July 14, 2010

Success Tour Destinations in August and September


I learned my lesson in writing post titles last time with my "Success Tour Stops in June" title. No, the tour does not stop, it was just a list of the stops on the tour. In fact, the tour is going incredibly well, and the most recent destinations have been great fun for everyone involved, and have included a growing roster of cities, like our first stop in Los Angeles.

Other stops, including Chicago, Portland, and Toronto have all of course featured a visit from Drake, who just ran a great iPad giveaway contest which resulted in him being seen (and photographed) over 200 times in cities around the world!

The full schedule of Eloqua customer success tour stops is always available on user.eloqua.com, but if you haven't had a chance to go there and find your city, the following stops are coming up in August and September:

Austin, August 11th
San Francisco, August 19th
Washington, D.C., September 2nd
New York City, September 14th
Denver, September 15th
Atlanta, September 21st

Attendance is free, just let us know you'll be there by registering on user.eloqua.com, and we'll see you there. Some great customer stories are shared at each event, and there is often a preview glimpse of Eloqua 10, and a number of other upcoming product innovations!

Follow along with the conversation on Twitter by following the #EloquaTour hashtag.

Hope to see you out at an event.

Tuesday, July 6, 2010

And the iPad winner is...


A few weeks ago our Eloqua Success Tour Ambassador, Drake, kicked off a contest to give away an iPad. Well, today is that magical giveaway day. It was an incredibly difficult decision for Drake because there were so many creative entries. (If you’re one of Drake’s many friends on Facebook you’ll be able to click the links below to view the photos.)

Drake commented that he really wanted to see the Eiffel Tower and he got versions of his wish in Vegas and on Ellis Island. He traveled as far away as Australia and Hawaii, and all over the US and Canada. He flew on a trapeze with the greatest of ease and celebrated a bit too much at a winery in Napa Valley. He went swimming (which didn’t end well), was burned, umpired a baseball game, golfed, scaled amazing heights, and even braved the protesters at the G20 summit. Drake also made friends with kangaroos, koala bears, sheep (ouch!), roosters, ducks, pigs, cows, dogs, donkeys, and llamas with really bad teeth. He had a bit of peace and music at Woodstock, and a tiny bit of corporate espionage (shhh). And yes, he even managed to play in the World Cup. And all the while he was spreading the gospel of marketing and sales alignment to everyone he met.

Drake is a tired man.

But not too tired to award an iPad! Drumroll please…

The iPad goes to Amy Kolzow! She managed to take Drake to eleven states across the US – impressive! - and even gave Drake several new outfits. But the real reason she won? She cleverly named Drake’s dog “Markie”. A shining moment in Eloqua branding. (Not sure what the connection is? Visit http://markies.eloqua.com for the scoop.)

Wednesday, June 30, 2010

Newsletter Dynamic Customization using Blind Form Submits


Vince Lockyer, Demand Generation Specialist at Avid was kind enough to send in this excellent (and very detailed) example of using blind form submits to customize a newsletter to the exact preferences of each recipient.

The Avid Spotlight newsletter has a subscriber base of well over a million contacts – from bedroom DJs and home video editing enthusiasts through to network TV news engineers, Top 10 music producers and Hollywood feature film editors.

To ensure our broad range of subscribers get the most relevant content, ADC (Activity Driven Content) is used to pull in sections of news and promotional content targeted towards six different segments.

In this post I’ll show how we used ADC and Email Blind Form Submits to dynamically customize the newsletter. Using this method our subscribers can personalize their newsletter with additional content preferences, and then immediately view the updated email in a web browser.

In the first month over 4000 individual customizations occurred using this method. Not only does it help to ensure people get the news they want, but it means our subscribers can provide us with explicit segmentation data about themselves.

How it works

Avid Spotlight content preferences are stored as a series of six contact fields containing an ‘on’ (form checkbox) value indicating whether the subscriber should be receiving that content. If an ‘on’ value is present for a particular content preference then that content gets pulled into the final email using ADC criteria rules.


An additional set of ADC rules check to see which content preferences the subscriber doesn’t have – displaying blind form submission buttons (right) that automatically add values to the respective content preferences fields.

After the form submission, a confirmation page is displayed automatically redirecting the subscriber to the Web Preview version of the newsletter containing the updated content (below).


Try it Yourself!

http://forms.avid.com/forms/spotlightdemo

Use this form to subscribe to our newsletter (you can remove yourself at any time). You’ll immediately receive the latest newsletter to try out the customization.

The Form

To keep the blind form submission URLs as short as possible, the HTML name of the form is simply called ‘sl’. The form fields are:

• em (Email Address)
• pref (Preference) – Containing the additional content preference code
• sguid (elqEmailSaveGUID) – Used to display the Web Preview
• elq (RecepientID) – Also used to display the Web Preview

The Blind Form Submission

Here is the format of the blind form anchors, using Eloqua dynamic email fields to pull in the email address and Web Preview fields:


Processing Steps

When a blind form submission is received, Eloqua does the following:

• Updates the Contact Field with the relevant content preference (‘on’ value)
• Updates an additional contact field containing the full name (text string) of the content preference (this is used in the confirmation page).
• Updates two more contact fields – RecepientID and elqSaveEmailGUID (also used by the confirmation page).
• Redirects to the Confirmation Page.

After the processing steps, the contact table will look something like this:


The Confirmation Page

This is where the additional content preference is confirmed to the subscriber in a Web Page, followed by a meta redirect to the saved Web Preview version of the email. In order for this last part to work, Contact Table field values have to be pulled into the confirmation page.


Firstly, the page pulls in the name of the content preference and the email address. In our case CEF100441 equals the content preference name field, and C_EmailAddress is the subscriber's email address:


The final part of the confirmation page is the meta redirect, which is in this format:


Where CEF100440 is the elqEmailSaveGUID, and CEF100442 is the RecipientID.
Note: these field names will be different in your instance of Eloqua, and you’ll need to use the ‘Insert Field’ menu item in the Confirmation Page builder to insert the HTML containing the field name.

Wednesday, June 23, 2010

Eloqua Cloud Connectors


For those of you who are either a bit technical, or who have technical folks on your team, there is now a very interesting opportunity for you to extend the capabilities of Program Builder in any way you choose. The capability is called Eloqua Cloud Connectors, and it is very simple, but incredibly powerful.

If you want to connect to your own custom systems (a free trial system to grab a token, an event registration system, etc), build custom logic (scoring leads based on unique criteria), or run custom rules (determining whether a person lives within a 100 mile radius of a certain city), you can now build that quickly and easily by building your own Cloud Connector.

Essentially Cloud Connectors, available today in your Eloqua instance, allow you to build any step you want in your marketing automation workflow within Program Builder. To do so, there are three simple steps:

- Define the Step in your program as a "Cloud Connector" step. This means that whatever happens in that step will be run by your service, rather than natively within Eloqua.

- Configure the Step with whatever rules, credentials, and configuration you need. This is configured and saved within the service that your build.

- Run the Step have your service call into the Cloud Connector API, find the members of the step, run whatever is needed, and then tell Program Builder that it is complete

It's as simple as that. You can build whatever marketing automation capabilities you need quickly and easily. Here's a quick diagram of how this might work connecting with a Hoovers database as an example:


To begin building your own Cloud Connector, all you need is a user account with access to the Eloqua API, and a creative idea. Here is an Eloqua Cloud Connector development sample guide to give you a walkthrough of how to get started, and sample code for all the steps you'll need to take in building one.

I look forward to hearing what you've built, and if you build something that is available to the Eloqua community, I would be glad to highlight it here.

Thursday, June 17, 2010

Eloqua API - PHP SDK now available


As I wrote the title for this post, it occurred to me that there were a lot of three letter acronyms in it, but I can't remove any without changing the message.

David Lanstein at Splunk just posted a PHP SDK for the Eloqua API, for anyone who has been building, or looking to build, API-based projects. It's freely available (Apache 2.0 license), and David mentions on the project page that he is eager to hear any feedback you might have as you build out your own projects.

As this blog is a community for all of us working with the Eloqua platform, please do let me know if there are other resources like this that you are interested in sharing.

David, thank you (and Splunk) for your generous contribution to the community.

Tuesday, June 15, 2010

Drake Brings you an iPad


If you’ve attended an Eloqua Customer Success Tour recently you may have met Drake. He’s our official “mascot” of Success Tours, and he’s done an exemplary job so far. He recently created a Facebook profile so that you can get to know him a bit better and last week he asked if he could run some Eloqua-related contests on his Facebook page. Of course we agreed. We love a good contest – especially when someone else does all of the work.

Over the next few months you can learn a bit more about Drake and his irreverent take on the art and science of marketing by viewing his Facebook wall posts (they’re not protected, so anyone and everyone can get to know him). He’ll be sharing some reading recommendations and I’m sure he’d love to hear your suggestions as well. Sometimes he might point you in the direction of a good blog post or marketing event. And sometimes he may simply share a good restaurant that he’s been to before or after a Success Tour.

But let’s get down to business and talk about Drake’s first contest. At the San Francisco Success Tour he saw Jill Rowley’s iPad and he’s decided he really needs one for his briefcase. Who can blame him? Since he’s going to buy one for himself he decided to be generous and buy one for a member of the Eloqua family too. But who to give it to? That’s where the contest comes in.

Download this PDF featuring a fantastic likeness of Drake. Print it and cut it out then take a picture of Drake somewhere interesting. Your photo can feature you and Drake together or just Drake alone in interesting surroundings. Post your picture to Facebook, friend Drake (“Drake at Eloqua”) and tag him in the photo. Voila!

On July 5 he’ll choose his favorite picture and send the winner a 16GB Wi-Fi iPad. Yep, it’s that easy. You can even enter more than once, which is highly recommended if you’re traveling. (Hint: Drake would really like to see the Eiffel Tower or some really awesome July 4th shenanigans.) Oh, and in case Drake can’t choose his favorite, he’ll see which photo has the most “likes” to help him make his decision.

Wednesday, June 9, 2010

Gated Forms - Asking for just the right information


One of the most common questions every marketing team wrestles with is the question of how much information to ask for from prospects as they request your marketing information. Luckily, the answer doesn't have to be static, you can ask for different information based on what you already know and what the individual has already provided.

The technique for doing this is called "gated forms", and is one of the most powerful techniques in the modern marketer's toolbox. You can set up gated forms yourself to work with your Eloqua marketing database.

Essentially, the technique works as follows:
- if you recognize the visitor based on their cookie, either provide them with the asset directly, or ask them just a little more information

- if you don't recognize them based on their cookie, check to see if they are in your database based on their email address

- if you do not have any information on the visitor at all, ask for a longer amount of information

The following diagram shows how this works:


By extending this simple technique further, you can ask for more information at each interaction, while never asking for an overly large amount of information, and never asking the same information twice.

Gated forms are very flexible as a technique, and can be used in a variety of situations - some as simple as just removing a form in front of a web asset, some as robust as asking for unique information of each visitor at each interaction.

To help you get started, here is a guide showing exactly how gated forms can be created and implemented, from the most simple scenarios to the most robust.

Wednesday, June 2, 2010

Success Tour Stops in June


The Eloqua Customer Success tour is in full swing, with recent stops in San Francisco, Minneapolis, and Austin drawing record attendance and great reviews.

Stops are happening around the country, so chances are we'll be in a city near you soon. Come out to meet other Eloqua users, compare notes, exchange ideas, and learn from some of the best marketers around.

You'll also have a chance to meet Drake. If you want to know why you should come meet Drake, you'll have to join us for an event...

The full schedule of Eloqua customer success tour stops is always available on user.eloqua.com, but if you haven't had a chance to go there and find your city, the following stops are coming up this month:

Seattle, June 8th
Chicago, June 10th
Philadelphia, June 10th
Portland, June 10th
Toronto, June 15th
Los Angeles, June 23rd

Attendance is free, just let us know you'll be there by registering on user.eloqua.com, and we'll see you there.

As an added benefit of coming out to the success tour, you'll get a glimpse of Eloqua 10, our new upcoming release. I coudn't put it any better than @travelingshinn did in the San Francisco tour stop:


Follow along with the conversation on Twitter by following the #EloquaTour hashtag.

Hope to see you out at an event.

Monday, May 31, 2010

Justifying Adjustments – Saying Hello…Faster


(Guest post from Amber Stevens)

A few weeks ago, @heatherfoeh wrote about the value of a Welcome Program. This past November, the Eloqua marketing team launched our own version of a 3 touch – 30 day Welcome Program designed to engage prospects during the time when they’re known to be most receptive to giving and receiving info (according to MarketingSherpa study). Initial results were amazing with click-through rates reaching over 20% in some instances. But, like any good marketer, we know there is room to optimize. Here’s what we’ve learned along the way.

Unsolicited hello’s make you seem like a crazy person. This might seem obvious, but we got so excited with the initial results of the program that we started convincing ourselves that it made sense to welcome everyone. Conversion rates plummeted. Using the ‘Email Group Overview Grouped by Contact Field’ report (which is great for slicing and dicing email results) to sort on lead source, I combined similar sources and quickly realized that for us, welcoming acquired names through list builds and our sales team prospecting efforts drove the lowest CTR and the highest un-subscribes.

We stopped doing that.

It’s also important to note that when we run online events or promotions with outside vendors, we send one “bridge” email to follow up on the specific event or action they took, and then feed them into the welcome program. We had considered stopping this practice thinking that perhaps only those contacts who directly sought us out (ie came to the website) should be welcomed, but when we looked at the data, we realized we have great conversions from our 3rd party leads.

We’ll keep doing this.


No one cares about “that guy” or your service pitch. Using the report ‘Email Group Overview’ I could see that conversions drop off drastically on both the second and third emails. Turns out, people LOVE the offers in the first email – but the second and third don’t drive a fraction of the conversions. Even when we swapped offers from a customer story (swapping male for female images had no impact) to our money back guarantee service, the second communication still gets paltry results. I think this has something to do with their buying stage – you wouldn’t necessarily care to learn more about services if you’re just window shopping. The third email achieves higher than average click through rates, but is still less than half as effective as the first email.

We’re going to revise the program and make it one touch – leveraging the highest converting offers (our Eloqua demo, fun intro to marketing automation and Best Practice Videos) – and minimizing other content by providing, but not over promoting.


So, as you can see, saying hello can take many different forms. The first step is to just get started – you can always learn and adjust along the way.

Please post your thoughts or questions on lead nurturing – I’m interested to hear what you’ve seen be successful.

Find me on Twitter @AmberSte