Today's post on Artisan is another guest post, this time from Ben McPhee, on our Product Management team. Ben is most well known for his recent work on Prospect Profiler, one of our keys to sales enablement, but he is also responsible for our work with the sports marketing vertical where we work with a number of professional sports teams, arenas, and racing facilities.
Ben's work in this area leads to him bringing some interesting requirements to the table, and gives him some unique experiences that are of value to a broader set of marketers. In today's post, he explores the use of validation rules to ensure that a visitor has checked a check-box on a form that indicates that they are of a certain age, or have read the terms and conditions. This is a useful technique for many marketing situations.
Do you require visitors to agree to particular terms and conditions before you can accept the data they are providing through a form? Do you require a checkbox to be checked before accepting a form submission? Well, you don't need to be an HTML or JavaScript expert to set this up in your Eloqua forms.
 Check out the simple instructions below to show you how to do this yourself!
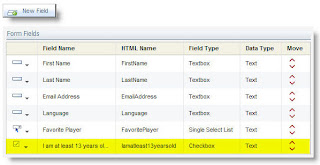
First, add the checkbox field to your form. From the Fields menu on the form, you can list the fields in your form, or add a new field. If this is a form hosted within Eloqua, you'll need to add the field, if it is hosted on your site you will have already captured the field.
For this example, we'll look at a Checkbox field type, but the same techniques can be used on any type of field.
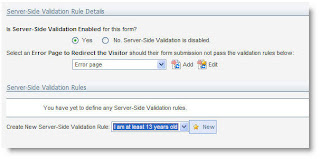
 Next, go to the Form menu and select "Edit Server Validation" to edit your server-site validation (the process that runs after the submission of your form to ensure that people have filled in the information you require).
You can set the rules to validate against, the fields to validate, and the error pages to display if the field is incorrect.
To set up validation, first select an Error Page that will be presented to submittors if the info they have provided DOES NOT meet the requirements you set. When you have done this, select the field to validate (the checkbox field you added to your form) and create a NEW validation rule.
You'll be looking for the value submitted by the checkbox field to be "on", so select "Field value in Data Set" as your Validation Type - this is essentially saying, "I'd like to validate that the checkbox has been checked by comparing what is submitted to a list of acceptable submissions".
Selecting this give you options below that you need to configure to define exactly what the form validation should be looking for. Go to the "Form Field Validation Parameters" area of the page to define that list of acceptable submissions. To do this you will be creating a new Data Value Set and saying, "Do not accept a form submission unless the value submitted in this checkbox is in this Data Value Set".
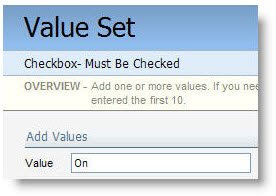
 Give your Value Set a name (in this example, "Checkbox- Must Be Checked", and then as your value, enter the value "On". The reason you are entering "On" is because by default, when a checkbox field in a form is checked, the system passes in a value of On or blank, depending on whether or not the box was checked.
With that validation set (of just one value - "On") created, you'll return to the previous page. Make sure that you have the "Set to the default value..." option Un-Checked so that your form submission is not altered.
And you're done! With this technique you can quickly ensure that no forms are submitted unless the right checkboxes are checked.
Ben's work in this area leads to him bringing some interesting requirements to the table, and gives him some unique experiences that are of value to a broader set of marketers. In today's post, he explores the use of validation rules to ensure that a visitor has checked a check-box on a form that indicates that they are of a certain age, or have read the terms and conditions. This is a useful technique for many marketing situations.
=================================
Do you require visitors to agree to particular terms and conditions before you can accept the data they are providing through a form? Do you require a checkbox to be checked before accepting a form submission? Well, you don't need to be an HTML or JavaScript expert to set this up in your Eloqua forms.
 Check out the simple instructions below to show you how to do this yourself!
First, add the checkbox field to your form. From the Fields menu on the form, you can list the fields in your form, or add a new field. If this is a form hosted within Eloqua, you'll need to add the field, if it is hosted on your site you will have already captured the field.
For this example, we'll look at a Checkbox field type, but the same techniques can be used on any type of field.
 Next, go to the Form menu and select "Edit Server Validation" to edit your server-site validation (the process that runs after the submission of your form to ensure that people have filled in the information you require).
You can set the rules to validate against, the fields to validate, and the error pages to display if the field is incorrect.
To set up validation, first select an Error Page that will be presented to submittors if the info they have provided DOES NOT meet the requirements you set. When you have done this, select the field to validate (the checkbox field you added to your form) and create a NEW validation rule.
You'll be looking for the value submitted by the checkbox field to be "on", so
 select "Field value in Data Set" as your Validation Type - this is essentially saying, "I'd like to validate that the checkbox has been checked by comparing what is submitted to a list of acceptable submissions".
Selecting this give you options below that you need to configure to define exactly what the form validation should be looking for. Go to the "Form Field Validation Parameters" area of the page to define that list of acceptable submissions. To do this you will be creating a new Data Value Set and saying, "Do not accept a form submission unless the value submitted in this checkbox is in this Data Value Set".
 Give your Value Set a name (in this example, "Checkbox- Must Be Checked", and then as your value, enter the value "On". The reason you are entering "On" is because by default, when a checkbox field in a form is checked, the system passes in a value of On or blank, depending on whether or not the box was checked.
With that validation set (of just one value - "On") created, you'll return to the previous page. Make sure that you have the "Set to the default value..." option Un-Checked so that your form submission is not altered.
And you're done! With this technique you can quickly ensure that no forms are submitted unless the right checkboxes are checked.


2 comments:
This is still less than ideal. Eloqua should support the automatic addition of appropriate client-side javascript for verifying all types of form elements, checkboxes included. We had to gin something up for this ourselves, and while it wasn't that difficult, it struck me as an unnecessary thing to have to do, given the sophistication and cost of this solution.
Yes, Eloqua could simplify this process by other means as well ... the simplest way I see is by allowing the ability to make the Checkbox a required field, so field has to have a value (checked) in order for page to be Submitted.
Post a Comment