Monday, December 20, 2010

Junk Scan - look for bad form data


Anyone who has put up a web form has suffered from bad form data. We all know what it looks like, "aaaaa", "test@test.com", "1@1.com", "asdf", "mickey mouse", "donald duck", "555-1212", the list goes on.

Sure, one option is to only provide access to an asset after sending a person a link, in order to ensure that the email address is valid, but there are many situations where you don't want to (or can't) add in this secondary step. Generally, these are real people submitting the form, so the various tools to prevent bots and spammers are of no use either.

However, having this data in your marketing database does no good either. With it there, your analytics will show incorrect results, segments might pull in bad data, and any of this data that gets passed to sales will immediately decrease marketing's credibility.

Now, to solve this problem, we have a Cloud Connector that does a "junk scan" on your data to look for the typical problems that are seen. It scans first name, full name, email address, and phone number looking for data that is known to be bad or looks suspect, and flags the record in your Eloqua marketing database.

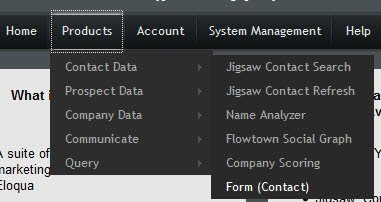
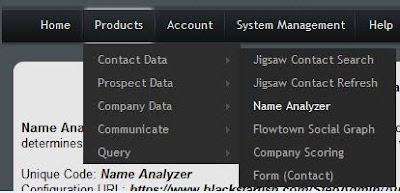
To get started, you’ll need the Cloud Connector installed in your Eloqua instance. This is very easy to do, see the recent post on Cloud Connector Installation instructions for how to add a new Cloud Connector to your install. The Cloud Connector we’ll be looking at here is available on Black Starfish, our repository of interesting connectors. Go to cloudconnectors.eloqua.com and create an account. Under Contact Data, you'll find Name Analyzer - that's the connector to install.


With the name analyzer cloud connector installed, all you need to do is create a step in your marketing automation program - after a web form is submitted, as part of your contact washing machine, or when you analyze your contact data and detect data quality issues. This step will take in contacts, and then the cloud connector will flag them as valid, invalid, or unknown (in a specific field in the contact data), and will also, as a bonus, flag their gender (useful for geographies like Germany where gender is important in building a salutation).


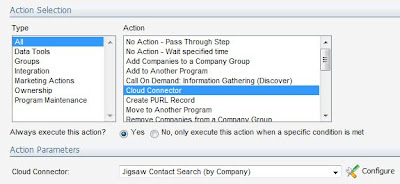
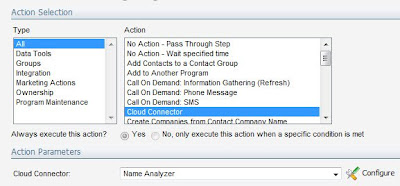
For the step, select "Cloud Connector" as your step type, and you will see a drop-down list of options below. You'll see the "Name Analyzer" cloud connector you just installed via the setup interface in this list. Choose that, and click the "Configure" button to begin setting up the step.


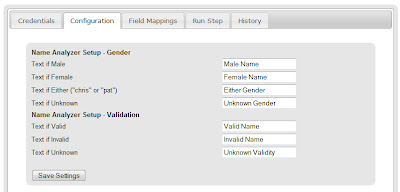
The popup window gives you your configuration options, the majority of which are how you want to flag the contact. You can choose what text you want to mark each contact with for a) gender, and b) validity. For gender, remember that there is an option for first names that could be either gender (ie, "Chris" or "Pat").


Click save on that screen and move to the field mapping tab. As inputs, it will take first name, last name, email address, and phone number, and as outputs, it will write the text you just selected to fields for gender and validity.
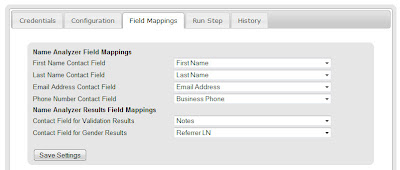


You're now ready to go. The validity analyzer looks at the following to figure out whether a person's contact information is valid:

- First Name: to understand if the name is known to exist (by cross-referencing against a database of known names

- Full Name: looking for known bad names ("mickey mouse" or "donald duck" where the first name may be valid itself ("mickey" or "donald")

- Email Domain: looking for @test.com or @1.com

- Email Name: looking for aaa@ or 111@ as invalid email names

- Phone Number: looking for numbers that are too short, all the same number (11111, 22222), or known to be bad (555-1212)

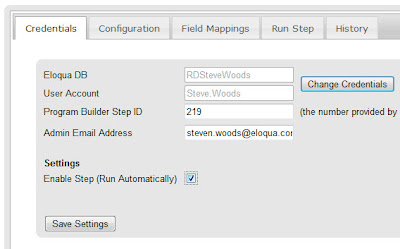
On the "Run Step" tab, you can run the step manually to pull in a few members from the step, and see what the results are, or, if you go to the "Credentials" tab, you can check off "Enable Step" and have the step run automatically.
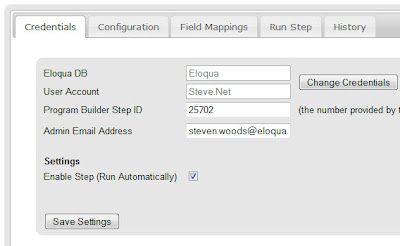


And that's it, you're done. Now, the contacts that flow through the step will be marked with validity and gender.
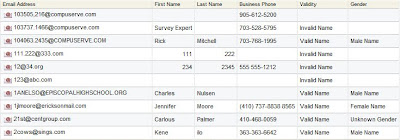


Looking forward to your feedback on this. Is this catching and flagging the right garbage names that are input? What other factors do you look for when you're looking at your names manually?

Tuesday, December 14, 2010

Eloqua and Jigsaw Integration for Better Marketing Data


If there is one common challenge that is faced by every marketer who thinks about marketing automation, it is access to up-to-date, complete, clean, and comprehensive data. Asking for data on web forms is tricky in that the more you ask for, the more visitors tend to abandon forms. Similarly, data collected via web forms generally suffers from being less clean and standardized than marketers might like.

For anyone who joined us at Dreamforce last week, you may have seen our Jigsaw integration and realized that it makes some significant strides in solving this challenge. Salesforce.com’s Data-as-a-Service solution, Jigsaw, has one of the best and most accessible stores of crowd-sourced data that is kept up to date and clean. Now, in an easily configurable way, you can access this data source directly from your marketing automation programs in Eloqua.

The Cloud Connectors for Eloqua/Jigsaw integration accomplish three separate integration tasks, but all are set up in roughly the same manner, so the instructions should be easily translatable between the three different connection options.

Contact Search – When you have companies that you’re interested in, whether you want to flesh out the list of the key people at an account that has shown some interest, or to proactively target a territory or a list of named accounts, this connector allows you to find the contacts at those companies who are in key roles. Simply by specifying the role (ie, marketing, sales, finance), level (ie manager, director, vice president), and geography, you can retrieve as many contacts as you specify at each company that flows through a given program builder step

Company Info – When the information on companies in your database goes little farther than a name, you will be very limited in your ability to market to them. This is a common problem when the information comes in via web forms though as company questions like revenue, industry, number of employees, or stock ticker tend to bulk up forms and drive visitors away. With the Company Info cloud connector, you can quickly append and correct this type of information directly from the Jigsaw company database.

Contact Refresh – when a contact enters your database, its information begins to go out of date immediately. Titles change, phone numbers are updated, and new information may be gathered that you don’t yet have. The Eloqua/Jigsaw Cloud Connector allows a contact refresh to append and update any information that Jigsaw has on any contact that flows through a step in your marketing automation program.

To get started, you’ll need whichever of the three Cloud Connectors you are interested in installed in your Eloqua instance. This is very easy to do, see the recent post on Cloud Connector Installation instructions for how to add a new Cloud Connector to your install. The Cloud Connectors we’ll be looking at here are available on Black Starfish, our repository of interesting connectors. Go to cloudconnectors.eloqua.com and create an account. Under Contact Data, you'll find Contact Search (by Company) and Contact Refresh, and under Company Data, you’ll find Jigsaw Company Info. Those are the connectors you’ll need, and the instructions for each one will be relatively similar from here on.

With an account set up and the connector installed into your Eloqua instance, you're now ready to quickly add in data from Salesforce.com's Jigsaw service into any program.


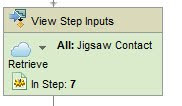
Add a step to your program, in this case we'll look at retrieving contacts at a specific company. The program step, in this case, will contain the companies, and we'll feed the contacts back into a contact group (obviously, if we want to process those contacts, we can just feed that contact group right into a program, but that's another topic).

For the step definition, choose "Cloud Connector", and you should have a drop down of options appear below. If the Jigsaw Contact Search option is not in that list, make sure you added the cloud connector definition to your Eloqua instance as we looked at earlier.


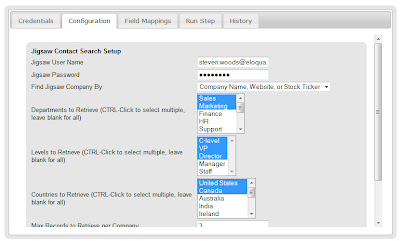
Click on the "Configure" button to pop open the configuration window. This connector will need your credentials for Eloqua (must be API-enabled), and for Jigsaw (it uses whatever license you have with Jigsaw so you will be charged for data accordingly).

In the configuration screen, choose what roles, levels, and geographies you are interested in, how many contacts per company you would like to retrieve. Hit save on this page to save your selections.


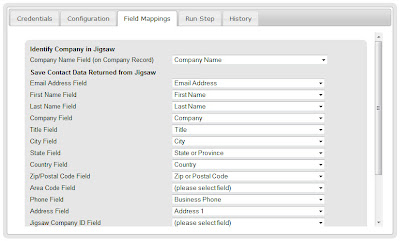
On the next tab, field mappings, pick the contact field you would like to save the data in. Jigsaw returns a lot of great information, but if you don't want any particular field, just leave that blank.


When you're ready, you can either go to the "Run Step" tab to run a few trial runs and see what data you'll get back, or just go right to the "Credentials" tab, check off "Enable Step", and click "Save" in order to have the step running automatically.


That's all that's needed. With that enabled, you'll have Jigsaw returning data on the right contacts at the companies you're interested in. The two other Jigsaw connectors, for company information, and for contact refresh, work in a very similar manner. Enjoy, and please don't hesitate to provide any feedback on what's working for you and what's not.

Monday, December 6, 2010

Generic Web Forms from Program Builder


As your marketing automation programs become increasingly advanced, there is sometimes a need to tie into remote systems from half way through a program. Perhaps a lead needs to be created in an proprietary, custom CRM system, or a demo account needs to be registered if a person reaches a certain threshold.

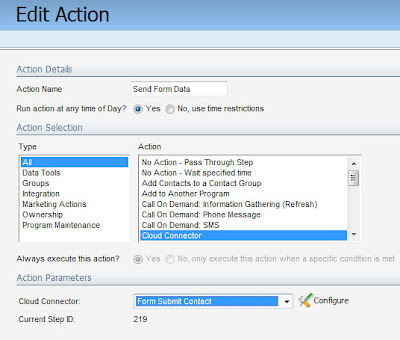
With Eloqua, you can now accomplish this by triggering a generic form submit from any step in Program Builder. Whether the step contains contacts, companies, or prospects, the data on those individuals can be packaged up and submitted as a web form (http Get or Post). Simply create a step in your program, and choose "Cloud Connector" as your step type to access Cloud Connector functionality.


The Cloud Connector step type we'll use for this is Form Submit Contact. If you haven't done this before in your install, you won't see that connector in the drop down list. That's okay, it's really simple to add them. See the recent post on Cloud Connector Installation instructions for how to add a new Cloud Connector to your install.

To find the Cloud Connector for submitting a form, go to cloudconnectors.eloqua.com and create an account. Under Contact Data, you'll find Form Submit (Contact). That's the connector you need, and follow the instructions to install it. (similar connectors are available for Prospects and Companies).


With that installed, you now can select it, and you will see a "Configure" button beside the dropdown that allows you to access the configuration screen.


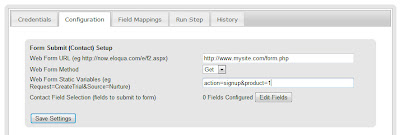
The first thing to configure is the destination form. Input the form URL on the site you are targeting. (note, that to perform some interesting creative scenarios, you can also point this right back at Eloqua web forms...).

Choose whether you want http Post or Get as your method, and then add any form variables that are submitted with every form regardless of the person.


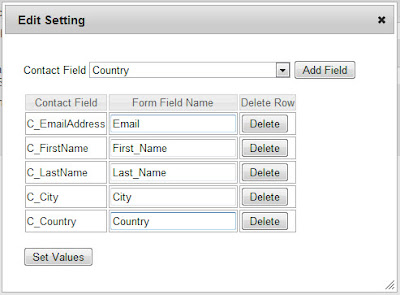
Then, to configure the set of fields that are submitted from each contact, prospect, or company, click the Edit Fields button. You will see a simple UI that allows you to choose the fields you are interested in, and then provide the HTML name for those fields in the web form you want to submit.


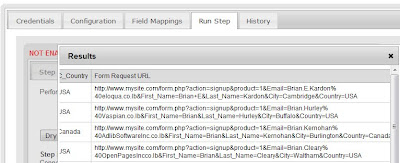
Click the "Set Values" button, and don't forget to hit save on the configuration screen to save these values, and you're all set. Use the "Run Step" tab to do a test or two to make sure that you've set everything up as intended. You'll be able to see what the forms that are being submitted will look like and what data is retrieved for each contact in the step.


When you're ready to go, go back to the "Credentials" tab and check off the "Enabled" checkbox to have this step run automatically.


Now as anyone flows into that step within Program Builder, a form is automatically sent on their behalf exactly as you specified.

Hopefully this capability is useful for you, don't be shy about feedback, we look forward to hearing from you. For those of you who are inspired to do so, please find the instructions to build your own Cloud Connector here. We look forward to seeing what you create.