Showing posts with label Security. Show all posts

Wednesday, April 28, 2010

Locking Down Your Assets


Guest post from Chad Horenfeldt
============

Eloqua has some great security features that let clients of all sizes implement specific business processes within Eloqua. In this post, I’m going to focus on securing assets in Eloqua.

By assets, I’m referring to the following objects within Eloqua that can be locked down:

- Email
- Email Group
- Contact Filters
- Distribution Lists
- Programs
- Forms

Eloqua allows you to lock down assets by either security group (a specific group of Eloqua users) or by individual user. Let’s look at a specific example. Let’s say you want to modify the security rights of an Email Group within Eloqua as you don’t want certain users to have access to these emails within this folder. We’ll assume that you have Customer Administrator security rights. Login to Eloqua and go to the Email area. Click on the drop down menu of the email and select “Edit Security”.
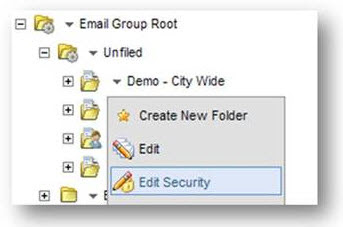


From the “Edit Security Rights” window, you can quickly select if the various security groups should have the ability to view, edit, delete or modify the security rights for this Email Group.
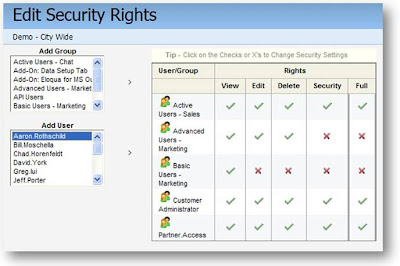


All you need to do is click on the red X to change it to a green check and vice versa. In this case, we only want certain users to have access to the emails in this group so we’ll disable access for most of the email groups and add the two users that we want to grant access to: Greg Lui and Jeff Porter:
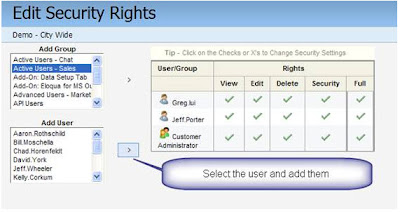


You’re all done! Only Greg and Jeff can access this Email Group. Just to add to this, users who create their own Email Groups can adjust the security access to it.

The same type of asset protection can be done for the other assets listed above such as emails, email templates, forms, programs and email distribution lists. As another example, you can remove editing privileges of an email to a security group or user(s) but these users can still copy the email and modify it for their own purposes. We often recommend to our clients to create emails that will be used as templates this way. After they’re created, put them in an Email Group called “0 Templates” so they appear at the top and ensure that the emails are locked down so that they can’t be modified. You can also secure the sections of an email but we’ll leave that topic to a future post. Remember to lock down your assets – especially if you have multiple groups operating within one Eloqua instance.

Wednesday, January 7, 2009

Quick tip - uploading users


Getting things done in software can take on an interesting pattern - I know I'm guilty of it - where once we figure out one way to do something, if it gets the job done, we continue with it, without necessarily looking for a better way. So, in that spirit, here's a tip that most of you might know, but if I can make things a touch easier for a couple of you, all the better.


If you're working with large numbers of sales users (or even a medium number - anything more than 10 or 20), you have to create, manage and maintain their user accounts in Eloqua. For things like Signature Rules, which are great for maintaining your sales people's personal relationships, you need quite a bit of information in the sales user profile. Maintaining this manually can be quite a bit of work. If you haven't discovered it, there's a better way (and I'm writing this tip because I was just chatting with a user who didn't know of this...).


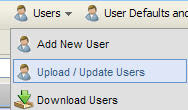
In the User Management area, choose Upload/Update Users from the top menu. This gives you a familiar upload wizard, very similar to what you are used to for uploading Contacts or Companies, but this one will upload user information to either create or update your user accounts.


There's quite a bit of information that you can manage on each user, so download a copy of the standard user upload template CSV file to give you a good starting point. This gives you a CSV (Excel) file with the right headers to work with to manage any of the relevant fields on the user record. You can work with your own if you want, you'll just have to map the fields in in the wizard.


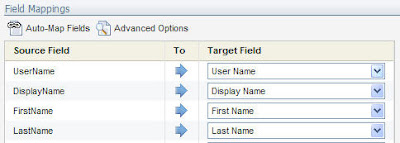
Fill out the CSV file in Excel with the details of the users you are looking to create or update, and then upload that file in the wizard. You're presented with a mapping screen, but if you used the standard template file, just click Automap Fields, and it will be mapped for you instantly.


Follow the wizard to the end, and click Ok, and you will have uploaded your users into Eloqua with their account information fully set up. You can even set up their appropriate security role membership, password change settings, and CRM user IDs.


Comments welcome as always - I would enjoy hearing whether this level of quick tip is useful, or whether you are interested in more advanced topics on this blog.