Thursday, July 30, 2009

Enabling Sales with Eloqua for Microsoft Outlook


Your sales team will be communicating with your prospects. That is unavoidable. It is also the fear of almost all marketing organizations. Will they use the right messaging? Will they take advantage of the right tools and content? Is their grammar and tone appropriate?

Many marketing organizations have legitimate reasons to fear sales-created content, as it is often sloppy, off-message, and outdated. However, sales will complain that marketing content is not easily accessible to them, needs to be tweaked slightly to meet their exact needs, and feels too "marketing" in tone.

Eloqua for Microsoft Outlook is designed to be a balance for that. It allows you, as a marketing team, to provide content to your sales team that is:

- Centrally managed and updated, ensuring it is always up to date

- Available to your sales team where they work, in Outlook

- On message and on brand, but allowing your sales team to personalize as needed

In order to do this, there is a small plug-in for Outlook that is downloaded and installed into each salesperson's Outlook client. To get the plug-in, go to:

Setup -> My Settings -> Eloqua for Microsoft Outlook

and download the plug-in from there. Note that this is part of the sales toolkit, so you will have to have that module.
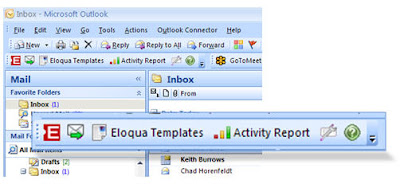
Download the plug-in, and walk through the installation wizard. You will be asked for you login credential with Eloqua, and once you have configured them, you will see a small toolbar at the top of your Outlook screen.

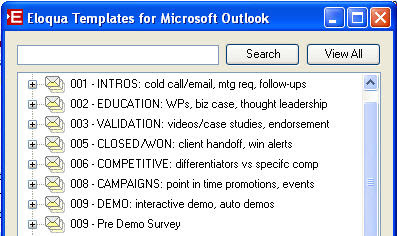
Clicking on the "Eloqua Templates" button gives you access to the marketing-supplied template library. As a marketing team, you can easily configure which emails you want accessible to sales through this interface by setting that up in the main application.

When the sales person selects a template and downloads it, they are within the normal, familiar Outlook email interface. From here, they can personalize the message as they see fit, and can add their own messaging.

Generally, what we have found is the most effective content for Eloqua for MS Outlook is very plain, natural content, as would be written by a sales person themselves. Highly graphical, rich content often does not end up being used by sales people as it feels less natural.
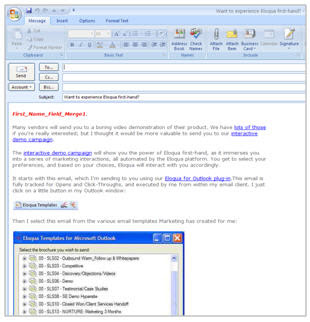
With the content selected, and edited, the sales person can send to one person, or to a list of people (marketing controls the size of the list they are allowed to send to, generally you want this to be only a few folks, 50 or 100).

When the email is sent, it is of course tracked through Eloqua giving immediate sales ingights into prospect interest levels and areas, unsubscribe preferences are respected, and the analysis is immediately available.

If sales edits marketing-supplied content, or creates content of their own, they can, of course, save those templates in their own personal library for later reuse. Marketing can relax knowing that sales is starting with well crafted, on brand, on message content. Sales can thrive now that they are able to get immediate access to the right content from their natural workspace.

A full suite of analysis is of course available for individual sales people to understand their own effectivenss, and for marketing to understand which sales people are adopting the marketing content and seeing success with it.

Tuesday, July 28, 2009

Optimizing your Marketing Automation: Tips from the Guru


This week's post is a guest post from Andrea Corey, our VP of Systems Architecture, and the guru of Program Builder optimization. She and her team are responsible for all the scale and speed initiatives behind Eloqua's architecture, and were the key folks behind the work that was highlighted in the recent Dell case study on Eloqua's marketing automation platform performing at one billion transactions per day.


In this post, Andrea offers a number of great tips on how to think about your programs so that they operate as smoothly as you need.
Enjoy,

Steve


====================================


Program Builder offers two main processing modes: Regular mode and Batch mode. Each can be effective at enabling many Marketing Automation needs; what follows are some helpful explanations and suggestions for optimizing your programs.

Regular mode, the default mode, is ideal for lead nurturing, free trial follow-ups, event follow-up and similar processes where you wish to send out communications or evaluate contacts over the course of a period of time. Regular mode programs process program members at 15-minute increments. In case you are new to Program Builder, this means that every 15 minutes, program members will move from one step to the following step in the program (assuming they are not waiting in a step due to a time-based rule).


Whether there are one or more decision rules between the two steps, all decision rules are evaluated in sequence in the same cycle. Therefore, to optimize your programs, you may wish to employ decision rules in sequences, rather than placing steps between the decision rules.
You will also want to avoid “empty steps” such as the first step in the program – many new users don’t realize that the first step in a program can in fact perform an action.

Now you’re wondering how to avoid that first empty step if your first operation is to run a decision rule in order to branch the records… A tip to consider is to have your members enter the program at different steps – based on what you know about the records when you add them to the program. For example, if your members are flowing into the program from a form, consider multiple conditional steps that push members into specific program steps.
Alternatively, you can establish several feeders, instead of just one, in order to optimize where the members start in the program. These are advanced configurations, and may require extra planning and design consideration, but they can be useful for decreasing the time it takes to run your automated processes.

If you find that program members are taking longer than you would like to progress through to the end of your program, you may want to consider doing your marketing automation in Batch mode. Batch mode is often suitable for lengthy or complex workflows and for bulk data processing such as data normalization. In this mode, members are fully processed from the start of a program through to the end of the program every two hours.
Even better, you can prioritize Batch mode automation programs such that they are evaluated in a specific sequence. Some customers have set-up several programs sequenced in batch mode – very complex and granular lead scoring, lead rating, lead assignment programs that are modular, yet process this entire set of processing every two hours. You can see how this enables far more complex logic to be efficiently leveraged.


I must add a disclaimer regarding Batch mode. When running in Batch mode, marketing automation programs do not maintain the detailed step-by-step history that can be useful when initially building and testing programs, so I recommend that you enable Batch mode once you are satisfied with your program’s configuration.

I’d love to hear feedback on how we can improve Program Builder to make you more effective in your marketing automation.

Thursday, July 23, 2009

Data Management, Deliverability, and Unsubscribes


At a recent Eloqua user group, there was a conversation around data management, cleansing, and permission management that led to a few key things being clarified, so I wanted to capture the general discussion here.

We’ve talked quite a bit about managing your active and inactive contacts in your database in order to keep your engagement levels high during a lead nurturing campaign. At a certain point, if you marketing database has grown large, and has been operating for a number of years, there may in fact be a number of contacts in your database that should be cleaned out entirely. This cleansing is a natural process, as people change jobs and with it change email addresses, or change personal email addresses, leaving their old email addresses dormant.

A large number of dormant email addresses in your list will decrease your overall campaign response rates, and may in fact cause a noticeable decrease in your deliverability rates as attempts to communicate with non-existant email addresses can cause you to be flagged as a potential source of spam. You will begin to see this in running deliverability tests against seed lists using the embedded testing tools within Eloqua.

The best technique in this situation is to cleanse these dormant addresses in bulk. You can do this from the Data Manipulation menu by selecting "Delete All Contacts in Group". Note that this deletes the Contact records entirely from the database.


The question, however, is what happens to those who have unsubscribed if their email address does end up back in your database again? Is that history of unsubscribing lost? Obviously, in order to stay compliant with both the spirit and letter of the law, you need to ensure that this is not the case.

The good news is that with Eloqua, the contact record and the subscription record are separate. If you have a contact, Jane.Smith@Acme.com, who unsubscribes, then is deleted, then is re-added, Jane.Smith@Acme.com will still be marked as an unsubscribed contact. The data on the contact (name, address, group membership, etc) is deleted when you select to delete the contact, and it will not return on re-adding the contact, but the record of their subscription status remains.

This is a critical point as it allows you to make your data management decisions without being unduly worried about losing contact unsubscribe data.

Tuesday, July 21, 2009

Marketing Analysis and the Lead Funnel


In thinking about B2B marketing analysis from the perspective of a top-down view of a balance sheet and income statement of lead metrics means that we need to look at the stages of the buying funnel a bit more objectively. A balance sheet view would give us a current (or past) point in time view of what leads are at what stage, and an income statement view would give us an indication of the transitions in stage that took place within the time period.


The first step is to define the stages of your buying process more explicitly. This can be as simple as the Sirius Decisions model of Inquiries and Marketing Qualified Leads, or it can be a unique mapping of the buying process stages of your business. The number of stages in your buying funnel will depend on your business and how your buyers buy.


With the stages defined, however, you can then begin to model them as part of your marketing analysis. Within Eloqua, this means defining the lead stages/ranks. In Campaigns, under "Inquiries & Leads", select "Lead Ranking Systems". You can define a lead ranking system to model your buyers buying process as you need.


Each leve you define has an order, a name, and a text value. The text value is what is written to the underlying contact or prospect when a lead is defined as being in this stage.


To indicate that a contact or a prospect is a lead at a certain stage of the buying process, you must build a lead ranking rule. Under Data Tools, build a lead ranking rule for each stage in your buying process.


With that in place, you can use a lead ranking rule whenever you want to define that a lead is at a particular stage. The text value for the lead rank/stage is written into the contact record, so existing processes that may be dependant on seeing data in the contact record are unimpacted.


The lead ranking rules can be run anywhere it might make sense; on groups that have been uploaded, such as lists from events or tradeshows, in form processing steps to indicate that anyone submitting a certain form is at a certain stage of the buying process, or within program builder.

Running a lead ranking rule from within program builder is done in a similar manner to how leads were ranked as being a certain stage using data update rules. Except that when done within a lead ranking system, the lead rank is stored historically, and forms a basis for all of your marketing funnel analysis.


With your lead funnel data flowing through as formal lead ranks, you will be able to easily represent it in funnel reports in the campaign analysis area. More importantly, when it is tracked in this way, a historical record of the lead rank for each person is kept. This allows you to view how each person's lead rank has changed over time, and begin to understand how your marketing campaigns have facilitated moving buyers through the lead funnel.


(*Please note that the capabilities described here are currently available only with Eloqua Team edition)

Thursday, July 16, 2009

Sales Enablement: Account Traffic Light Dashboards


Enabling your sales team to succeed based on your marketing automation investments means ensuring that you can show them insights into their accounts and territories that they might otherwise not have been able to see.

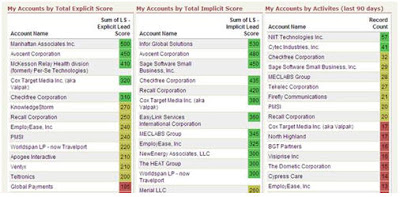
An excellent way to do this is through the use of a "traffic light" dashboard that shows each salesperson, for their own territory, the hot, warm, and cold accounts that they own.

The use of a "traffic light" dashboard, to do this in green, yellow, and red has proven an excellent tool in many sales organizations as it allows salespeople to determine, at a glance, which accounts are showing buying interest.

To set this up in salesforce.com is quite easy. I've included the salesforce.com instructions here, but a similar process for Microsoft CRM or Oracle CRM On Demand should also work.

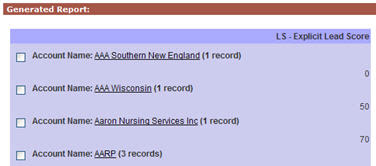
The first step is to create a report that rolls up the individual lead scores of the contacts in an account to the account level itself. Note that to do this project, we're relying on you already having set up a good lead scoring process, with that data integrated into your CRM system.

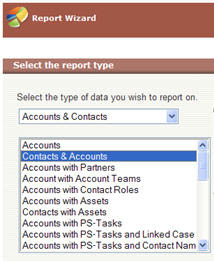
Build a report on "Accounts & Contacts" and select the "Contacts & Accounts" option to bring in data from both the contact (ie, their lead score), and the account (account name, etc).

When you are asked for a summary type, select a Summary report in order to allow us to aggregate the lead scores of each contact in the account into an overall lead score.

Although a sum of individual contacts' lead score is not the most perfect way of defining the exact score of an account, it does provide an excellent, directional view of which accounts are showing interest and should be contacted.

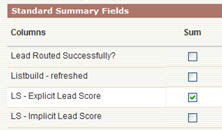
You will be asked to select your Summary Fields. Under Standard Summary Fields, select a Sum for your Explicit Lead Score field. This process can be repeated for Implicit Lead Score also, at a later point to build a second traffic light dashboard component based on buyer activity. Both implicit (how interested) and explicit (who) provided unique and valuable dimensions of lead scoring, and are worth dealing with separately.

With this sum field selected, you will be asked to select how to roll up your data. We'll roll it up by Account Name in order to show the aggregate lead score for each account in a rep's territory. Note that this view provides an account level overview of which accounts to talk with, and very elegently complements the sales insights provided by Prospect Profiler to give you a good detailed view of an individual's area and level of interest.

The sort order of this column is not important as we will be changing this later for the dashboard.

The next step is to select the field that we are interested in. As we will be rolling up by account, the contact fields are not of interest and can be deselected. For account fields, select those that are of interest to you for a high level view, such as Account Name, Account Owner, and Industry.


Similarly, on the next step, the order of the columns can be selected in any way you would like. It will not affect the final dashboard, so order the columns as you wish.

Selecting your filter criteria now allows you to build a report that is unique to each salesperson for their territory. Whether you use account ownership, or more detailed data-level criteria to define an account ownership structure, you should be able to build an appropriate filter set to allow each salesperson to see accounts in their own territory.

The one thing you will want to do on the filter page, under advanced settings, is to hide report details. This hides contact level details, and allows the report to only show the account level rollup of the overall lead score.

The display options on the next step are also not relevant as we will be showing this report in a dashboard, which will determine its own display settings, so just click Run Report to generate the report and verify that you have a rolled up lead score for each account in the target territory.

Save this report as we will use it to generate a dashboard from. You may again wish to create a similar report based on implicit lead score, and you will likely see demand from each of your sales reps for a similar report in their own territory, so you will likely end up with a series of these reports.

Now that we have a report created, the next step to tackle is to create the traffic light dashboard based on that report.

The common way to do this is to create a new, three column dashboard, and add in each view as a component with that dashboard to give salespeople a territory map to work from.

When you have created a dashboard, add in a component to represent this report. Make the component a "Table" component type, and give it an appropriate title such as "My Territory's Accounts by Explicit Score".

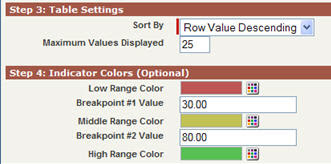
Select the report you have just created as a source report in order to bring in the data on accounts with rolled up lead score. You will likely want to set the Sort order to "Row Value Descending" in order to show the highest scored accounts first, and usually a maximum of 25 or 50 values displayed keeps the report manageable.

You can then set, based on your lead scoring ranges, where you want the traffic light colors to show. For example, if you have a 0-100 scoring range, you may want 0-30 as red, 31-80 as yellow, and 81-100 as green. You will find that this clearly shows why it is so important to define lead scoring caps and buckets so that scores do not get unweildy and are maintained within a workable range.

With that in place, you are ready to go. Save your dashboard, and work closely with your sales team to ensure that you have the right ranges identified, and the right way of defining territories to ensure that they are seeing the highlights of their own accounts.

Your sales team will be able to quickly discern which accounts are showing interested and should be called, and by doing so, will quickly become much more effective in their selling.

Tuesday, July 14, 2009

Perfecting Delivery and Viewing of your Emails


Ensuring that your emails are delivered as intended, are not flagged as junk, and appear correctly regardless of the recipient’s inbox is a critical thing to consider in managing your communications.

There are many critical things you should do in order to maximize your email deliverability, and ensure that your email content is highly relevant to your recipients. To understand where you are and where you need to make more progress on, however, there is no substitute for frequent testing.

To make this easy for you, Eloqua comes with a built in suite of tools to allow you to test and analyze a variety of these key areas. We talked about the analysis and reporting tools for email deliverability a few weeks back, but now we'll look at more proactive tools for understanding your email prior to sending.

For any email you are interested in analyzing, choose QuickSend Email to bring up the QuickSend interface and use the External Testing tab. This allows you to run a number of tests against that email to verify how it is delivered and presented to the recipients. For most clients, these tests are included in your subscription (up to a set number per month), talk with your customer success manager to verify.

The Inbox Viewer test shows you a preview of exactly what that email looks like in a particular inbox or email service provider. Many clients render images, layouts, backgrounds, or styles differently, which can alter the way your email appears, and hence its effectiveness. When you run the inbox preview tests, you are given a report which displays exactly what the recipient will see.


Whereas we would all like it if there was a single standard for what content can be displayed in an email client, and how it should be rendered, the reality is that there are significant disparities. The combination of browser and email service provider for web-based providers adds a new dimension as Gmail under IE may render differently than Gmail under Firefox.

On top of this complexity, rendering images may be prevented by the email client, by being offline, or by not being supported on a mobile device. Viewing how your emails render with and without images is crucial to ensuring that they connect with your recipients.


The Email Content test analyzes the content of your emai looking for known issues in your content, the format of your HTML, or your writing that will cause issues with recipient systems.

This is a very deep and powerful test, very much worth looking at. It analyzes your content for potential viruses (even embedded forms can be seen as viruses by some filters, due to credit card scams), and then looks for known triggers of spam flags as well as using common Bayesian (adaptive) filters to look for common flags.

Also included within this report are a variety of accreditation and authentication tests to ensure that your IP address is properly identified as yours. As this is managed by Eloqua, you are unlikely to see any problems in this area, but should any arise, be sure to notify your customer success manager.


The Domain Deliverability seed list tests will attempt to send your email to a pre-defined list of email inboxes on a variety of service providers. You can select from a seed list that is focused on B2B, B2C or International email inboxes. The test results will display whether the email was delivered, whether it was flagged as junk, or was blocked entirely. Results will also show an indication of why any problems are taking place, which gives you a good indication of where to look in order to fix any discovered problems.


The report will show a number of ISPs, the time of receiving emails (some ISPs will throttle suspect emails), and the percentage of emails that are delivered, missing, or flagged as spam.


All three types of tests are worth running a few times each month or before any major campaign in order to understand whether there will be any issues that can be easily avoided.

Note that the tests may take up to 2 hours to return results as they are actually sending emails and retrieving results from a variety of system, each of which may have delays, so give yourself time for the results to be delivered.

Thursday, July 9, 2009

Optimizing your Marketing Automation - Batch Mode and Chained Programs


When looking at your marketing automation programs, they can be run in a few different modes in order to better optimize the speed with which they are processed. We spoke about this earlier in discussions of batch mode and Program Builder optimization. In a real environment, however, you may have a few different programs working together.

For example, in moving contacts from a web form to your CRM system, you may want to ensure they are cleansed and normalized in a contact washing machine, scored, and then updated in your CRM system. Perhaps you have a data quality program such as a contact washing machine, a lead scoring program, and a CRM update program to manage some non-standard approaches you use in your CRM implementation.

These programs generally are run in batch mode in order to ensure that they are processed end-to-end in one run. However, if you have a sequence of a few marketing automation programs which are chained together, the worry is that each program might be processed end-to-end, but then the subsequent program execution may not execute immediately, and may have to wait for the next execution cycle.

This can easily be resolved in Eloqua. When you set a marketing automation program to run in batch mode, you are presented with a screen that shows the order in which the programs are executed. By clicking on any program in this list, you can select the order in which it is executed.

If you have three programs, A, B, and C, which must process your contacts in sequence, use this interface to ensure that these three programs do execute in sequence. Rather than needing to wait for a subsequent cycle, each program is executed, in sequence, within one batch mode cycle, and your contacts are processed through all three programs at once.

This quick update will ensure that your contacts move from your web forms to your CRM system as quickly as possible, while still allowing you to maintain separate, very manageable programs that can work together seamlessly.

Tuesday, July 7, 2009

Marketing Automation and Restricting Send Times


Whereas I think that the idea that you can achieve major gains in undifferentiated email marketing through time-of-day email sending has been overhyped by the industry, I do think that there are specific situations where careful selection of the time a communication is sent can be of value.


There are two general scenarios in which it makes sense:


- if it is best that it arrives to the sender within a specific time window


- if it is best that it appears it was sent within a specific time window


Email, by its nature, is an asynchronous medium that generally does not "interrupt" the recipient, so the recipient is able to work through the emails they have received at a time that is convenient to them. However, other media type, such as recorded voice and SMS (text messaging) are media types that do interrupt the recipient.


In using those media types within a marketing automation system, you'll want to restrict when they can be sent. Likely, you'll restrict them to business hours. When setting communications up in Program Builder, it's quite easy to define when they can be executed.


On the Edit Action page, there is a selection to "Run action at all times". If you set this to "No", you are then presented with a menu of options. You can select the timezone you would like to use to define the execution times, and then a schedule for when the communication can be sent.


The second situation in which you might want to use this technique to manage when a communication is sent is if it is important that it be seen as having been sent at a particular time. The most common situation in which this is relevant is when you are sending an email on behalf of a sales person. This technique can be very powerful in terms of generating response from prospects, but you will want to ensure that the email is sent in daylight hours unless your sales team has a well established reputation for burning the midnight oil.


Although the email industry has overhyped the relevance of time-of-day on results for undifferentiated email, in a marketing automation context, being able to control time of sending can be very relevant in situations where the media type being used should only be received in daytime hours, or in situations where you want the communication to be seen as being sent in daytime hours.

Thursday, July 2, 2009

Creatively using SMS/Text Messages with Marketing Automation


Multi-channel marketing can be an excellent way to gain a stronger connecting with an audience. By moving outside of the normal realm of email communication, or emphasizing a message with a combined campaign, the effectiveness of a message can be significantly increased. SMS messaging can be an effective part of this strategy in certain circumstances.
For online events such as webinars, an SMS channel can provide a near-real-time reminder of the event’s start, upping participation rates among existing registrants. For face to face events, such as tradeshows, an SMS campaign can be used in order to drive booth traffic, especially when tied in with a contest for a booth prize of significant interest (perhaps through providing a code each hour that can be used to re-enter a booth draw).

Tying in SMS campaigns within Eloqua is easy. The general structure is very similar to the use of voice messages for marketing reminders that we discussed a while ago. In the Communicate->SMS area, create a new SMS call. Within the call, you can specify the text of the outbound SMS message and the sender number. Note that you can use similar field merge techniques to what you would use in email to insert first names, last names, company names, or any other key data point.

With the SMS call created, you can then either use the call in a batch, by defining a distribution list, and sending to that distribution list, or you can insert the call within a marketing automation program. If used in a marketing automation program, as contacts flow to the step, they will be automatically sent an SMS message. Used this way, SMS messages can be delivered automatically, in the hour or two leading up to an event.

Many B2B marketing organizations are unlikely to find that SMS is a core part of their go to market plan, but used selectively and creatively, it can add tremendously to an existing campaign.