Showing posts with label Data Quality. Show all posts

Monday, December 20, 2010

Junk Scan - look for bad form data


Anyone who has put up a web form has suffered from bad form data. We all know what it looks like, "aaaaa", "test@test.com", "1@1.com", "asdf", "mickey mouse", "donald duck", "555-1212", the list goes on.

Sure, one option is to only provide access to an asset after sending a person a link, in order to ensure that the email address is valid, but there are many situations where you don't want to (or can't) add in this secondary step. Generally, these are real people submitting the form, so the various tools to prevent bots and spammers are of no use either.

However, having this data in your marketing database does no good either. With it there, your analytics will show incorrect results, segments might pull in bad data, and any of this data that gets passed to sales will immediately decrease marketing's credibility.

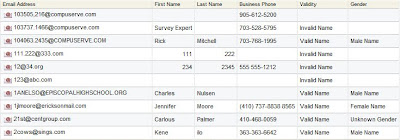
Now, to solve this problem, we have a Cloud Connector that does a "junk scan" on your data to look for the typical problems that are seen. It scans first name, full name, email address, and phone number looking for data that is known to be bad or looks suspect, and flags the record in your Eloqua marketing database.

To get started, you’ll need the Cloud Connector installed in your Eloqua instance. This is very easy to do, see the recent post on Cloud Connector Installation instructions for how to add a new Cloud Connector to your install. The Cloud Connector we’ll be looking at here is available on Black Starfish, our repository of interesting connectors. Go to cloudconnectors.eloqua.com and create an account. Under Contact Data, you'll find Name Analyzer - that's the connector to install.
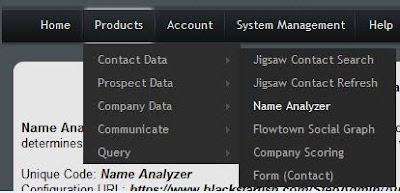


With the name analyzer cloud connector installed, all you need to do is create a step in your marketing automation program - after a web form is submitted, as part of your contact washing machine, or when you analyze your contact data and detect data quality issues. This step will take in contacts, and then the cloud connector will flag them as valid, invalid, or unknown (in a specific field in the contact data), and will also, as a bonus, flag their gender (useful for geographies like Germany where gender is important in building a salutation).


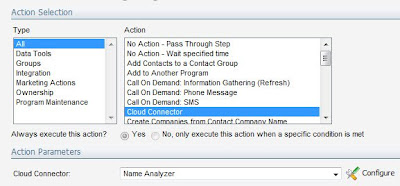
For the step, select "Cloud Connector" as your step type, and you will see a drop-down list of options below. You'll see the "Name Analyzer" cloud connector you just installed via the setup interface in this list. Choose that, and click the "Configure" button to begin setting up the step.


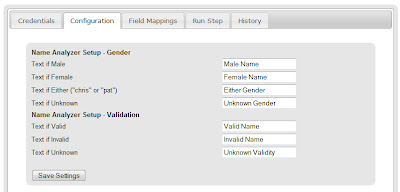
The popup window gives you your configuration options, the majority of which are how you want to flag the contact. You can choose what text you want to mark each contact with for a) gender, and b) validity. For gender, remember that there is an option for first names that could be either gender (ie, "Chris" or "Pat").


Click save on that screen and move to the field mapping tab. As inputs, it will take first name, last name, email address, and phone number, and as outputs, it will write the text you just selected to fields for gender and validity.
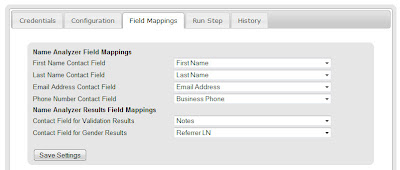


You're now ready to go. The validity analyzer looks at the following to figure out whether a person's contact information is valid:

- First Name: to understand if the name is known to exist (by cross-referencing against a database of known names

- Full Name: looking for known bad names ("mickey mouse" or "donald duck" where the first name may be valid itself ("mickey" or "donald")

- Email Domain: looking for @test.com or @1.com

- Email Name: looking for aaa@ or 111@ as invalid email names

- Phone Number: looking for numbers that are too short, all the same number (11111, 22222), or known to be bad (555-1212)

On the "Run Step" tab, you can run the step manually to pull in a few members from the step, and see what the results are, or, if you go to the "Credentials" tab, you can check off "Enable Step" and have the step run automatically.
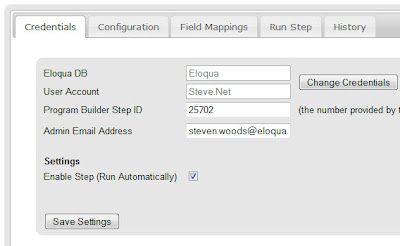


And that's it, you're done. Now, the contacts that flow through the step will be marked with validity and gender.


Looking forward to your feedback on this. Is this catching and flagging the right garbage names that are input? What other factors do you look for when you're looking at your names manually?

Tuesday, April 20, 2010

Closing the Loop on Paid Search


Guest post from Elle Woulfe, Senior Marketing Programs Manager at Eloqua. Elle is one of the people responsible for our own internal use of Eloqua to optimize our marketing, and in this post, she looks at how we approach our investments in paid search marketing.


========================

Paid search ranks high on the list of marketing tactics for most B2B companies, but many marketers lack the ability to close the loop on search generated inquiries. Tying clicks to revenue in order to understand the business impact of SEM allows you to optimize spend and improve ROI.

Like most technology companies, Eloqua depends on both paid and natural search to find those buyers in the early stages of researching marketing automation vendors. We use a disciplined system of testing and optimization throughout our search program to produce the best results. But knowing which keywords generated the most inquires isn’t enough. We rely on Eloqua to track SEM leads from first click to close, generating a complete view of the revenue impact and the ROI of our search program.

For paid search, we treat each landing page and its associated keywords, as a campaign. When a visitor searches Google for a term related to marketing automation, like “lead scoring,” and clicks on one of our paid search terms, they land on an Eloqua landing page with a relevant offer for that term. When a user completes the form on the search landing page they are associated with that campaign in Eloqua. Now we can easily track the impact that search has on our sales funnel, but before that happens - our standard lead management process kicks in.

Clean Data Makes Happy Marketers

Eloqua’s automated data cleansing, lead scoring and routing processes are initiated once a prospect submits a form. In order to use our data for segmentation and targeting, lead scoring and analysis, we need an accurate dataset. When a contact enters our database it first goes through the contact washing machine. In this process, contact data is normalized and appended and the contact is associated to an account where possible. The contact is then scored based on fit and behavior and finally, this new data is synced to our CRM system, updating the relevant fields to give sales an accurate picture of prospect activity.

The contact’s most recent search term, as well as any other activities the prospect has taken is displayed in the CRM system so sales as a real-time view into prospect activity and interest.


How We Close the Loop

• A contact is associated to a search campaign when they complete the form. Now, as they engage with other Eloqua assets or campaigns, those interactions are associated to the contact as well, providing a complete picture of all the marketing activities that influence them.

• Eloqua campaign reporting automatically pulls opportunity, lead rank and revenue information associated to the contact and captured in our CRM back into Eloqua so we have a single view of search marketing success metrics and the impact of search influenced leads on the sales funnel.

• If a deal closes with the account our search lead is associated to, the search campaign is tracked as having influenced the prospect. The total deal size is automatically divided by all the campaigns that touched all the contacts associated to the account and the search campaign gets its cut. If multiple people at the account were influenced by search campaigns, all of those touch points are counted as influencing campaigns and get their fair share.

• In the event that our search campaign was the last touch point before a sales opportunity was opened with the account – the search campaign becomes the lead source directly attributed to that deal.

Picking the Winners

By setting up campaigns for each search landing page, we can easily see how each page is performing in terms of the number of inquires generated and follow the trail to see the impact on revenue. With the data pulled in from CRM, we can also see what stage of the funnel each lead is at and can quantify the impact each landing page (and associated keywords) have had on revenue generated. This holistic approach to tracking our search marketing performance makes it easy to pick the winners of our search campaign and calculate the return on our investment in paid search.

Friday, March 12, 2010

Reporting on sparkly clean data


(guest post from Mike MacFarlane @eloquamike)

===================================

In the year and a half that I have been working in Eloqua’s Marketing Operations team, one of the things that I have realized is that Marketing Automation is more than just “deploying an email”. Actually, it is much more than that.

Using Eloqua to really drive the alignment between our sales and marketing teams, I've realized how valuable it is to have absolute accuracy on any reports. This means, sometimes, I want to run a little bit of a cleanup routine on data before I report on it, rather than just running the out-of-the-box reports.

For our own team, this approach had started off a while back with managing how data came into our database and what we did with it once it entered. Enter the “Contact Washing Machine” – a program that I built within our own instance of Eloqua that helps to standardize and normalize key data that we segment and report off of. Once we were able to align our data, it opened up a world of possibilities in terms of the depth of reporting I could do (as well as how easily I could pull reports).

We wanted this confidence in the data to carry over to all our reporting, and I want to show you how we achieved that when we were building what we call our Activity Dashboard (there is lots of information in Eloqua’s Customer Central on how to build out your dashboard). The primary purpose of this dashboard was the help visualize exactly what was happening in our database – everything from total inquiries, inquiries by segment, inquiries by normalized title… the list goes on and on!

To get the ball rolling on this process, I created a very simple program in Program Builder which would help me to bucket active prospects into one group. We have various definitions of what an inquiry is, but for simplicities sake, I am going to define my inquiry as a form submission.

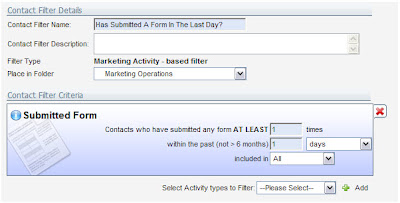
Step 1: I built an Activity Based Filter that evaluates any and all form submissions within the last day. This lets me get started with the set of data I'm interested in having a sparkly clean report on:


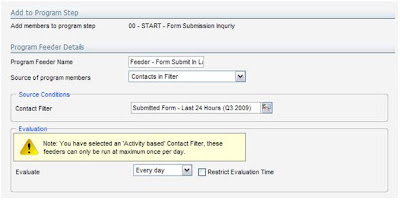
Step 2: I took my filter and added it as a feeder to my program (*note that activity filters only evaluate once a day). This technique lets me work with the data before I see it in a report, rather than use the out-of-the-box forms reports:


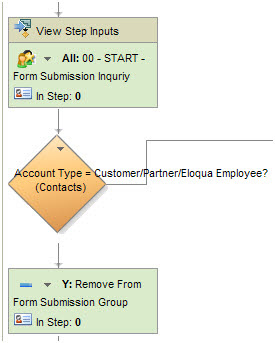
Step 3: The same step where I have my feeder setup, I also have a step action to add these people to a contact group. I'm going to report on the contact group members, rather than directly on the form submissions, so it allows me to do a little bit of data cleanup first:


You will notice above that after I add these people to a contact group, I evaluate to see if they are a current customer or partner of Eloqua – if they are, I remove them from the contact group that placed them in originally. The purpose of this is because I strictly want to evaluate inquiries from prospects. Any other cleanup and massaging of the data that you want to do before you report on it can be done here in this program. I'll just show this one cleanup step of removing customers and partner, but you can extend and elaborate.

Step 4: Once you have your contact group setup, you can start to build out all kinds of reports to place on your dashboard. For example, if you wanted to have a report that showed your inquiries by title, you could use the report called “Contact Field Values By Contact Group”. Simply select the title field in your database (or in our case at Eloqua, we use our Normalized Title field which is part of our Contact Washing Machine) and the contact group that is referenced within your activity program and run the report. The output looks something like this:


Steps 5: Next, you will want to add this report to your dashboard:


Your end result will look something like this - a very similar report to what you would have had out of the box, but now sparkly clean:


There are many other reports that you can add to your dashboard by simply utilizing this one, dynamic contact group so feel free to check out the Report Console within Eloqua. I would love to hear your feedback about how you are utilizing dashboards within Eloqua to help provide visibility on your marketing efforts, so feel free to leave your comments below.

Happy Marketing!

Thursday, January 7, 2010

Hexaware's Data Washing Machine


Today's Eloqua Artisan post is a a second guest post from colleague and friend, Amit Varshneya. In this post, he looks at a topic we've touched on very generally - the contact data washing machine - and shows specifically how he has configured it for his company, Hexaware. As part of his contact washing machine, he also uses a third party service provider to perform some manual steps, which adds an interesting dimension to the process.

Amit is VP, Marketing at Hexaware Technologies (http://www.hexaware.com). In this role he oversees the company's marketing initiatives globally to create a preference and demand for Hexaware's service offerings. Amit is the driver and evangelist of the sales marketing funnel measurement process at Hexaware and is a passionate champion of Eloqua.

====================

Aah! The unmistakably fresh scent of neatly scrubbed data!

It’s an accepted fact that data management is an important requirement to be able to run proper segmenting and targeting for marketing campaigns - unclean data reduces the effectiveness of marketing campaigns. Recognizing this, and taking cue from Steve Woods’ concept of the Data Washing Machine, the marketing organization at Hexaware took a comprehensive approach to cleaning our data and then keeping it clean. And what a difference that has made! We have improved:

• Our ability to reach prospects with highly targeted campaigns
• Our time to put together these customized campaigns
• Our relationship with our sales teams

What is clean data? Chris Petko explains this very well in his vlog post with the 3C framework – clean data needs to be Consistent, Complete, Correct.

The Hexaware Data Washing Machine is a mix of automated and manual steps (well, you do need to give the cuffs and collars some extra attention!) that ensures that our data is Consistent, Complete and Correct. Let me share briefly how we did this:


  • Identified a list of required mandatory fields – we laid a scope for ourselves; what fields do we absolutely need for good segmenting? These fields need to be filled in; no matter what the source of data – form submittals, list uploads, CRM integration - these fields need to be complete. Once this is done, it becomes a lot easier to measure “completeness”.

  • Decided on a standard list of values for some of these fields - Industry, Country, Salutation, lead source etc. These fields can have only one of the standard values. We then published these. (When Marketing Managers request segment lists, campaigns or reports they can check off the published values they need). Consistency

  • Data Templates with these required mandatory fields and standardized values were also defined and published – this helped guide all incoming data uploads, as well as form creation and CRM integration activities. Consistency.

  • We then put in place an automated Program that helps us manage completeness and correctness of data. This program runs on the 4th of every month and does the following:

    • Identifies data modified or added in the last month

    • Isolates into a bucket all incomplete data. This was a more important step for the very first time; now this step helps us identify any faulty imports and take corrective action.

    • Isolates competitors and ISP emails (we only correspond with corporate email addresses). This helps us keep our data fresh and relevant. These records are deleted from the database.

    • Isolates bouncebacks. These records are deleted after a check for obvious typos.

    • Isolates unsubscriptions. No action is taken on these records – however this is reported to indicate overall health of the database.

  • Once this program successfully runs, these buckets are handed over to our dedicated data desk. The data desk is manned by trained data experts and has been setup in our offshore BPO subsidiary – CaliberPoint (CaliberPoint specializes in data management processes and being an India based offshore setup, affords us significant cost savings). This data desk does the following:

    • Scans through records for any data consistency issues (like where the data is all Uppercase, or where conversational name of company is not being used. This can be a substantial challenge for personalization)

    • Scans through email bounceback records for typos (eg. Any email addresses that have a comma (“,”) etc)

    • Scans and identifies any bad/dummy data (Mickey Mouse records, asdfs, abcs, etc)

    • Scans through any incomplete records (as mentioned earlier the numbers in this bucket have progressively reduced in every run as expected)


This washing machine has been in place the last 5 months and in that time has tremendously improved our segmenting and targeting capability and effectiveness. We’re still learning and making adjustments to it along the way. If you have any suggestions, I would love to hear them. Thanks!

Monday, October 12, 2009

Easily Offending Most of the World - Data Validation Errors


I'm a huge fan of clean data, anyone who has read this blog for long knows that. However, clean data can never trump customer experience. Many times, simple tactics that you use to manage your incoming data can have large and unintended consequences.

The example that prompted this post was a Zip Code validator on a web form. The form did not specify country, and it was for the download of a whitepaper, so it was not something that seemed likely to be restricted to only viewers from the United States. However, the Zip Code field had a validation javascript on it, and required a Zip Code that was correct according to US standards.

I'm from Canada, and we have Postal Codes that use numbers and letters in a A9A 9A9 format, so clearly this did not pass the test, and I received an error alert. I dashed off a quick note to the site owner, and then filled in the only Zip Code I have top of mind - 90210.

This is an interesting example, as it highlights a mis-match between the user experience on that web form, and the quality of the data. Bringing the data management in house into an inline data management process like a contact washing machine is usually the best bet, while minimizing the burden placed on web form visitors. For address information, using address validation to balance the user experience can often be better than restrictive forms.

In thinking about the experience of your landing page visitors, be sure to balance the need for quality data with the need to deliver a great experience to your visitors.


Thursday, September 3, 2009

Check-box Confirmations and Web Forms


Today's post on Artisan is another guest post, this time from Ben McPhee, on our Product Management team. Ben is most well known for his recent work on Prospect Profiler, one of our keys to sales enablement, but he is also responsible for our work with the sports marketing vertical where we work with a number of professional sports teams, arenas, and racing facilities.


Ben's work in this area leads to him bringing some interesting requirements to the table, and gives him some unique experiences that are of value to a broader set of marketers. In today's post, he explores the use of validation rules to ensure that a visitor has checked a check-box on a form that indicates that they are of a certain age, or have read the terms and conditions. This is a useful technique for many marketing situations.


=================================


Do you require visitors to agree to particular terms and conditions before you can accept the data they are providing through a form? Do you require a checkbox to be checked before accepting a form submission? Well, you don't need to be an HTML or JavaScript expert to set this up in your Eloqua forms.


Check out the simple instructions below to show you how to do this yourself!


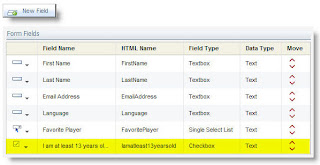
First, add the checkbox field to your form. From the Fields menu on the form, you can list the fields in your form, or add a new field. If this is a form hosted within Eloqua, you'll need to add the field, if it is hosted on your site you will have already captured the field.

For this example, we'll look at a Checkbox field type, but the same techniques can be used on any type of field.


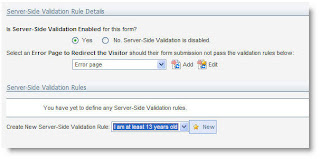
Next, go to the Form menu and select "Edit Server Validation" to edit your server-site validation (the process that runs after the submission of your form to ensure that people have filled in the information you require).


You can set the rules to validate against, the fields to validate, and the error pages to display if the field is incorrect.

To set up validation, first select an Error Page that will be presented to submittors if the info they have provided DOES NOT meet the requirements you set. When you have done this, select the field to validate (the checkbox field you added to your form) and create a NEW validation rule.


You'll be looking for the value submitted by the checkbox field to be "on", so select "Field value in Data Set" as your Validation Type - this is essentially saying, "I'd like to validate that the checkbox has been checked by comparing what is submitted to a list of acceptable submissions".

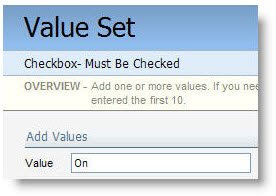
Selecting this give you options below that you need to configure to define exactly what the form validation should be looking for. Go to the "Form Field Validation Parameters" area of the page to define that list of acceptable submissions. To do this you will be creating a new Data Value Set and saying, "Do not accept a form submission unless the value submitted in this checkbox is in this Data Value Set".


Give your Value Set a name (in this example, "Checkbox- Must Be Checked", and then as your value, enter the value "On". The reason you are entering "On" is because by default, when a checkbox field in a form is checked, the system passes in a value of On or blank, depending on whether or not the box was checked.

With that validation set (of just one value - "On") created, you'll return to the previous page. Make sure that you have the "Set to the default value..." option Un-Checked so that your form submission is not altered.

And you're done! With this technique you can quickly ensure that no forms are submitted unless the right checkboxes are checked.

Thursday, August 27, 2009

Better Marketing Analysis Through Dynamic Filters


When you run a report within Eloqua, you will often want to understand a bit more about the data that you have within the report. Whereas you can easily export the data for secondary analysis in a tool like Excel, often the easiest thing to do is to dynamically filter the results of your report to get the view you want.

This is easy to do from most list reports (ie, a list of visitors, or a list of contacts).

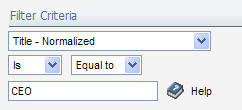
In the top menu, under Filter, select "Filter these contacts" and you will be presented with a window that lets you define a filter. That filter is applied dynamically to the report you are looking at, letting you quickly see a subset of your data.

For example, if you had a list of contacts who had submitted a web form for a download, and wanted to understand how effective that marketing campaign had been at targeting CEOs, you might add a filter for "Title = CEO". Note, however, that the need for a contact washing machine becomes very clear in doing this. If we have not managed the data quality of our incoming title data, it will be hard to define a good filter. However, if the data has been standardized and normalized, we can work with a normalized Title field that can be easily filtered.

With the "CEO" filter layered on to our results, we can quickly see whether the campaign has been effective at generating responses from top execs. The filters can be quickly and easily removed or changed, which lets you work with any list report to get a better sense for the data it contains.

Dynamic filters on reports are a quick but powerful tool for getting better insights out of your marketing data.


Thursday, August 20, 2009

Address Validation and the User Experience


It’s challenging to optimize the forms on your landing pages to make sure that you maximize both your conversion rate and the quality of the data flowing into your marketing database. The more fields we require, the worse our conversion rates are.

Similarly, performing inline validation on form data that prevents a submit can be very dangerous if done incorrectly as it will prevent submissions or frustrate visitors. One area that offers great promise to optimize is in the realm of address correction. If you are collecting physical addresses, either to use for direct mail marketing or for management of sales territories, you want the addresses to be correct.

However, we have all had experiences with websites that attempt to force an inline correction of our address and end up frustrating us as visitors.

Luckily, there is an approach that balances data quality with customer experience. Using a built-in function within your marketing automation programs, you can leverage Pitney Bowes global address standards database to automatically correct your addresses. This allows you to let visitors to your website experience a very flexible free-form approach to entering their addresses, but allows you to quickly correct those addresses to ensure that your data is very accurate.

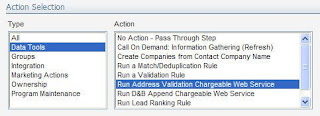
To do this, from your marketing automation program, create a step that is an "Address Correction" step, into which your contacts, prospects, or companies will flow. The action, available under the "Data Tools" set, is "Run Address Validation". Note that this is a paid service, but the per-hit fee is very reasonable.

Within the program builder step, that is all you need to configure. However, if you want to configure the fields that are sent/returned for correction, you can configure them in the Setup area.

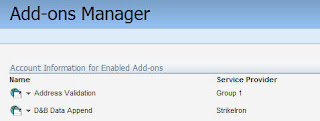
Go to Setup->Management->System Management->Add-on Manager to manage the address validation add-on.

Select the Address Validation add-on.

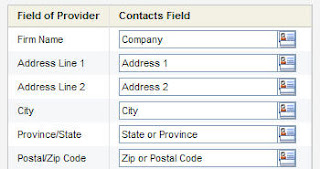
Within the setup interface for the Address Validation add-on, you will see a Task menu in the upper right corner, under Tasks, select Set Field Mappings.


This then gives you the mapping interface for the set of fields that are sent out to the address validation service and returned in a corrected manner. Select the fields from your own marketing database that you would like to use, or use the defaults that are already set.


If you use an address validation service, rather than forcing the user to wrestle with an inline validation, you allow the 5% of new or unknown addresses to pass through without causing user frustration.

Tuesday, August 18, 2009

Insights on Data Quality from Contact Group Dashboards


Understanding your data is one of the most critical things to do as a marketer. Data is a foundation for everything you do; lead scoring, segment definition, content personalization, lead routing, and marketing analysis. Without good data, each of those tasks will be challenging if not impossible.

One of the most powerful tools in understanding your data is the contact group. It lets you build almost any cut of data that you want. Most simply, this can be done with simple group overlap rules that show people who are in group A, but not group B for example.

A slightly more advanced technique is to combine groups and filters to perform robust group manipulation to create a combination of activity and data as a driver for a group definition. This process can be further automated using a marketing automation program to dynamically create a dashboard based on group membership.

With each of these techniques, you are provided with a one-click dashboard of the group. By selecting "Contact Group Dashboard" from the menu, you get a full suite of interesting reports showing you what is happening with that group and the contacts in it.

One of the most interesting reports in this dashboard is the Contact Field Completeness report. This report shows you, based on a view, how complete the fields are in contacts within that group. Each field is shown as being between 0 and 100% complete, giving you good insight into whether you have data to work with for the set of contacts in your group.

However, more interesting than this, is the results you get by clicking on a field of interest. For example, if we click on the "Title" field (98.2% complete), we can see that the data within that field is from a manual text field as it is obviously free form.

A quick look at this data gives you a good sense of whether it is of sufficient quality to build rules upon.

Using this dashboard to quickly understand your data gives you a very quick sense of where you are at and what areas you need to work on in terms of data quality.

Armed with this understanding, you can quickly tune your contact washing machine to best optmize the data that you have and the data that you need. With cleansed and normalized data, building segmentation rules, lead scoring rules, content personalization rules, and marketing analysis becomes significantly easier.


Tuesday, July 28, 2009

Optimizing your Marketing Automation: Tips from the Guru


This week's post is a guest post from Andrea Corey, our VP of Systems Architecture, and the guru of Program Builder optimization. She and her team are responsible for all the scale and speed initiatives behind Eloqua's architecture, and were the key folks behind the work that was highlighted in the recent Dell case study on Eloqua's marketing automation platform performing at one billion transactions per day.


In this post, Andrea offers a number of great tips on how to think about your programs so that they operate as smoothly as you need.
Enjoy,

Steve


====================================


Program Builder offers two main processing modes: Regular mode and Batch mode. Each can be effective at enabling many Marketing Automation needs; what follows are some helpful explanations and suggestions for optimizing your programs.

Regular mode, the default mode, is ideal for lead nurturing, free trial follow-ups, event follow-up and similar processes where you wish to send out communications or evaluate contacts over the course of a period of time. Regular mode programs process program members at 15-minute increments. In case you are new to Program Builder, this means that every 15 minutes, program members will move from one step to the following step in the program (assuming they are not waiting in a step due to a time-based rule).


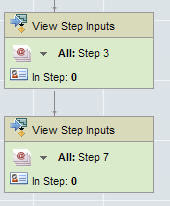
Whether there are one or more decision rules between the two steps, all decision rules are evaluated in sequence in the same cycle. Therefore, to optimize your programs, you may wish to employ decision rules in sequences, rather than placing steps between the decision rules.
You will also want to avoid “empty steps” such as the first step in the program – many new users don’t realize that the first step in a program can in fact perform an action.

Now you’re wondering how to avoid that first empty step if your first operation is to run a decision rule in order to branch the records… A tip to consider is to have your members enter the program at different steps – based on what you know about the records when you add them to the program. For example, if your members are flowing into the program from a form, consider multiple conditional steps that push members into specific program steps.
Alternatively, you can establish several feeders, instead of just one, in order to optimize where the members start in the program. These are advanced configurations, and may require extra planning and design consideration, but they can be useful for decreasing the time it takes to run your automated processes.

If you find that program members are taking longer than you would like to progress through to the end of your program, you may want to consider doing your marketing automation in Batch mode. Batch mode is often suitable for lengthy or complex workflows and for bulk data processing such as data normalization. In this mode, members are fully processed from the start of a program through to the end of the program every two hours.
Even better, you can prioritize Batch mode automation programs such that they are evaluated in a specific sequence. Some customers have set-up several programs sequenced in batch mode – very complex and granular lead scoring, lead rating, lead assignment programs that are modular, yet process this entire set of processing every two hours. You can see how this enables far more complex logic to be efficiently leveraged.


I must add a disclaimer regarding Batch mode. When running in Batch mode, marketing automation programs do not maintain the detailed step-by-step history that can be useful when initially building and testing programs, so I recommend that you enable Batch mode once you are satisfied with your program’s configuration.

I’d love to hear feedback on how we can improve Program Builder to make you more effective in your marketing automation.

Tuesday, February 3, 2009

Sanity Checks and Data Profiling


If you're doing almost anything in marketing, you need good data. Lead scoring, lead routing, personalization, segmentation, and many other processes are only as good as the underlying data. Profiling what you have in terms of data is the first step, as it tells you whether you need to cleanse your data. It may also tell you that your underlying data will not give you the insight you need to execute your scoring or segmentation strategy as you had intended.


The quick and easy way to profile your data is to get a sense of what is in each field. You can do this from any Contact, Prospect or Company Group, and it gives you an overall sense of the consistency and quality of your data.


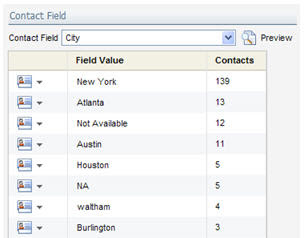
First, create a group that contains the people you are interested in working with (one technique for defining group membership using overlap is talked about here: http://eloqua.blogspot.com/2008/12/defining-segments-using-group-overlap.html). From there, use the "Field Summary" option in the top menu. This brings up a window where you can choose the field that you wish to profile.


You can profile any field in your data model, and you will see a result that shows the values in that field and the frequency (ie number of contacts) in which that value appears.


Note that you will only be able to profile fields where there is some consistency of data - if there are over 1000 different distinct values, this method will not work.


It's a great habit to get into to do a quick sanity check of your data any time you build a process that relies on it. Data quality is a key foundation for many marketing processes and strategies, and the more you focus on it, the more you will build in processes to ensure that data quality remains high.


If you find that data profiling highlights some data issues, you might find the following useful; a common strategy that many marketers employ in handling their data quality is the Contact Washing Machine described here: http://digitalbodylanguage.blogspot.com/2008/12/contact-washing-machine.html


Friday, January 2, 2009

Eliminating form spam with a quick Captcha


An annoying thing about most forms that make their way onto the web is that they get discovered by automated spam robots that submit their garbage information, and in doing so, invalidate your numbers, and give you extra cleanup effort in order to ensure that only clean data enters your databases.

Luckily there's a quick and easy way to fix that - you have probably seen it if you've ever commented on a blog or signed up for an account on any free service. It's called a CAPTCHA - an acronym for "Completely Automated Public Turing test to tell Computers and Humans Apart.", and in it's most common form, it uses a randomly generated image of a word or letter sequence that you have to type in in order to allow your form to be submitted.

On many less critical sites, it is also done with a simple human-readable request, and verification of that against the known correct answer. Many blog sites like Marketing Profs Daily Fix(http://www.mpdailyfix.com/) and Six Pixels of Separation (www.twistimage.com/blog) use this technique successfully.

There's a simple and easy way to do this with Eloqua, and while it won't prevent form spam from someone who exerts significant effort on your specific web form, it's quick and easy and will prevent almost all form spam from bots that discover your form by trawling the web.

First, create a text field on your form, called Captcha Field, where you will ask a user to submit a word, or the answer to a question.

Then, from the top menu, add server side validation to the form by choosing "Edit Server Validation". We will be verifying that the submitted answer to the Captcha question matches the correct answer, and this should only be the case if it is a human, not a spam bot, submitting the form.

We'll use server side validation (after the form is submitted) as most spam bots will bypass any of the javascript client side validation that one can use (before the form is submitted).

Add a new validation rule on the Captcha field, and make that validation rule of the "Field Value in Data Set" type. This will verify that the value submitted is part of a set of acceptable values, although in our case, the "set" of values is likely to only contain one value. However, if you think that the human-readable question might have more than one possible way of phrasing the answer, you might want to add both (ie, if you ask "what is 2 + 2", you might want to add "four" and "4" as possible answers.

The validation parameters have an option for setting the value to a correct value if it is not correct, but we will not enable that as that would correct the spam bot's answers and allow them through, defeating the purpose.

Create a new Data Set called Captcha Values, and in that set, add in your accepted answers. In our case, if we have the instruction on the form say "type in the word 'notaspammer'", we would add "notaspammer" to our correct value list. You can use words, answers to simple questions or very simple (2 + 2) math questions. Remember that you're only able to stump automated form trawlers, not dedicated efforts with this technique, so keep it simple.

Add the field to your form layout, and instead of the normal field name, type in your Captch question. Next, configure a message that alerts them that the field was not correctly filled out in the case of an error, and you will have a basic Captcha for your form.

I look forward to your comments on this technique, what has worked, what hasn't, and what percentage of spam bots you have found this to resolve.