Showing posts with label Event marketing. Show all posts

Tuesday, April 12, 2011

Cvent Integration with Marketing Automation


As the leading event management platform, Cvent serves the needs of event marketers everywhere. Many marketers work with both Eloqua and Cvent; Eloqua marketing programs providing the drive to compel attendees to register, and Cvent managing the event attendance, payments, and logistics.

What is needed, however, is a way to immediately know, within Eloqua, when a person registers for the event in Cvent. This is critical as you will want the marketing automation programs that you are using to drive event attendance to cater themselves to the fact that the person has already registered.

To do this now is easy, as there is an Eloqua/Cvent connector that automatically feeds registrants from Cvent into Eloqua and places them within a contact group. From there, they can be fed into a marketing automation program, used for analysis, or used as a reference in any follow-on communications.

To get started, go to Feeder -> Cvent Registrant Feeder within cloudconnectors.eloqua.com . Feeders do not require a Program Builder step as they just run on their own and feed data directly into Eloqua.


Create a new Cvent Registrant Feeder step, supply your Eloqua credentials, and specify how often you want the Feeder to run. Usually once a day is sufficient.


In the configuration screen that appears next, add your Cvent account details. Note that this MUST be an API enabled account. Talk with your Cvent account rep if you do not have an API enabled account.

In enabling your API account the Cvent team will need to specify which IP addresses should be allowed. Have them enable the following ranges:

65.55.*.*
65.54.*.*
65.52.*.*
70.37.*.*
207.46.*.*
209.240.*.*


For those familar with CIDR notation, the precise ranges are as follows (note that 65.55.80.0/20 does NOT mean 65.55.80.0 to 65.55.80.20):

65.55.80.0/20
65.54.48.0/21
65.55.64.0/20
70.37.48.0/20
70.37.64.0/18
65.52.32.0/21
70.37.160.0/21
207.46.192.0/20
65.52.0.0/19
65.52.48.0/20
65.52.192.0/19
209.240.220.0/23


With an API account specified, hit Save to refresh the list of available events in Cvent, and select the event you are interested in pulling data for. Specify whether you want the bulk of the attendance information stored in the contact record or within a custom data object, and select a Contact Group to place the retrieved contacts into.


On the Field Mappings tab, specify the contact fields, or custom data object fields that should be used to store the information from Cvent. A wide variety of demographic, attendance, and participation information is retrieved.


With this set up, you can use the Run tab to test run your feeder. You will see within Eloqua, the people who registered for, and/or attended your event show up automatically.


To have this run automatically on the schedule you originally specified, go to the Credentials tab and select the Enable Step checkbox.


With this automated connection set up, you will be able to better cater your event marketing to what is happening with your Cvent registrations in real time. Please don't hesitate to provide feedback as you explore better ways to run your events now that Cvent and Eloqua can be seamlessly connected.

Monday, February 28, 2011

On24 and Eloqua Integration


For those who use On24 as your system for webinars or virtual events, you have probably quickly realized the need for deep integration between On24 as virtual event software, and Eloqua as marketing automation software, to market those events and follow up with registrants and attendees accordingly. The insight to be gained from understanding what a prospect did at a webinar is tremendous, as webinars generally show a wide range of attendance stats among those who register. Large percentages of people who register do not attend at all - often between 40 and 60% of registrants. Among those who do, some may drop off after 5 minutes while others may stay for the full hour. Knowing about this attendance difference is crucial in understanding how to follow up and how to score leads.

A prospect who registered but did not attend should be sent a “sorry we missed you” rather than a “thanks for attending” email, while a prospect who dropped off after only 5 minutes might respond well to a follow-up proposing a different set of topics that might be more appealing. Similarly, lengthy attendance combined with engagement such as asking and answering a number of questions is a great indicator of high interest and likely purchase intent.

Working with this insight, however, requires it to be present within Eloqua's marketing automation system. Only when it is, can lead nurturing and scoring can take advantage of it. Bringing this data in manually would require a tedious continual effort, which would test the patience of most marketers. Eloqua now has a cloud connector to enable this integration and bring the best digital body language insights from On24 into Eloqua. The On24 cloud connector allows three main usage scenarios (each can be used as individual steps within a marketing automation program as you design the promotion, reminder, and follow-up campaigns around your webinars):

- Register Attendee: Registers a contact who is in that step of a program with a specific event in On24.

- Query Attendance: Looks at each contact in that step of the program and queries On24to see if they attended the live or archived events and for how long, how many poll questions or surveys they answered, and how many questions they asked. All very interesting info for subsequent lead scoring or follow-up.

- All Attendees: Automatically pulls a list of all people who attended a particular On24 webinar and feeds them in to Eloqua as contacts and places them into a group (where of course they can be fed automatically into a program for follow-up nurturing). Again, for each attendee, the information captured is if they attended the live or archived events and for how long, how many poll questions or surveys they answered, and how many questions they asked.

To get started, you’ll need the Cloud Connector installed in your Eloqua instance. This is very easy to do, see the recent post on Cloud Connector Installation instructions for how to add a new Cloud Connector to your install. The Cloud Connector we’ll be looking at here is available on our repository of interesting connectors. Go to cloudconnectors.eloqua.com and create an account. Under Communication, you'll find On24: Register and On24: Query Attendance, while under Feeder, you’ll find On24: All Viewers – those are the connectors we’ll be working with, and the ones to install.

Once you have them installed, you can begin using them within your webinar invitation and management program. The cloud connector steps for On24 integration can be plugged into your marketing automation program at whatever points make sense, so be sure to whiteboard what you want to have happen and use the steps accordingly.

Likely, you’ll want to use a On24: Register step when the buyer has indicated that they are interested in attending, perhaps by clicking a link or submitting a form.

You’ll want to run the On24: Query step after the event has taken place to see who attended and for how long. That data can be used to guide prospects down unique follow-up paths depending on their behavior.


Now, for each step, you’ll need to configure the Cloud Connector to do what you need. Each connector is roughly the same, but with slightly different options, but once you have one figured out the rest will be simple. For the sake of simplicity, we’ll walk through the On24: Query step. Choose Cloud Connector as a step type, and pick On24 Query from the drop-down below (if you have installed the connector in your Eloqua instance as we discussed earlier). Click the Configure button to launch the configuration UI.

The connector will need to be configured with your On24 credentials, including the Event ID, Session ID, Client ID, and Key. These credentials must be obtained from On24 team when you ask them to enable the Eloqua integration feed on your On24 account.

A final setting is where you want to store the returned information, in the contact record or in a custom data object (data card). If you're running many events, you'll want to use custom data objects to keep a full history of attendance.

With that configured and saved, move to the field mappings tab, and choose the contact fields or custom data object fields that you want to read data from or write data to. Each data point returned (minutes attended live or archived, poll or survey questions answered, and questions asked) can be mapped to an individual field or left blank if you're not interested.

That's all that's needed to have full integration between your On24 webinars and your Eloqua marketing automation. You can go over to the Run Step tab to run the integration manually a few times to make sure it's all working. This shows you the results you will be pulling back into Eloqua or lets you manually run the step to check that it's all configured correctly.


When you're happy with the results, just go to the Credentials tab to click "Enable Step" to enable it to run automatically.


We'd love to hear your feedback on this connector, what can be improved, and what else you need it to do.

Tuesday, January 4, 2011

WebEx and Eloqua Integration - Webinars as source of Digital Body Language


Webinars are as much of a core element of most B2B marketer's day to day tactics as anything. They form a great vehicle for educating prospects on a deeper topic than might otherwise be possible, they allow a richer interaction with presenters, and they provide a great interim point to guide prospects towards that is less of a commitment than a purchase.

However, webinars generally show a wide range of attendance stats among those who register. Large percentages of people who register do not attend at all - often between 40 and 60% of registrants. Among those who do, some may drop off after 5 minutes while others may stay for the full hour. Knowing about this attendance difference is crucial in understanding how to follow up and how to score leads.

A prospect who registered but did not attend should be sent a “sorry we missed you” rather than a “thanks for attending” email, while a prospect who dropped off after only 5 minutes might respond well to a follow-up proposing a different set of topics that might be more appealing. Similarly, attendance for the majority of the webinar is indicative of very high engagement, and may be a good factor in lead scoring.

Historically, this has been difficult as this data would have to be brought in manually. Eloqua now has a cloud connector to change that – making us the first marketing automation platform with a seamless integration into WebEx. The WebEx cloud connector allows four main usage scenarios (each can be used as individual steps within a marketing automation program as you design the promotion, reminder, and follow-up campaigns around your webinars):

- Register Attendee: Registers a contact who is in that step of a program with a specific event in WebEx meeting center, training center, event center, or sales center.

- Unregister Attendee: Unregisters a contact who is in that step of a program from a specific event in WebEx meeting center, training center, event center, or sales center.

- Query Attendance: Looks at each contact in that step of the program and queries WebEx to see if they attended and for how long

- All Attendees: Automatically pulls a list of all people who attended a particular WebEx webinar and feeds them in to Eloqua as contacts and places them into a group (where of course they can be fed automatically into a program for follow-up nurturing)

To get started, you’ll need the Cloud Connector installed in your Eloqua instance. This is very easy to do, see the recent post on Cloud Connector Installation instructions for how to add a new Cloud Connector to your install. The Cloud Connector we’ll be looking at here is available on Black Starfish, our repository of interesting connectors. Go to cloudconnectors.eloqua.com and create an account. Under Communication, you'll find WebEx: Register, WebEx: Unregister, and WebEx: Query Attendance, while under Feeder, you’ll find WebEx: All Viewers – those are the connectors we’ll be working with, and the ones to install.


Once you have them installed, you can begin using them within your webinar invitation and management program. The cloud connector steps for WebEx integration can be plugged into your marketing automation program at whatever points make sense, so be sure to whiteboard what you want to have happen and use the steps accordingly.

Likely, you’ll want to use a WebEx: Register step when the buyer has indicated that they are interested in attending, perhaps by clicking a link or submitting a form.


You’ll want to run the WebEx: Query step after the event has taken place to see who attended and for how long. That data can be used to guide prospects down unique follow-up paths depending on their behavior.


Now, for each step, you’ll need to configure the Cloud Connector to do what you need. Each connector is roughly the same, but with slightly different options, but once you have one figured out the rest will be simple. For the sake of simplicity, we’ll walk through the WebEx: Query step. Choose Cloud Connector as a step type, and pick WebEx Query from the drop-down below (if you have installed the connector in your Eloqua instance as we discussed earlier). Click the Configure button to launch the configuration UI.


The connector will need to be configured with your WebEx credentials, the type of WebEx event (ie Meeting Center, Event Center, etc), and the Session ID (from the event details page in WebEx). You can also configure the Session ID to be pulled dynamically from the contact record if you're running a large number of events and want to manage this dynamically.

A final setting is where you want to store the returned information, in the contact record or in a custom data object (data card). If you're running many events, you'll want to use custom data objects to keep a full history of attendance.


With that configured and saved, move to the field mappings tab, and choose the contact fields or custom data object fields that you want to read data from or write data to.


That's all that's needed to have full integration between your WebEx webinars and your Eloqua marketing automation. You can go over to the Run Step tab to run the integration manually a few times to make sure it's all working, or just go to the Credentials tab to click "Enable Step" to enable it to run automatically.


We'd love to hear your feedback on this connector, what can be improved, and what else you need it to do.

Tuesday, August 10, 2010

How Event Automation Saved My Marriage


(guest post from Joe Gelata, of Sybase)

We’re all in the same boat - we need to run successful campaigns but we’re tight on time. It comes down to two choices; work around the clock building and managing campaigns or don’t run them at all. The former will put stress on your personal life and marriage while the latter will have you looking for a new job. Luckily, Eloqua offers us a third option: Automation!

I was recently tasked with building a registration system for a seminar series that had some ambitious requirements:

• Manage registration for 45 different seminar sessions in 12 cities across North America and Europe over the span of several weeks

• Support for communication in 3 languages

• Target email content to each contact (e.g. send 350+ unique emails)

• Schedule communications differently for each geographical region

• Prep leads for Sales so they have accurate data on each lead

To make it interesting we only had 1 ½ people and 2 ½ weeks to design, build, test, and launch the system. This was a challenge in itself but the real kicker was that we had next to no resources to manage the system once it was running. The only way to meet these challenges was to dig deep into our Eloqua toolbox and automate everything. Here’s how we did it and what we used...


Program Builder
Program Builder was our saving grace when it came to scheduling emails and preparing leads for sales. The former was done by segmenting our lists by geography. We used decision rules to determine if each contact was in a contact filter for each region. Once segmented they were sent to one of several programs that automated the sending of invitation emails based on the schedule for that particular region. Since each of the regional invitation programs was identical (with the exception of the email dates) we were able to build one and copy it for the rest making this a quick and easy process.


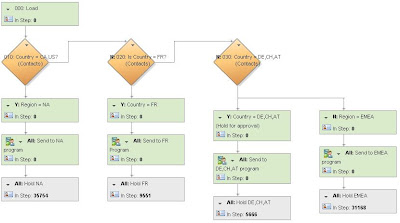
Preparing leads for sales was slightly more complex. Aside from a campaign, we wanted to tag the contacts with the city they registered for, the session they registered for, and their attendance status. This adds up to 96 different combinations of information. To automate this we used Program Builder, Contact Groups, and Update Rules. In a nutshell, the program:

• Accepted all contacts from the ESM (more on ESM later)

• Segmented the contacts based on their session using a Contact Filter

• Added a campaign association

• Added product information

• Grouped all contacts together again

• Segmented the contacts based on their attendance status using their membership in an ‘Attended Contacts’ group

• Added an “Attended” or “Did Not Attend” status

• Sent contacts to the CRM integration program

The only manual piece of the process was uploading our attendee lists. The rest was pure automation.

Activity Driven Content
Activity Driven Content (ADC) is perhaps the most underrated component in Eloqua. Not only is it extremely easy to use, but it can drastically cut the development time of your emails while helping you increase click-throughs, lower opt-out rates, and take your targeting to a level you never thought possible. This is the kind of automation that may actually put your marriage in jeopardy. You know what I’m talking about: “Honey, I did the coolest things with Eloqua today…” Unless you’re married to a marketer this conversation always end with someone falling asleep. It’s only cool to us!

With three languages and information on 45 different sessions, we had a lot of content to deliver to registrants. Our goal was to keep emails as short and to-the-point as possible. After all, no one wants to ready a 7’ email with information on 44 sessions they didn’t register for. Lucky for us, Eloqua offers Activity Driven Content which dynamically serves up content based on data in a contact record or data card. To do this you build ADC pieces which are essentially fragments of HTML for each version of content you will be sending. You then setup ADC Rules to determine which piece should be sent to each contact. For example, you can create the introductory paragraph of your email in multiple ADC fragments each in a different language. Next you can create an ADC Rule that looks up a contacts country and pulls the ADC in the appropriate language. The final step is to insert the ADC into your email. The email itself basically serves as a shell for the ADC:


When you send the email to a specific contact, the ADC is populated:


ADC is an extremely powerful tool. It did a great job customizing language and location info for this seminar series but the possibilities are endless. You can target content based on any standardized contact or data card field you have in your database. Industry, title, interest, buying stage, company size…the list goes on and on. Just think what it can do for your newsletters. And don’t forget to add in a personalized signature from your sales reps while you’re at it.

Event & Survey Manager
Event & Survey Manager (ESM) is a wonderful tool for managing multi-session events. It has three basic parts:

Registrant Info

This is the Data Card Set and its associated fields. It works with the individual Data Cards which store all of the registrant information collected on the form (form data can also be saved to contact records at the same time). Each Data Card is associated to a contact. The Data Card Set is a table separate from the contact table and can be used for events and surveys.

Event Details
These fields are specific to your event and can include date, time, location, session name, presenter, etc. Each session has its own record. Each Data Card will be associated to one of these sessions.

Event Actions
Think of this as program builder for events. You can do all the regular stuff such as send emails and add contacts to a program step. The big difference is Event Actions are triggered based on dates relative to the session date each contact has registered for. For example, where Program Builder can be setup to send an email to everyone on January 1st, Event Actions can send an email two days before the session a specific contact is registered for. It makes setup a dream and allows a customer centric email schedule.

For our seminar we created a Data Card Set with fields that matched those on our form, loaded info for all 45 sessions into the Event Details, and scheduled our emails in Event Actions. For example, a ‘Registration Confirmation’ email was sent each time a new contact was added to ESM, a ‘Seminar Reminder’ email was sent 5 days before their session, and they were added to our follow-up program one day after their event. Building this in Program Builder would have been a mammoth task. However, building it in ESM took 15 minutes of training and a few hours to setup. And of course, it required no management whatsoever.


Results

The major accomplishment with this project was simply that it was completed successfully. Given the scarce resources available to build and run registration, it was a huge challenge. However, automation allowed us to come out victorious. Throughout the process we were able to offer registrants completely customer centric communications – from the content to the delivery date. Even with very little management, this massive seminar series ran smoothly.

Beyond the event itself, building this system forced us to dive into new areas of Eloqua that we have never explored before. This learning experience has sparked new creative ideas on how to use these tools and address other problem areas we had previously written off.

Wednesday, December 2, 2009

Quick Tip: Auto-Shutoff on Marketing Automation Programs


Often, when setting up a marketing automation program, such as one that invites people to an event or webinar, you will know in advance when it needs to end. Perhaps three weeks after the event, when the final "thanks for attending" email has been sent out, you want to shut off the program. There's an easy way to do that with Eloqua.
On the main menu, select Program Details to see the overall settings for your program. About half way down the page there is a setting for "Automatically disable program on a specified date". Check the tick-box, and enter the date you are interested in having the program disabled on. That is all you need to do, and the program will be shut off on that date.


Although there is nothing terrible about having a program running beyond the date it's no longer needed, shutting them off keeps your system organized and makes it clear that the program is not currently being used for any marketing purposes.

Wednesday, November 11, 2009

Building a Tweetboard - Social Media at a Live Event


(Another guest post from Mike MacFarlane, who may be better known as @eloquamike)
===============================================

In the Eloqua community, we just celebrated our 2nd annual Eloqua Experience conference in San Francisco. It was an absolutely amazing event and one of the highlights was the conversation happening on Twitter.

In Steve’s previous post about creating social media buzz at an event, he mentioned something about our “Tweetboard” – a large screen showing a live stream of conversations happening on Twitter in relation to Eloqua Experience. We set this up primarily so that those who were at the conference could see that they was another conversation happening online.

Setting up a Tweetboard is really easy and can be by using a small snipit of code provided by a website called Hootsuite and Eloqua Hypersites (and maybe a little design instinct).

First, you need to create an account at http://www.hootsuite.com/. Once you have gone ahead and done that, you will be presented with a screen (that looks a lot like the popular tool TweetDeck). In the top right hand corner, there is a search button that you can use to enter in what key words or hashtags you want to search against:


(note that if you are querying multiple terms, you will need to use an “OR” statement)

Once you have setup your search query, you will want to create a “Saved Column”:


Once your column has been saved, you can generate some source code in which you can add to your blogs, website, etc. Simple select the “Embedd” button (which looks like <>):


You will then be presented with a screen that will give you options to help customize the look and feel of the feed:


Once you have all your setting in place, simply select “Grab Code” and copy and paste the generated source code and place onto your blog, website, etc.

In my case, I took the code and placed it into our Eloqua Hypersite. We wanted to add a little branding and messaging to it, so I create a header image to sit above the feed that had the Eloqua Experience logo, as well as instructions on how to joing the conversation. The end product looked like this (you can also still see it live here):

Wednesday, January 28, 2009

Using Voice to Drive Event Attendance


We've all experienced a similar challenge if we've used webinars, seminars, or other events in our marketing. We put great effort into promoting the event, and driving registrations, but on the day of, a significant percentage of registrants fail to show up.

There are many reasons for this, and I talked a bit about using calendar files (ics) to simplify the reminder process by allowing registrants to add the event into their calendars here: http://eloqua.blogspot.com/2008/12/using-reminders-to-drive-more.html

Another way to assist in ensuring that the maximum number of registrants attend is to keep the level of interest in the webinar or event high by having the speaker leave a message for registrants reminding them of the upcoming event and giving them a few key points that they can expect to get out of the event.

Nothing is more important in creating a successful event than having content that the participants are interested in, and a compelling keynote speaker or webinar presenter is often the most significant factor. If you have selected a good speaker, the message from them will help your attendance rates.


From the Call On Demand area, select Create Phone Message, and select Recorded Voice as a type. This will walk you through a quick wizard that will let you set up the message. You won't need any specialized recording devices, as your message can be recorded over the phone if you don't have a sound file to upload.


Select the option to make the recording now, and type in your phone number. When you click Start Recording, you will receive a call that will allow you to record you message. Follow the simple instructions on that call, and your voice content is created.


Using the voice content is also simple. You can, from the Call On Demand area, send a voice message in a similar manner to how you would send an email. Or, if you would like to tie the message in as part of a program, you can add it in Program Builder. Add a step of type "Call on Demand: Phone Message" and select your voice recording to have the voice call automatically triggered.

By using Program Builder to automate the voice call, you can have the voice content automatically delivered an hour or two in advance of the webinar, or the day before the event, for maximum effect.

Tuesday, December 23, 2008

Using reminders to drive more attendance to your events


Anyone who uses events, either online or offline for demand generation or inbound marketing will likely suffer from the same challenge - all the effort you put into promoting the event and driving registrants gets diminished by half on event day as 50% of your registrants forget to show up.

There are numerous reasons for this, but let's look at them one at a time. Just plain forgetting is one of the common reasons, made even more common if you don't do everything possible to ensure your prospects are able to remember.

Giving them a quick and easy way to get the event details into their calendar is one simple way to smooth out the path to great attendance by eliminating one way in which they might simply forget to attend.

In the email editor, click the Insert/Edit Hyperlink button, which pops up the Insert Hyperlink dialog box. Instead of inserting a normal hyperlink though, change the action to "Open an ICS Calendar file". That provides a standard Calendar file that will work with Outlook or whatever desktop email/calendar program they happen to be using.
Click on the Select box to select your ICS Calendar file. If you've already created one, you can find it and insert it, but if not, you can create one in one of two ways. The first option is to create it manually by typing in the event timing and details. This gives you the ability to set times, reminders, subjects, etc.

In the Calendar Entry section, be sure to add in any online event details for your web conferencing provider for the meeting so your attendees have quick and easy access to the information they'll need to join.


The second way to create the ICS file is to have it automatically created from an existing event in the Eloqua Event module. Once your familiar with using ICS files, you'll be able to create one from an event in a similar manner to how we've created it manually here.

With that set up, just drop the ICS link into your email and you're done. When you send out out your "Thanks for registering" email, that link allows them to drop an entry into their Calendar with one click.

Nothing beats a great speaker and compelling, original content for driving attendance at a webinar or seminar, but the more you can help your registrants to remember the details of the event, the better your ratio of registrants to attendees will be.