
We talked recently about uploading select list values to be used in a form on your website to make the experience easier for visitors. There is an even more powerful technique that can be used to automatically update picklists that are dynamically sourced in another application.
In a similar manner to how we manually updated the picklists, we can use the upload wizard to automatically update the picklists. If, for example, the list of industries you are interested in having in your picklist is defined in a remote system that you want the list in Eloqua to automatically reflect, you can set that up to re-synchronize on a nightly basis.
 One of the more common remote sources that is dynamic is a custom report in your CRM system. This creates a .csv export that is current as of the moment that it is called, and can thus be used as a dynamic source. Typical uses might be a list of products, industries, or regions that is maintained in the CRM system.
In a similar manner to how we manually updated the picklists, we can use the upload wizard to automatically update the picklists. If, for example, the list of industries you are interested in having in your picklist is defined in a remote system that you want the list in Eloqua to automatically reflect, you can set that up to re-synchronize on a nightly basis.
 One of the more common remote sources that is dynamic is a custom report in your CRM system. This creates a .csv export that is current as of the moment that it is called, and can thus be used as a dynamic source. Typical uses might be a list of products, industries, or regions that is maintained in the CRM system.
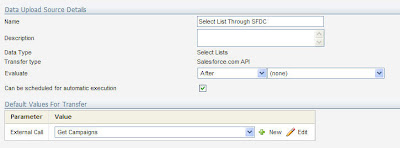
 You can also use API calls to your CRM system in many cases to pull the information you require. In either case, go to Setup->Integration->Inbound and create a new data source. Be sure to check the box for "Can be scheduled for automatic execution", as this is what we'll be doing.
Following the same technique as we did with the manual upload from a .csv file, we’ll pick a source that is dynamic - our recently created source. The upload wizard will pull enough of the report to determine the columns available, which can then be used for mapping into the relevant fields in the select list. You'll likely want to choose the option to delete existing values, or to match on your option value field.
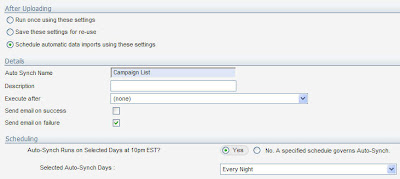 On the last step of the wizard, in the "After Uploading" section, choose that you would like to schedule automatic imports based on these settings. Select the schedule you would like the update to run on. Typically this will be weekly or daily. When the scheduled time arrives, the list will be re-uploaded with the most current version.
Following the same technique as we did with the manual upload from a .csv file, we’ll pick a source that is dynamic - our recently created source. The upload wizard will pull enough of the report to determine the columns available, which can then be used for mapping into the relevant fields in the select list. You'll likely want to choose the option to delete existing values, or to match on your option value field.
 On the last step of the wizard, in the "After Uploading" section, choose that you would like to schedule automatic imports based on these settings. Select the schedule you would like the update to run on. Typically this will be weekly or daily. When the scheduled time arrives, the list will be re-uploaded with the most current version.
That is all that is needed, now your select list will be automatically populated with data from your remote source on a daily basis without you having to do anything.


