Monday, December 20, 2010

Junk Scan - look for bad form data


Anyone who has put up a web form has suffered from bad form data. We all know what it looks like, "aaaaa", "test@test.com", "1@1.com", "asdf", "mickey mouse", "donald duck", "555-1212", the list goes on.

Sure, one option is to only provide access to an asset after sending a person a link, in order to ensure that the email address is valid, but there are many situations where you don't want to (or can't) add in this secondary step. Generally, these are real people submitting the form, so the various tools to prevent bots and spammers are of no use either.

However, having this data in your marketing database does no good either. With it there, your analytics will show incorrect results, segments might pull in bad data, and any of this data that gets passed to sales will immediately decrease marketing's credibility.

Now, to solve this problem, we have a Cloud Connector that does a "junk scan" on your data to look for the typical problems that are seen. It scans first name, full name, email address, and phone number looking for data that is known to be bad or looks suspect, and flags the record in your Eloqua marketing database.

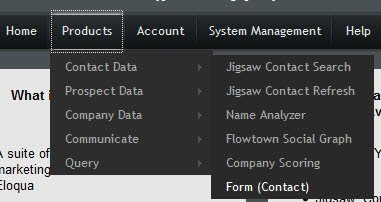
To get started, you’ll need the Cloud Connector installed in your Eloqua instance. This is very easy to do, see the recent post on Cloud Connector Installation instructions for how to add a new Cloud Connector to your install. The Cloud Connector we’ll be looking at here is available on Black Starfish, our repository of interesting connectors. Go to cloudconnectors.eloqua.com and create an account. Under Contact Data, you'll find Name Analyzer - that's the connector to install.
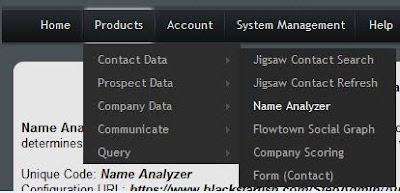


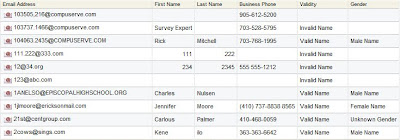
With the name analyzer cloud connector installed, all you need to do is create a step in your marketing automation program - after a web form is submitted, as part of your contact washing machine, or when you analyze your contact data and detect data quality issues. This step will take in contacts, and then the cloud connector will flag them as valid, invalid, or unknown (in a specific field in the contact data), and will also, as a bonus, flag their gender (useful for geographies like Germany where gender is important in building a salutation).


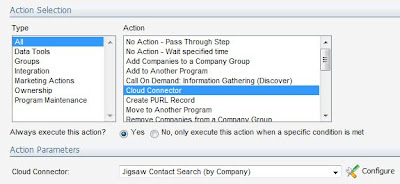
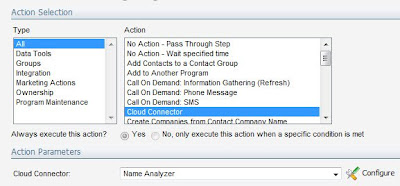
For the step, select "Cloud Connector" as your step type, and you will see a drop-down list of options below. You'll see the "Name Analyzer" cloud connector you just installed via the setup interface in this list. Choose that, and click the "Configure" button to begin setting up the step.


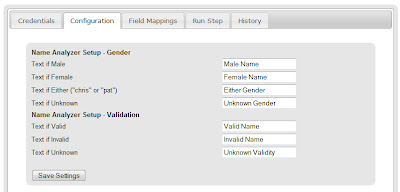
The popup window gives you your configuration options, the majority of which are how you want to flag the contact. You can choose what text you want to mark each contact with for a) gender, and b) validity. For gender, remember that there is an option for first names that could be either gender (ie, "Chris" or "Pat").


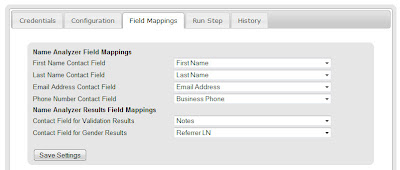
Click save on that screen and move to the field mapping tab. As inputs, it will take first name, last name, email address, and phone number, and as outputs, it will write the text you just selected to fields for gender and validity.


You're now ready to go. The validity analyzer looks at the following to figure out whether a person's contact information is valid:

- First Name: to understand if the name is known to exist (by cross-referencing against a database of known names

- Full Name: looking for known bad names ("mickey mouse" or "donald duck" where the first name may be valid itself ("mickey" or "donald")

- Email Domain: looking for @test.com or @1.com

- Email Name: looking for aaa@ or 111@ as invalid email names

- Phone Number: looking for numbers that are too short, all the same number (11111, 22222), or known to be bad (555-1212)

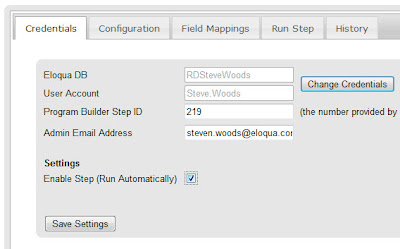
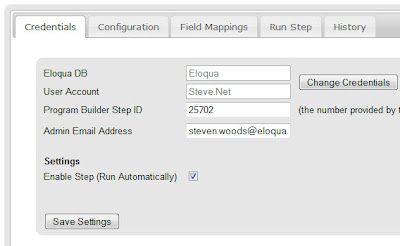
On the "Run Step" tab, you can run the step manually to pull in a few members from the step, and see what the results are, or, if you go to the "Credentials" tab, you can check off "Enable Step" and have the step run automatically.


And that's it, you're done. Now, the contacts that flow through the step will be marked with validity and gender.


Looking forward to your feedback on this. Is this catching and flagging the right garbage names that are input? What other factors do you look for when you're looking at your names manually?

Tuesday, December 14, 2010

Eloqua and Jigsaw Integration for Better Marketing Data


If there is one common challenge that is faced by every marketer who thinks about marketing automation, it is access to up-to-date, complete, clean, and comprehensive data. Asking for data on web forms is tricky in that the more you ask for, the more visitors tend to abandon forms. Similarly, data collected via web forms generally suffers from being less clean and standardized than marketers might like.

For anyone who joined us at Dreamforce last week, you may have seen our Jigsaw integration and realized that it makes some significant strides in solving this challenge. Salesforce.com’s Data-as-a-Service solution, Jigsaw, has one of the best and most accessible stores of crowd-sourced data that is kept up to date and clean. Now, in an easily configurable way, you can access this data source directly from your marketing automation programs in Eloqua.

The Cloud Connectors for Eloqua/Jigsaw integration accomplish three separate integration tasks, but all are set up in roughly the same manner, so the instructions should be easily translatable between the three different connection options.

Contact Search – When you have companies that you’re interested in, whether you want to flesh out the list of the key people at an account that has shown some interest, or to proactively target a territory or a list of named accounts, this connector allows you to find the contacts at those companies who are in key roles. Simply by specifying the role (ie, marketing, sales, finance), level (ie manager, director, vice president), and geography, you can retrieve as many contacts as you specify at each company that flows through a given program builder step

Company Info – When the information on companies in your database goes little farther than a name, you will be very limited in your ability to market to them. This is a common problem when the information comes in via web forms though as company questions like revenue, industry, number of employees, or stock ticker tend to bulk up forms and drive visitors away. With the Company Info cloud connector, you can quickly append and correct this type of information directly from the Jigsaw company database.

Contact Refresh – when a contact enters your database, its information begins to go out of date immediately. Titles change, phone numbers are updated, and new information may be gathered that you don’t yet have. The Eloqua/Jigsaw Cloud Connector allows a contact refresh to append and update any information that Jigsaw has on any contact that flows through a step in your marketing automation program.

To get started, you’ll need whichever of the three Cloud Connectors you are interested in installed in your Eloqua instance. This is very easy to do, see the recent post on Cloud Connector Installation instructions for how to add a new Cloud Connector to your install. The Cloud Connectors we’ll be looking at here are available on Black Starfish, our repository of interesting connectors. Go to cloudconnectors.eloqua.com and create an account. Under Contact Data, you'll find Contact Search (by Company) and Contact Refresh, and under Company Data, you’ll find Jigsaw Company Info. Those are the connectors you’ll need, and the instructions for each one will be relatively similar from here on.

With an account set up and the connector installed into your Eloqua instance, you're now ready to quickly add in data from Salesforce.com's Jigsaw service into any program.


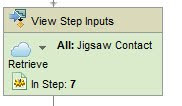
Add a step to your program, in this case we'll look at retrieving contacts at a specific company. The program step, in this case, will contain the companies, and we'll feed the contacts back into a contact group (obviously, if we want to process those contacts, we can just feed that contact group right into a program, but that's another topic).

For the step definition, choose "Cloud Connector", and you should have a drop down of options appear below. If the Jigsaw Contact Search option is not in that list, make sure you added the cloud connector definition to your Eloqua instance as we looked at earlier.


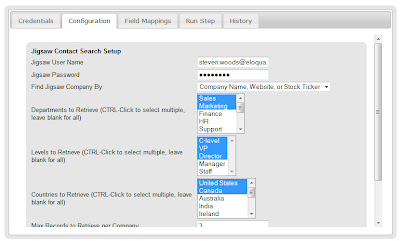
Click on the "Configure" button to pop open the configuration window. This connector will need your credentials for Eloqua (must be API-enabled), and for Jigsaw (it uses whatever license you have with Jigsaw so you will be charged for data accordingly).

In the configuration screen, choose what roles, levels, and geographies you are interested in, how many contacts per company you would like to retrieve. Hit save on this page to save your selections.


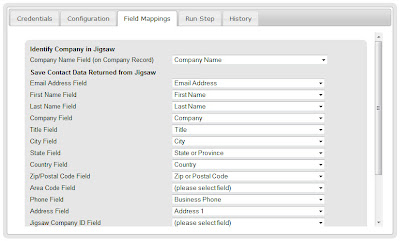
On the next tab, field mappings, pick the contact field you would like to save the data in. Jigsaw returns a lot of great information, but if you don't want any particular field, just leave that blank.


When you're ready, you can either go to the "Run Step" tab to run a few trial runs and see what data you'll get back, or just go right to the "Credentials" tab, check off "Enable Step", and click "Save" in order to have the step running automatically.


That's all that's needed. With that enabled, you'll have Jigsaw returning data on the right contacts at the companies you're interested in. The two other Jigsaw connectors, for company information, and for contact refresh, work in a very similar manner. Enjoy, and please don't hesitate to provide any feedback on what's working for you and what's not.

Monday, December 6, 2010

Generic Web Forms from Program Builder


As your marketing automation programs become increasingly advanced, there is sometimes a need to tie into remote systems from half way through a program. Perhaps a lead needs to be created in an proprietary, custom CRM system, or a demo account needs to be registered if a person reaches a certain threshold.

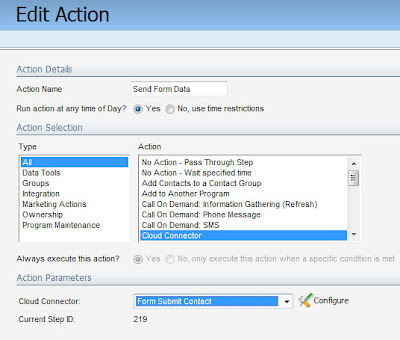
With Eloqua, you can now accomplish this by triggering a generic form submit from any step in Program Builder. Whether the step contains contacts, companies, or prospects, the data on those individuals can be packaged up and submitted as a web form (http Get or Post). Simply create a step in your program, and choose "Cloud Connector" as your step type to access Cloud Connector functionality.


The Cloud Connector step type we'll use for this is Form Submit Contact. If you haven't done this before in your install, you won't see that connector in the drop down list. That's okay, it's really simple to add them. See the recent post on Cloud Connector Installation instructions for how to add a new Cloud Connector to your install.

To find the Cloud Connector for submitting a form, go to cloudconnectors.eloqua.com and create an account. Under Contact Data, you'll find Form Submit (Contact). That's the connector you need, and follow the instructions to install it. (similar connectors are available for Prospects and Companies).


With that installed, you now can select it, and you will see a "Configure" button beside the dropdown that allows you to access the configuration screen.


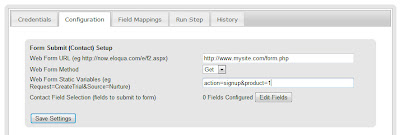
The first thing to configure is the destination form. Input the form URL on the site you are targeting. (note, that to perform some interesting creative scenarios, you can also point this right back at Eloqua web forms...).

Choose whether you want http Post or Get as your method, and then add any form variables that are submitted with every form regardless of the person.


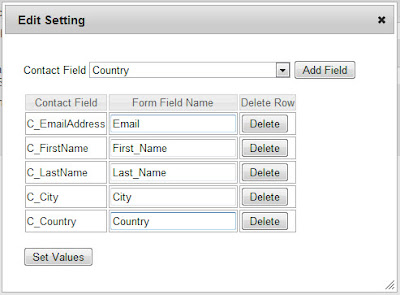
Then, to configure the set of fields that are submitted from each contact, prospect, or company, click the Edit Fields button. You will see a simple UI that allows you to choose the fields you are interested in, and then provide the HTML name for those fields in the web form you want to submit.


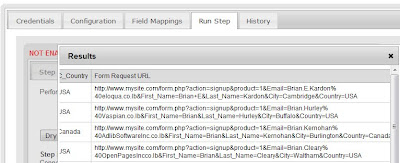
Click the "Set Values" button, and don't forget to hit save on the configuration screen to save these values, and you're all set. Use the "Run Step" tab to do a test or two to make sure that you've set everything up as intended. You'll be able to see what the forms that are being submitted will look like and what data is retrieved for each contact in the step.


When you're ready to go, go back to the "Credentials" tab and check off the "Enabled" checkbox to have this step run automatically.


Now as anyone flows into that step within Program Builder, a form is automatically sent on their behalf exactly as you specified.

Hopefully this capability is useful for you, don't be shy about feedback, we look forward to hearing from you. For those of you who are inspired to do so, please find the instructions to build your own Cloud Connector here. We look forward to seeing what you create.

Monday, November 15, 2010

Creating Reports from Eloqua Discover for Salesforce.com


(guest post from Ben McPhee)

As you may know, we recently launched a new sales tool called Eloqua Discover for Salesforce.com. This application, written entirely on the Force.com platform, provides sales reps both individual and account-level activity insights paired with flexible tracking tools so that they are able to understand which prospects they should be engaging, with what content they should be engaging them and when engagement would be most effective.

But the question comes up:

How can management and executives get the same information? What about the management and executive level folks that do not directly own or engage all sales opportunities but want to leverage the insights provided by Discover to keep track of general activity within territories and understand who the hottest accounts are?


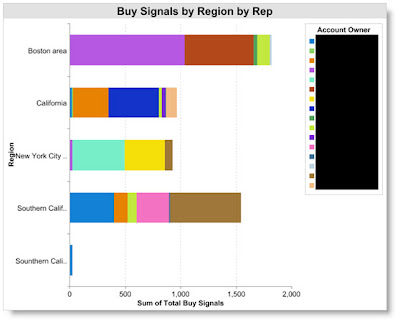
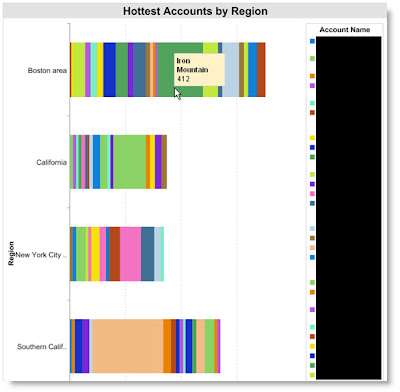
Because of the way Eloqua Discover for Salesforce.com is designed, you can easily generate rollup activity reports right in Salesforce.com based on rep & region and know exactly which Accounts in which regions are most likely to buy. Here’s what it can look like:

The graph below illustrates which regions have the greatest purchase interest at the Account level, broken down by which reps own those Accounts


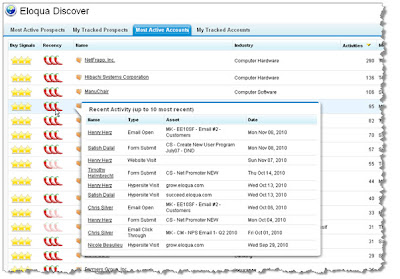
The graph below illustrates which Accounts are showing the most buying interest, by region. Hovers allow you to quickly see exactly which Accounts are exhibiting the highest engagement


How do you do this? It’s actually pretty straight forward.

In short, you just make a report in SFDC that references a few extra fields that Discover has added to your Account object. You could also do it based on fields added to the Contact and Lead objects (the same fields are added to all), but for illustration purposes, we’ll focus on the Account rollup reporting here.

Once Eloqua is up and running with activity synchs to SFDC and you have installed and configured Eloqua Discover for Salesforce.com, you can go to create a new report.

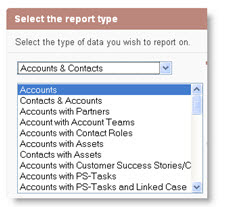
To create the reports shown above, you will want to create a Accounts & Contacts report, then base it on Accounts.


Select the type of report you want (e.g., Summary) and then when you get to the Standard Summary Fields interface, scroll down and you will note additional fields that have been added to the Account object by the Discover application:


Opt to Sum any of the fields on which you want to report – in this case, we have used Total Buy Signals and Total Open Opportunities (we are using Total Open Opps so that we can filter out Accounts that do not have at least one open opportunity).

Depending on how you want to group the data (e.g., You are interested in seeing, by region, WHICH ACCOUNTS have the most Buy Signals), select the appropriate metrics. For the second graph above, we use the following grouping logic:


Then make sure that in your Columns selection, from the Account: Custom Info area, you choose the 2 new fields – Total Open Opportunities and Total Buy Signals:


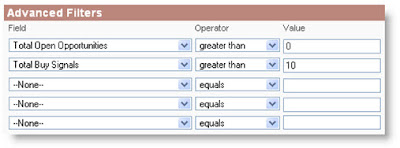
Then, make sure you apply a filter that weeds out:
• Accounts linked to no open opportunities
• Accounts that aren’t showing a relatively significant amount of activity


Depending how your regions are broken out, you may also want to generate several different reports only covering certain regions or certain reps (as we have done in this example), so the filters are entirely up to you and will simply dictate the breadth of data you want to cover in each overview report.

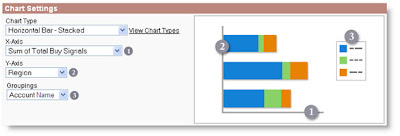
Now, you just have to put the finishing touches on your Chart. The below outlines the basic setup for the Hottest Accounts by Region report:


And you’re done!

Now that you can quickly whip up overview reports of your hottest Accounts, Leads and Contacts, Eloqua Discover for Salesforce.com quickly becomes an invaluable tool for not only providing your sales reps with close power but also for providing your sales management and executive team with high-level insight into which regions, reps and accounts are seeing and generating the most interest in your products.

If you’d like some general info on Eloqua Discover for Salesforce.com, please get a hold of your Customer Success Manager and/or check out http://eloquaforsales.eloqua.com/.

A question out to the readers and users – will this type of reporting prove valuable? Why? If not, what are the additional metrics and perspectives that would really drive this over the fence?

Tuesday, November 9, 2010

Cloud Connector Installation, Step by Step


(guest post by Dave Seaton)

An exciting new capability within Eloqua that you may have heard mention of a couple of times is the Cloud Connector concept. Essentially, Cloud Connectors allow anyone in the Eloqua community to build their own steps within Program Builder. If you're interested, the instructions for building Cloud Connectors are here, but for now, we'll focus on installing one that's already built.

Here's a step by step guide to getting your first Cloud Connector installed and ready to go.

1) Enable Account

First you need to have your account set up correctly. Please ensure that your company is enabled for API usage and that the user account you plan on using is enabled as an API user. To confirm your company has the API enabled please contact an Eloqua Product Specialist at 1 866 327 8764. If you are a customer administrator for Eloqua you can go to the user management tab and ensure that the user has the API User role enabled as well as one of Advanced User - Marketing or Basic User - Marketing User Role. Please feel free to contact an Eloqua Product Specialist if you require assistance setting up an account.


2) Find A Connector

With an API-enabled, account, you're now ready to set up a connector. If you have built one already, or have a third party you're working with, great. For this example, we'll use one of the connector prototypes that Eloqua has built, available at cloudconnectors.eloqua.com, but the same sequence of steps is used for whatever connector you're looking to install.

Each connector is identified by a unique code, and a URL. These should either be displayed in the connector's setup screen, or provided to you by your Cloud Connector provider. You will need to copy the Unique Code and Configuration URL into Eloqua.


3) Install Connector In Eloqua

To install this Cloud Connector in Eloqua go to System Management and you will see the Cloud Connector Manager on the left side. (Setup -> Management -> System Management -> Cloud Connector Manager)

Name your Cloud Connector in the service name field, copy the Configuration URL from cloudconnectors.eloqua.com into the service URL field and copy the Unique Code from the provider into the Unique ID field. Click add - you have now created a Cloud Connector!


4) Implement Connector

With this Cloud Connector installed, it will now be an available option within a step in Program Builder. You can use it once, twice, or as many times as you like, as you would a normal Program Builder step. To implement the connector go to the Program Builder module in Eloqua. In a program you need only create a new step and set the default action to Cloud Connector. Then use the drop down menu to select the Cloud Connector you have created.


5) Configure Connector

While editing the default action of your cloud connector step you will need to configure the external program that the Cloud Connector connects to. Simply click on the configure button, login and a window will open that connects you to the login for the Cloud Connector's configuration screen.


You have now installed and configured your first Cloud Connector!

Monday, October 4, 2010

Follow Drake to San Francisco for Eloqua Experience


Hi Eloqua friends - Drake here, your Eloqua Customer Success Tour Ambassador. Today I’m beginning my cross-country trip to Eloqua Experience 2010 where I will be working at the Eloqua University booth. I’m starting from the east coast of the US and making my way by plane and car to San Francisco, arriving on October 17. Why am I telling you this? Because you can follow me along the way, guess my route, and potentially win a $100 iTunes or Amazon gift card. Here’s how:


  • Every weekday I will be posting a clue about where I am on my Facebook wall (www.facebook.com/EloquaDrake) and via Twitter (@EloquaDrake).

  • You can post your guess about my location (name of the city) in the comments on my Facebook wall, then after two more moves I’ll reveal where I was.

  • I’ll be keeping a tally of who has the most correct guesses and that person will win the gift card.

  • Tip: You don’t have to be going to Eloqua Experience to participate, but if you are going to be there, I’ll also throw in an extra gift onsite at the event as well.

Here are a few more pieces of information about the locations I’ll be visiting:


  • They’re all US cities with populations over 100,000

  • When I fly, I’ll be flying on Continental non-stop

  • When I drive, it will be somewhere that I can get to within 8 hours in a car (which will really only take me 6 hours, heh heh) – in other words about 500 miles.

  • I won't ever backtrack - my movement will always be in the direction of San Francisco

Visit me on Facebook today for my first clue about my starting point city.

Tuesday, August 31, 2010

Win a Free Ticket to Eloqua Experience!


(guest post from Adrian Chang)

Are you Eloqua's biggest fan? Share why on our Facebook Fan page and you can win a free ticket to this year's Eloqua Experience in San Francisco from October 18-20.

We are looking for you to share 10 Reasons why you are Eloqua's biggest fan. Be creative

- write a poem, create a YouTube video, or use photos to craft your submission. You will post your entry on our Eloqua's Facebook Page - www.facebook.com/eloqua.

Rules
· One entry per Eloqua Fan - make it count!
· You must be a fan of Eloqua on Facebook (Go to www.facebook.com/eloqua and "Like" our page)
· This contest is for Eloqua customers only
· You may use Twitter to promote your entry and link to our fan page - please use #1EloquaFan for the contest.

Also, if you want to make mention of this year's Eloqua Experience, please use #EE10SF.

Judging

The winner will be selected by a committee of Eloqua employees. The committee will review entries based on creativity and response from the Eloqua community (Likes, Comments).

Duration

Starts September 1st through the 15th (ending at 11:59pm PT). Winner will be announced on September 17th.

Prize
One (1) free ticket to Eloqua Experience. Current registrants may still apply - you will be reimbursed in the event that you are selected as the winner. Also, the winning entry will be featured during the conference.

Eloqua Employees, Customers and Partners – How can you participate?

1. If you are a Facebook User, please ensure that you are a Fan of Eloqua. Go to www.facebook.com/eloqua and
"Like" our page

2. Highlight the entries that you like by commenting or click on the "Like" button for any entries

3. For general guidelines as to how you can participate in Social Media - http://blog.eloqua.com/eloqua-socialplaybook

Any questions? Please contact me Adrian Chang at 416.642.7586 or at adrian.chang@eloqua.com

Tuesday, August 24, 2010

Content is King, but sometimes we need to replace the King


(guest post from Ben McPhee)
We all know how important content is. It didn’t just rise to the throne à la nepotism like the rest of the kings with which we are familiar. No – content is legit. Content can make or break a campaign, a quarter or even a job.

Now while content in and of itself is critical to pushing out information and pulling in prospects, what is just as important is the ability to manage content in such a way that it is always where it needs to be when it needs to be there. Pretty straight forward, but examples never hurt.

Everyone knows that overwhelming sensation of dunce after sending out a work email to 5 executives reading, “Please see the attached deck . . .” and then shortly thereafter realizing that you either didn’t attach anything but your recently crippled pride or that you actually attached the first draft of the presentation you whipped up 3 months prior on 4 minutes of sleep.

That kind of sucks – but now imagine you actually sent a link to the wrong presentation or an outdated rate sheet or a promotional flyer sporting a decimal place two digits too far to the right . . . to 50,000 of your prospects . . . yikes . . . would be nice if there was an easy way to stuff that one under the rug.

But it’s not just about putting out fires – it’s also about having a scalable, manageable method of pushing out regular content updates to your prospect and client base. You may have the same email going out every week with only minor updates within the content to which the central link in the email directs your audience - do you really want to have to edit that email every single time you send it out? Or have to make changes to HTML or jump through any hoops whatsoever? If the execution and process management suffers from confinement and complexity, ripples can extend from poor content, to lost content to late content and beyond.

Because we recognize the important of a clean and quick content delivery and update process, a while back, we implemented a Replace Content tool that makes it super-easy to swap content to which you are linking in your emails and landing pages - WITHOUT having to actually go into those emails and landing pages! Now, we want to make sure you remembered that it’s there!

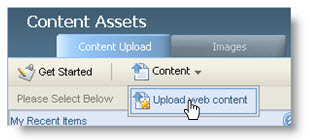
1. Uploading your content is easy – just go to the Content Asset area and upload:


2. Then, to insert a replaceable link to the content, copy and paste either the Email Redirect Link (for emails, so that you can track clickthroughs AND ensure that your branding is properly injected into the URL, assuming you have either the Silver or Gold Branding & Deliverability package) or the Trackable URL (for landing pages):


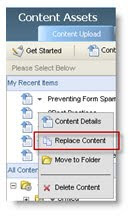
3. Once you have inserted your replaceable content link into your email or landing page, it’s a breeze. Whenever you want to update the content to which the link points, simply go to your content asset, click the dropdown next to its name and select, Replace Content:


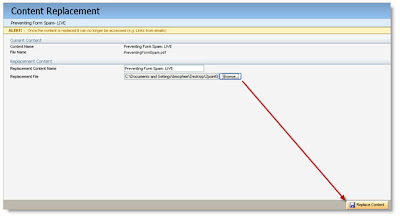
4. Then select the file with which you want to replace the content and hit Replace:


You’ll get a warning to verify that you in fact want out with the old and in with the new:


Once you hit ok, the system will begin the replace process and then when it’s done, you’ll see the green bar of success and you’re done!


Now anyone who clicks on the link you inserted in your email or landing page will be automatically redirected to the new content – and you barely had to do ANYTHING!

Go ahead and test it – send an email out with a replaceable link in it, click it, see the first round content, replace the content, go back to the email, click the link again, check out the new content - takes a few minutes and you can see just how powerful this feature really is.

So remember the next time this saves your organization either time or embarrassment – Eloqua’s got your back!

Tuesday, August 17, 2010

Adding and Tracking Facebook ‘Like’ buttons in Eloqua emails


(Guest post from Vince Lockyer, Demand Gen Specialist, Avid)
vince (d0t) lockyer (at) avid (dot) com

There have been a lot of blog posts recently about Facebook ‘Like’ buttons and how to use them in marketing emails.

While it’s easy to add a link to a Facebook group or page from an email, it’s not been so easy to integrate a fully working ‘Like’ button into an email in a similar way it works with a webpage – and also accurately track who’s clicking it and what they are ‘liking’.
So far only one or two vendors have come up with an embedded solution to this – which of course only works with their platform. Now using the method described here you can get the same functionality for your Eloqua emails. This solution requires a bit of HTML tweaking in the final step.

How it works
From your Eloqua email, a blind form-submit sends the email address of the recipient, the URL, and the name of the webpage being ‘liked’ to an Eloqua form. After logging and tracking these details the form confirmation page then displays the webpage overlaid with the Facebook Like Button Social Plug-in.

Try it out!
Try out this example form with your own data to see how it looks.

How to build it

Create two new contact fields:
• Facebook – Last Like URL
This will contain the URL of the last thing that the contact liked. It’s required also because the form confirmation page will need the URL to display the webpage in the final step.

• Facebook – Last Like Name
(Optional but highly recommended.) Contains the name of the last thing that the contact liked. Required to make the reports more readable and also to be displayed in the form confirmation page.

Create a new form with the following fields. Keep the form name and the HTML names of the fields short as they will be used in the blind form submit URL. Try something like ‘fb’ or ‘like’ for the form name.

• ‘e’ – Email Address
• ‘l’ – URL
• ‘n’ – Name

Add a ‘Update Contact Data’ processing step to update the two Facebook fields from the form submissions.

Add a confirmation page processing step. Here you will need to build the HTML for displaying the webpage overlaid with the Facebook Social Plug-in.

Confirmation Page HTML
The confirmation page displays the webpage being ‘liked’ in an iframe embedded in the Eloqua confirmation page. A semi-transparent layer is overlaid on top with the Facebook Social Plug-in contained in another layer (see image).

A close button is included in the top-left that hides the overlaid layers and reveals the webpage beneath.

Download the HTML for the confirmation page, you can use it as-is or customise it to your requirements. Note: you will need to edit it to update the field merges and locations of the graphics files in your Eloqua instance.

To add-in your own field merges for the ‘Facebook – Last Like URL’ and ‘Facebook – Last Like Name’ use the Insert Contact Field option in the Eloqua Confirmation Page editor. To upload the images use the Upload Images tool under Hypersites or Email Marketing > Tools & Content Components. You’ll need to copy the URL of the hosted image once uploaded and paste that into the HTML.

Adding the Like button to an email

Once the form fields, form and confirmation page is setup you can add the ‘Like’ button to your email. The button will trigger a blind-form submission in this format:


Make sure “?elqFormName=” equals the HTML name of the form you created and “&elqSiteID” equals your unique Eloqua site ID. “&l=” is the URL of the webpage being liked and “&n=” is the name.

Reporting

To get a report of who is liking what, view the Form Data report:


Liking or Recommending

The code described here will allow you to add a ‘Like’ button. You can also add-in a ‘Recommend’ button using the same code – you’ll just need to change the ‘action’ parameter in the Facebook Social Plug-in to ‘recommend’:
“&action=recommend”

Wednesday, August 11, 2010

Drake Has a New Contest For You


(Guest post from Eloqua's Drake)

This is Drake, Eloqua's Success Tour Ambassador and I'm kicking off another round of Customer Success Tours beginning today in Austin, TX. Our theme for the events this quarter is "sales enablement", but actually the goal is to make you, the marketer, a hero to your sales team. Envision them giving you accolades at the next company-wide meeting...

In honor of this theme I've cajoled the folks at Eloqua into letting me host another contest on Facebook. Here's the scoop: post a picture on my Facebook wall (facebook.com/eloquadrake) that depicts marketing and sales being aligned. Think "lock-step" and "BFFs" (or whatever kids these days are saying). And most importantly, think creatively, because that's what will win the prize. You can post up to three times, so make 'em count. The deadline is September 6 (Labor Day) so you have a little time to strategize.

What's the prize? Your personal reward is a $100 iTunes or Amazon gift card (your choice) and your company reward is 10 licenses of the Eloqua Sales Toolkit which contains Eloqua for Microsoft Outlook, Eloqua Prospect Profiler and Eloqua Discover. What's Eloqua Discover? Come to a Success Tour to see a live demo of this great new tool. So it's a win-win for both you and your company.

Get started by friending me on Facebook so you can see all the postings and scope out the competition. I'm looking forward to seeing what you come up with.

(Oh – my Eloqua friends asked me to remind you that this Friday, August 13th is the early bird deadline for Eloqua Experience. You can attend for $999 if you sign up by this Friday, so what are you waiting for? After that the price goes up to $1350 – is there really anything to think about?)

Tuesday, August 10, 2010

How Event Automation Saved My Marriage


(guest post from Joe Gelata, of Sybase)

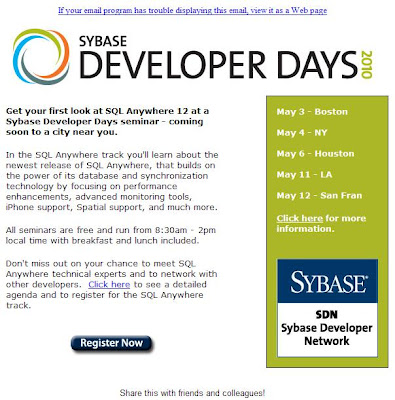
We’re all in the same boat - we need to run successful campaigns but we’re tight on time. It comes down to two choices; work around the clock building and managing campaigns or don’t run them at all. The former will put stress on your personal life and marriage while the latter will have you looking for a new job. Luckily, Eloqua offers us a third option: Automation!

I was recently tasked with building a registration system for a seminar series that had some ambitious requirements:

• Manage registration for 45 different seminar sessions in 12 cities across North America and Europe over the span of several weeks

• Support for communication in 3 languages

• Target email content to each contact (e.g. send 350+ unique emails)

• Schedule communications differently for each geographical region

• Prep leads for Sales so they have accurate data on each lead

To make it interesting we only had 1 ½ people and 2 ½ weeks to design, build, test, and launch the system. This was a challenge in itself but the real kicker was that we had next to no resources to manage the system once it was running. The only way to meet these challenges was to dig deep into our Eloqua toolbox and automate everything. Here’s how we did it and what we used...


Program Builder
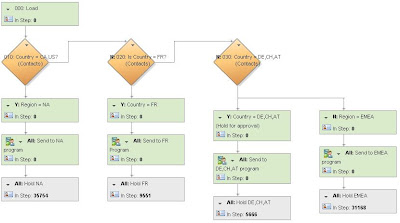
Program Builder was our saving grace when it came to scheduling emails and preparing leads for sales. The former was done by segmenting our lists by geography. We used decision rules to determine if each contact was in a contact filter for each region. Once segmented they were sent to one of several programs that automated the sending of invitation emails based on the schedule for that particular region. Since each of the regional invitation programs was identical (with the exception of the email dates) we were able to build one and copy it for the rest making this a quick and easy process.


Preparing leads for sales was slightly more complex. Aside from a campaign, we wanted to tag the contacts with the city they registered for, the session they registered for, and their attendance status. This adds up to 96 different combinations of information. To automate this we used Program Builder, Contact Groups, and Update Rules. In a nutshell, the program:

• Accepted all contacts from the ESM (more on ESM later)

• Segmented the contacts based on their session using a Contact Filter

• Added a campaign association

• Added product information

• Grouped all contacts together again

• Segmented the contacts based on their attendance status using their membership in an ‘Attended Contacts’ group

• Added an “Attended” or “Did Not Attend” status

• Sent contacts to the CRM integration program

The only manual piece of the process was uploading our attendee lists. The rest was pure automation.

Activity Driven Content
Activity Driven Content (ADC) is perhaps the most underrated component in Eloqua. Not only is it extremely easy to use, but it can drastically cut the development time of your emails while helping you increase click-throughs, lower opt-out rates, and take your targeting to a level you never thought possible. This is the kind of automation that may actually put your marriage in jeopardy. You know what I’m talking about: “Honey, I did the coolest things with Eloqua today…” Unless you’re married to a marketer this conversation always end with someone falling asleep. It’s only cool to us!

With three languages and information on 45 different sessions, we had a lot of content to deliver to registrants. Our goal was to keep emails as short and to-the-point as possible. After all, no one wants to ready a 7’ email with information on 44 sessions they didn’t register for. Lucky for us, Eloqua offers Activity Driven Content which dynamically serves up content based on data in a contact record or data card. To do this you build ADC pieces which are essentially fragments of HTML for each version of content you will be sending. You then setup ADC Rules to determine which piece should be sent to each contact. For example, you can create the introductory paragraph of your email in multiple ADC fragments each in a different language. Next you can create an ADC Rule that looks up a contacts country and pulls the ADC in the appropriate language. The final step is to insert the ADC into your email. The email itself basically serves as a shell for the ADC:


When you send the email to a specific contact, the ADC is populated:


ADC is an extremely powerful tool. It did a great job customizing language and location info for this seminar series but the possibilities are endless. You can target content based on any standardized contact or data card field you have in your database. Industry, title, interest, buying stage, company size…the list goes on and on. Just think what it can do for your newsletters. And don’t forget to add in a personalized signature from your sales reps while you’re at it.

Event & Survey Manager
Event & Survey Manager (ESM) is a wonderful tool for managing multi-session events. It has three basic parts:

Registrant Info

This is the Data Card Set and its associated fields. It works with the individual Data Cards which store all of the registrant information collected on the form (form data can also be saved to contact records at the same time). Each Data Card is associated to a contact. The Data Card Set is a table separate from the contact table and can be used for events and surveys.

Event Details
These fields are specific to your event and can include date, time, location, session name, presenter, etc. Each session has its own record. Each Data Card will be associated to one of these sessions.

Event Actions
Think of this as program builder for events. You can do all the regular stuff such as send emails and add contacts to a program step. The big difference is Event Actions are triggered based on dates relative to the session date each contact has registered for. For example, where Program Builder can be setup to send an email to everyone on January 1st, Event Actions can send an email two days before the session a specific contact is registered for. It makes setup a dream and allows a customer centric email schedule.

For our seminar we created a Data Card Set with fields that matched those on our form, loaded info for all 45 sessions into the Event Details, and scheduled our emails in Event Actions. For example, a ‘Registration Confirmation’ email was sent each time a new contact was added to ESM, a ‘Seminar Reminder’ email was sent 5 days before their session, and they were added to our follow-up program one day after their event. Building this in Program Builder would have been a mammoth task. However, building it in ESM took 15 minutes of training and a few hours to setup. And of course, it required no management whatsoever.


Results

The major accomplishment with this project was simply that it was completed successfully. Given the scarce resources available to build and run registration, it was a huge challenge. However, automation allowed us to come out victorious. Throughout the process we were able to offer registrants completely customer centric communications – from the content to the delivery date. Even with very little management, this massive seminar series ran smoothly.

Beyond the event itself, building this system forced us to dive into new areas of Eloqua that we have never explored before. This learning experience has sparked new creative ideas on how to use these tools and address other problem areas we had previously written off.