Thursday, August 27, 2009

Better Marketing Analysis Through Dynamic Filters


When you run a report within Eloqua, you will often want to understand a bit more about the data that you have within the report. Whereas you can easily export the data for secondary analysis in a tool like Excel, often the easiest thing to do is to dynamically filter the results of your report to get the view you want.

This is easy to do from most list reports (ie, a list of visitors, or a list of contacts).

In the top menu, under Filter, select "Filter these contacts" and you will be presented with a window that lets you define a filter. That filter is applied dynamically to the report you are looking at, letting you quickly see a subset of your data.

For example, if you had a list of contacts who had submitted a web form for a download, and wanted to understand how effective that marketing campaign had been at targeting CEOs, you might add a filter for "Title = CEO". Note, however, that the need for a contact washing machine becomes very clear in doing this. If we have not managed the data quality of our incoming title data, it will be hard to define a good filter. However, if the data has been standardized and normalized, we can work with a normalized Title field that can be easily filtered.

With the "CEO" filter layered on to our results, we can quickly see whether the campaign has been effective at generating responses from top execs. The filters can be quickly and easily removed or changed, which lets you work with any list report to get a better sense for the data it contains.

Dynamic filters on reports are a quick but powerful tool for getting better insights out of your marketing data.


Tuesday, August 25, 2009

Experts in the Field - Pedowitz Group's Sweet Platform for 2-way SMS


Many times when we're thinking of marketing automation, we're thinking of interacting with users while they are on their computers - email and the web being the main forms of interaction. However in some situations, your audience is not at their computers, and new approaches are needed.

The Pedowitz Group has developed their Sweet platform for just this purpose. It enables (among other things) 2 way SMS (text message) interaction, so if you have an audience at a tradeshow, a conference, a sports venue, or anywhere they are not at their computers, you can quickly and easily enable them to interact with your via their mobile device.

Quite simply, the Sweet platform allows you to promote a text message address (known as a short code) such as the following wherever you are at:

text TDGARDEN yourname@yourdomain.com to 37619

(Go ahead and try it if you are interested - US #’s only - and the campaign is no longer active so you won't win anything)

This can be promoted at your tradeshow booth, on the big screen at a game, or on a bill-board, however you decide to promote it, and with whatever offer you want to make.

What happens next is where Eloqua gets involved. The Pedowitz Group's Sweet platform captures the inbound messages, and processes them, handling all of the data and subscription management. It then passes those messages to Eloqua as standard web form submits.

Whatever you can do with Eloqua forms or a marketing automation program, you can now do immediately when a person text messages you based on your promotion. Outbound SMS messages can be handled via the Sweet platform, or via Eloqua's SMS capabilities within a marketing automation program - whichever is appropriate.
The possibilities are endless, and quite interesting. I look forward to hearing what campaigns you've run using mobile marketing and text messaging solutions.

Thursday, August 20, 2009

Address Validation and the User Experience


It’s challenging to optimize the forms on your landing pages to make sure that you maximize both your conversion rate and the quality of the data flowing into your marketing database. The more fields we require, the worse our conversion rates are.

Similarly, performing inline validation on form data that prevents a submit can be very dangerous if done incorrectly as it will prevent submissions or frustrate visitors. One area that offers great promise to optimize is in the realm of address correction. If you are collecting physical addresses, either to use for direct mail marketing or for management of sales territories, you want the addresses to be correct.

However, we have all had experiences with websites that attempt to force an inline correction of our address and end up frustrating us as visitors.

Luckily, there is an approach that balances data quality with customer experience. Using a built-in function within your marketing automation programs, you can leverage Pitney Bowes global address standards database to automatically correct your addresses. This allows you to let visitors to your website experience a very flexible free-form approach to entering their addresses, but allows you to quickly correct those addresses to ensure that your data is very accurate.

To do this, from your marketing automation program, create a step that is an "Address Correction" step, into which your contacts, prospects, or companies will flow. The action, available under the "Data Tools" set, is "Run Address Validation". Note that this is a paid service, but the per-hit fee is very reasonable.

Within the program builder step, that is all you need to configure. However, if you want to configure the fields that are sent/returned for correction, you can configure them in the Setup area.

Go to Setup->Management->System Management->Add-on Manager to manage the address validation add-on.

Select the Address Validation add-on.

Within the setup interface for the Address Validation add-on, you will see a Task menu in the upper right corner, under Tasks, select Set Field Mappings.


This then gives you the mapping interface for the set of fields that are sent out to the address validation service and returned in a corrected manner. Select the fields from your own marketing database that you would like to use, or use the defaults that are already set.


If you use an address validation service, rather than forcing the user to wrestle with an inline validation, you allow the 5% of new or unknown addresses to pass through without causing user frustration.

Tuesday, August 18, 2009

Insights on Data Quality from Contact Group Dashboards


Understanding your data is one of the most critical things to do as a marketer. Data is a foundation for everything you do; lead scoring, segment definition, content personalization, lead routing, and marketing analysis. Without good data, each of those tasks will be challenging if not impossible.

One of the most powerful tools in understanding your data is the contact group. It lets you build almost any cut of data that you want. Most simply, this can be done with simple group overlap rules that show people who are in group A, but not group B for example.

A slightly more advanced technique is to combine groups and filters to perform robust group manipulation to create a combination of activity and data as a driver for a group definition. This process can be further automated using a marketing automation program to dynamically create a dashboard based on group membership.

With each of these techniques, you are provided with a one-click dashboard of the group. By selecting "Contact Group Dashboard" from the menu, you get a full suite of interesting reports showing you what is happening with that group and the contacts in it.

One of the most interesting reports in this dashboard is the Contact Field Completeness report. This report shows you, based on a view, how complete the fields are in contacts within that group. Each field is shown as being between 0 and 100% complete, giving you good insight into whether you have data to work with for the set of contacts in your group.

However, more interesting than this, is the results you get by clicking on a field of interest. For example, if we click on the "Title" field (98.2% complete), we can see that the data within that field is from a manual text field as it is obviously free form.

A quick look at this data gives you a good sense of whether it is of sufficient quality to build rules upon.

Using this dashboard to quickly understand your data gives you a very quick sense of where you are at and what areas you need to work on in terms of data quality.

Armed with this understanding, you can quickly tune your contact washing machine to best optmize the data that you have and the data that you need. With cleansed and normalized data, building segmentation rules, lead scoring rules, content personalization rules, and marketing analysis becomes significantly easier.


Thursday, August 13, 2009

Lead Scoring for Sales Enablement - Visual Cues in Salesforce.com


We all know that sales people are visual people. We touched on that quite a bit in last week's post on sales enablement. Rather than interpret a list or a number, they would much rather quickly look at a picture to indicate whether a person was qualified as an individual, or hot or cold as a prospect.

This visual orientation is one of the main reasons for the popularity of Prospect Profiler among sales professionals, as it provides this quick, visual view of what is happening with a prospect.

However, even without Prospect Profiler, these visual cues can be extremely valuable to your sales team. Having a visual indication of whether an individual is qualified and/or interested, is something you can configure quickly and easily within salesforce.com or your CRM system of choice, without any additional cost.

To do this is very simple. Essentially, you are building custom formula fields, where the "formula" returns an image that represents what you are interested in displaying.

To get started, go to the setup area, and under Leads->Fields, scroll down to Lead Custom Fields, and add a New field.

From here, you will be guided through a quick wizard to set up the field. The type of field you want to create is "Formula" as we will be applying some logic to the image display, and the output type is Text.

Provide a field label for your field, such as if we are building an image of 0-5 stars to represent how qualified a person is as a buyer (explicit score), we might label the field "Explicit Rating Image".

From here, you are presented with a Formula screen - select the Advanced Formula tab to get started. Note that we are just creating a formula to look at the Explicit Lead Score (which is already present) and return an image. We are not building a formula to actually score the leads, which will have been done in Eloqua, based on the best practices for lead scoring, and passed into Salesforce.com.

There is a small amount of code being used here, but nothing to be overly concerned about, as you can edit an existing code sample in order to build the exact image you require.

When we are looking at the explicit score, it may vary between 0 and 100, so we'll return 0 to 5 stars based on where it sits in that range. The first thing we need to do, however, is to tell the formula which field it is looking at to find your lead's explicit score.


Click on "Insert Field" and a dialog box will give you a list of your fields. When you select it, the internal name for that field is inserted in your code. You'll need to replace the internal name in any of these examples with your own in order to have it work in your CRM system.

For this example, to look at an explicit lead score field called "LS_Explicit_Score" (replace this with your own), and display stars based on the range of values in the score field, the code would be as follows:

IF( LS_Explicit_Score > 80,
IMAGE("/img/samples/stars_500.gif", "5 star"),
IF( LS_Explicit_Score > 60,
IMAGE("/img/samples/stars_400.gif", "4 star"),
IF( LS_Explicit_Score > 40,
IMAGE("/img/samples/stars_300.gif", "3 star"),
IF( LS_Explicit_Score > 20,
IMAGE("/img/samples/stars_200.gif", "2 star"),
IF( LS_Explicit_Score > 10,
IMAGE("/img/samples/stars_100.gif", "1 star"),
IMAGE("/img/samples/stars_000.gif", "0 star")
)))))


You can see that this also takes into account the range of scores (ie 0-100) you have in your scoring, so it is important to make sure your lead scores don't grow with time more than appropriate, and that the right scoring caps are in place. This ensures that your scores remain cleanly between 0 and 100 as they should.

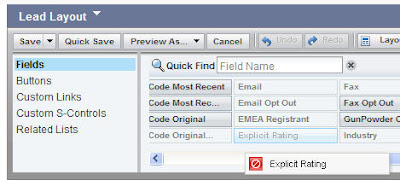
With this in place, you can then define who the field is visible to, and edit the Lead Layout to add in your field where appropriate. Generally, it is a good idea to drage the field for the images next to the number for the score so your sales team begins to get a feel for the underlying numbers.

This same process can also be followed for the other dimensions of lead scoring, such as implicit scoring (how interested a person is). Follow a similar process, but build your formula off of the implicit score. If you wanted a formula that would use a Consumer Reports style set of partially colored circles to represent the score, the following would work:

IF( LS_Implicit_Score > 80,
IMAGE("/img/samples/rating5.gif", "High"),
IF( LS_Implicit_Score > 60,
IMAGE("/img/samples/rating4.gif", "Med-High"),
IF( LS_Implicit_Score > 40,
IMAGE("/img/samples/rating3.gif", "Med"),
IF( LS_Implicit_Score > 20,
IMAGE("/img/samples/rating2.gif", "Med-Low"),
IF( LS_Implicit_Score > 10,
IMAGE("/img/samples/rating1.gif", "Low"),
IMAGE("/img/samples/s.gif", "no rating")
)))))


Again, you will want to replace LS_Implicit_Score with the name of the field in which you store your implicit score. Continue this process for any other fields you like.

If the field you are building a rule from has a ranking or stage such a Hot/Warm/Cold or A/B/C, rather than a score that comes in a range (0-100), you can use a slightly different way of writing the code, using a "Case" statement, as follows (again, in this example, replace "Rating" with your own field, and the A/B/C values with the values you expect in that field:

IMAGE(
CASE(Rating,
"A", "/img/samples/flag_green.gif",
"B", "/img/samples/flag_yellow.gif",
"C", "/img/samples/flag_red.gif",
"/s.gif"),
"status color")


With this in place, you can easily provide your sales team with the visual cues they need to quickly and easily understand which of their leads are qualified, which are interested, and which require follow-up.

Tuesday, August 11, 2009

Naming Conventions - A Simple Technique with a Big Payoff


Today's guest post is from Joel Rothman, one of our Senior Product Consultants. Joel spends a lot of time innovating new services and deploying our larger enterprise clients, so he has a lot of experience with how to make a marketing automation deployment successful.

Often, as Joel relates, it comes down to getting the basics right. In today's post, he talks about a simple thing - naming conventions - that can be put in place easily, but will pay many dividends in a larger organization's marketing efforts.


==============================


While not really as sexy as “Contact Washing Machines” or dashboards, a proper naming convention is a simple thing that can have great returns. Better to spend 5 minutes now thinking about it, then a few hours later trying to fix it.

Naming conventions can help you organize your assets within Eloqua to make it easier to find in select lists. It can also help with searching across the platform. And, if you are integrating things like Campaigns with your CRM system, it can help you get the most out of reporting in that system too! I would go as far as to recommend that you use consistent naming conventions across all your systems, if possible.


A solid naming convention could be used for consistency around the application, from Campaigns to emails and other channels.
There is no one size fits all naming convention. Best bet, make it as short as possible, while still be as descriptive as possible. Something like this would work well:

Region/Quarter/Initiative/Type/Name


So, you could end up with something like:

EMEA-Q109-LN-WP-NAME

OR

NA-Q209-LG-WB-NAME


Region/Initiative are things that are very specific to the way you do business, and I have seen them called various things. But, I would always recommend having at least a time frame and a type. For timeframe, it can be yearly or monthly, but I find quarterly usually works best. You also need to think through if it’s going to be the starting date of the planning or the execution. I would recommend the start date for the execution of a campaign. For type, things I normally see are webinar, seminar, tradeshow, whitepaper, direct mail, search engine etc…

Now, this is just an example, you would definitely need to choose a naming convention that fits your business. I have seen clients create spreadsheets that help generate the name for you, which is a good way to promote consistency.

If you are late to the naming convention party, I would say come on in, grab a party hat, it’s better late than never. Pick a date, and move forward with all assets after that date. Because naming conventions are about consistency, it’s not something I would roll out for a subset of assets (like emails, but not forms). Rather, it’s something you probably want to do with as much as you can. I haven’t seen any clients go back and change existing assets that were already executed on to line them up with a naming convention. However, assets that are still being used should probably be renamed.

Thursday, August 6, 2009

Getting Started with the Eloqua Web Services API


Aaron Riley joins us this week as a guest blogger. I'm very excited to have Aaron contribute a few posts as he is one of our senior product consultants, and spends a lot of time helping our clients and partner work with the Eloqua web services API.

I hope to feature a number of interesting extensions of the Eloqua platform here in the coming months. Some of the innovations I have seen that extend the marketing automation or multi-channel marketing elements of Eloqua, especially from our partner community, are quite exciting.

If you have been thinking about getting started with the API to build your own extensions, here's Aaron with a quick walk through of how to get started


===========================================


Web Services and Demand Generation


Tighter business alignment and decision making requires more integration, automation, and the ability to report across multiple systems. Using web services, you can connect back office systems, CRM systems, databases, social media sites, and other offline media with Eloqua.


At Eloqua, our web services API allows for:


1) Bi-directional integration between Eloqua's marketing automation platform and on-premise or custom CRM systems


2) Connecting marketing automation with social media, such as Facebook, Twitter, or Linked-In


3) Automating lead nurturing workflow in concert with other web services such as telemarketing or inbound SMS providers


4) Exporting your marketing data to a data warehouse for Business Intelligence (BI) and reporting for more advanced marketing analysis than what is native to Eloqua


The API gives access to the contact, company, visitor, groups, and data card entities, as well as marketing activities. We currently have over 100 clients using the API and have certified partners who can help.


Getting Started


1) Reach out to your Customer Success Manager (CSM) and ask for the API to be enabled. It won't be enabled by default in your instance, but we'd be happy to turn it on for you.


TIP: Access Customer Central for documentation and examples.


2) Create a user in Eloqua and add them to the API User security group.


TIP: Test your user and password.


3) Import the WSDL into Visual Studio 2008 as a service reference.


4) Run the following “Hello World” VB.NET snippet to get you started:


TIP: Customer Central has code samples in other development languages if you prefer

Public Class Test
Public Sub New()

Dim elqService As New EloquaAPI.EloquaServiceClient()
elqService.ClientCredentials.UserName.UserName = "COMPANY\API.USER"
elqService.ClientCredentials.UserName.Password = "********"

Try
Dim result As EloquaAPI.DescribeEntityTypeResult
result = elqService.DescribeEntityType("Base")

Dim entry As EloquaAPI.EntityType

For Each entry In result.EntityTypes
Console.WriteLine(entry.ID)
Console.WriteLine(entry.Type)
Console.WriteLine(entry.Name)
Next

Catch exS As System.ServiceModel.FaultException
Console.WriteLine(exS.ToString)
Catch ex As Exception
Console.WriteLine(ex.ToString)
End Try

elqService.Close()
End Sub

End Class

You are now connected and ready to integrate your marketing efforts with the rest of your business, update your data warehouse, or further your automated lead nurturing efforts.

Tuesday, August 4, 2009

10 Ways for Marketing to Enable the Sales Team


Marketing and sales often don't enjoy the best of relationships. The great news is that this situation has an amazing opportunity to change. Marketing can, right now, provide their sales team with insights that can make a tremendous difference in their lives and drive bigger commission cheques for them. Nothing changes a relationship with your sales team faster than a larger commission cheque.


Here are 10 things you can do, with Eloqua and your CRM system that will quickly deliver a lot of value to your sales team:

For Their Territories:

1) Territory Traffic Light Dashboard - For each sales person's territory, configure them a "traffic light" dashboard that gives them an instant view of which of their accounts are showing buying interest.


Here's how to build a Territory Traffic Light Dashboard


2) Territory-Based Email Alerts - configure for each rep, automatic email alerts for the accounts they own. This will give them a real-time indicator of buying interest, and let them manage the accounts proactively based on buyer interest.


Here's how to set up Territory-Based Email Alerts


3) Unknown Company Visitors - Show them which companies are on the website doing research who may not currently be known to your organization, give you a great opportunity to initiate a conversation as a buying process starts at that organization.


Here's how to configure a report on Unknown Company Visitors


For Their Accounts:


4) Account Insights and Key Players - Give each sales person a roll-up view that shows, for each of their accounts who the people are who are showing interest and what they are interested in. Armed with this insight, your sales team can quickly determine what the key conversations they need to have are.

Here's how to show sales a report that provides Account Insights and Key Players


5) Configure Your Social Media GPS - Identify social media activities and pass those through to your CRM system so that your sales team can understand which accounts, and which individuals are engaged in social media conversations. By presenting the prospect's social media activity within your CRM system, you enable your sales team to understand new context to the prospect interaction without leaving an environment they are comfortable with.


Here's how to Configure Your Social Media GPS


6) Find Sales the Right Contacts - Integration into role-based discovery services to drive real insight into who can make a purchase decision, not just a raw list of quasi-targeted and out of date names. Often, the person doing the bulk of the research is not the ultimate buyer, so discovering the names of the inviduals in the right role can be very beneficial to your sales team.

For Their Contacts or Leads:


7) Prospect Profiler for Sales Insights - enable Prospect Profiler in order to provide a rich, interactive, graphical view of each individual's interest. This allows your sales team to guide conversations and know who is showing the right level of buying interest.
Here's information on Eloqua's Prospect Profiler for Sales Insights

8) Show Areas of Prospect Interest - Configure your CRM integration to identify areas of your website that a person is showing interest in and highlight those within their concact or lead record in your CRM system. This enables sales to immediately know which topic of conversation will be most warmly received. Be sure to also use graphical imagery to more clearly highlight interest.
Here's how to Show Areas of Prospect Interest to sales in your CRM system

For Your Communications

9) Send-on-behalf-of-Sales - Have your marketing team send outbound email campaigns on behalf of your sales team. Not only does this drive a much higher response rate to the email campaigns, but it also builds upon the salesperson's relationship with the prospect and provides a great opportunity to start dialogs.

Here's how to set up your marketing campaigns to be Sent-on-behalf-of-Sales

10) Provide Sales with Content - provide marketing-created content to your sales teams in their Outlook desktop email environment so they can find great content, personalize it, and send it in a trackable way to their prospects quickly and easily.

Here's how to Provide Sales with Content within their Outlook environment


There are many ways that your marketing team can enable your sales team, and the 10 ideas above are great ones to get started with. In today's environment, it is possible for marketing and sales to have a much stronger relationship than they ever have had before, and it all starts with sales enablement.