Showing posts with label Email marketing. Show all posts

Tuesday, August 24, 2010

Content is King, but sometimes we need to replace the King


(guest post from Ben McPhee)
We all know how important content is. It didn’t just rise to the throne à la nepotism like the rest of the kings with which we are familiar. No – content is legit. Content can make or break a campaign, a quarter or even a job.

Now while content in and of itself is critical to pushing out information and pulling in prospects, what is just as important is the ability to manage content in such a way that it is always where it needs to be when it needs to be there. Pretty straight forward, but examples never hurt.

Everyone knows that overwhelming sensation of dunce after sending out a work email to 5 executives reading, “Please see the attached deck . . .” and then shortly thereafter realizing that you either didn’t attach anything but your recently crippled pride or that you actually attached the first draft of the presentation you whipped up 3 months prior on 4 minutes of sleep.

That kind of sucks – but now imagine you actually sent a link to the wrong presentation or an outdated rate sheet or a promotional flyer sporting a decimal place two digits too far to the right . . . to 50,000 of your prospects . . . yikes . . . would be nice if there was an easy way to stuff that one under the rug.

But it’s not just about putting out fires – it’s also about having a scalable, manageable method of pushing out regular content updates to your prospect and client base. You may have the same email going out every week with only minor updates within the content to which the central link in the email directs your audience - do you really want to have to edit that email every single time you send it out? Or have to make changes to HTML or jump through any hoops whatsoever? If the execution and process management suffers from confinement and complexity, ripples can extend from poor content, to lost content to late content and beyond.

Because we recognize the important of a clean and quick content delivery and update process, a while back, we implemented a Replace Content tool that makes it super-easy to swap content to which you are linking in your emails and landing pages - WITHOUT having to actually go into those emails and landing pages! Now, we want to make sure you remembered that it’s there!

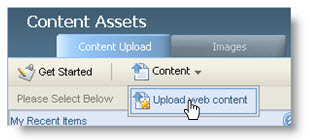
1. Uploading your content is easy – just go to the Content Asset area and upload:


2. Then, to insert a replaceable link to the content, copy and paste either the Email Redirect Link (for emails, so that you can track clickthroughs AND ensure that your branding is properly injected into the URL, assuming you have either the Silver or Gold Branding & Deliverability package) or the Trackable URL (for landing pages):


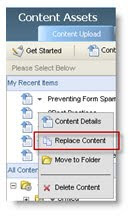
3. Once you have inserted your replaceable content link into your email or landing page, it’s a breeze. Whenever you want to update the content to which the link points, simply go to your content asset, click the dropdown next to its name and select, Replace Content:


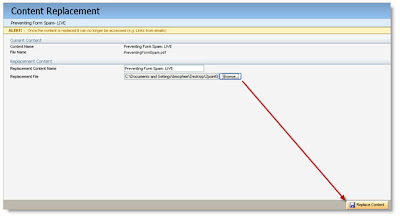
4. Then select the file with which you want to replace the content and hit Replace:


You’ll get a warning to verify that you in fact want out with the old and in with the new:


Once you hit ok, the system will begin the replace process and then when it’s done, you’ll see the green bar of success and you’re done!


Now anyone who clicks on the link you inserted in your email or landing page will be automatically redirected to the new content – and you barely had to do ANYTHING!

Go ahead and test it – send an email out with a replaceable link in it, click it, see the first round content, replace the content, go back to the email, click the link again, check out the new content - takes a few minutes and you can see just how powerful this feature really is.

So remember the next time this saves your organization either time or embarrassment – Eloqua’s got your back!

Thursday, May 20, 2010

“Stop Light Program” – Filters for controlling Email Frequency


Guest post from Carlos Cerqueira, a senior product specialist on our Premier support team.

==========================


Have you been enjoying the new Contact Filter options but want some ideas for incorporating them into your Email Marketing, beyond simple segmentation?
A great way to incorporate the new filter options into your email campaigns is to use the concept of Email Frequency or as one of my client’s has coined it: “The Stop Light Program”. This allows you to address issues with over saturating prospects/contacts with emails by automatically having them removed from email sends once they reach an appropriate number of email receptions.

The need to create a program is no longer required but the idea is still much the same: Create a series of Filters based on email frequency ranges that assign contacts a Red, Yellow or Green value. Based on the color assigned to the contact you can then implement these filters into various areas of the application to either block or allow email sends to these contacts.

Prerequisites for Filters

What you want to do is to decide beforehand what amount of email sends should classify a contact to be placed into the Red, Yellow or Green categories. You will need to input those values in your filters when you create them.

There are valuable reports in Eloqua that will help you decide as an organization what are acceptable email ranges to assign to your different colors.

An Example would be as follows:

Red – received over 10 emails in last month

Yellow – received between 4 and 9 emails in last month

Green – received between 1 and 3 emails in last month

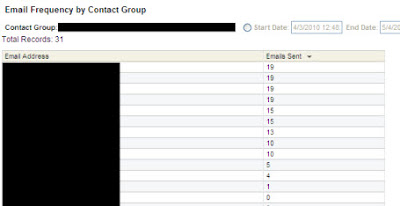
A Valuable report is the Email Frequency by Contact Group (which is also a great report to look at on your Contact Group Dashboards) which will show you all the contacts in that group and how many emails they received within a certain time range:


Creating Filters

To create a new filter head over to the Contact Tab and select the Contacts dropdown. Select Create a new Contact Filter.

Once you are in the Contact Filter canvas you can see all your criteria options on the right hand side which can be dragged and configured on your canvas area.

The criteria we are interested in is the “Have been Sent an E-Mail”:


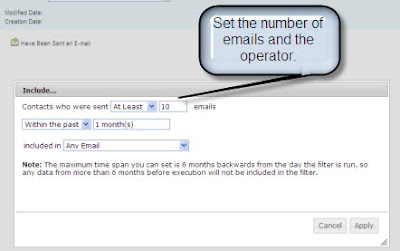
Click and drag that criteria onto the canvas and a configuration window will pop up:


Each color will be its own filter and the email amounts can be altered at any point as your initial ranges may be re-thought.

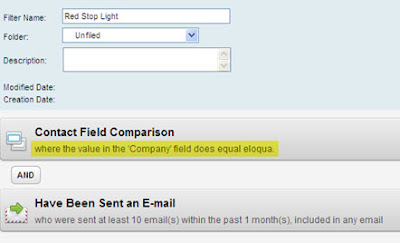
Additional criteria such as Contact Data may be used to further segment out your contacts to target specific industries, companies or countries, i.e. Adding a criteria to only see contacts that are part of a certain company:

Another good tactic is to incorporate other activity based criteria into the filter such as Opened emails, clicked and E-mail, etc. This allows for granular filtering and also then allows for more flexibility in how you leverage these new filters.

Leveraging the Filters

Now that you have these filters built you want to know how to implement them into your current process to possibly prevent “Red Stop Light” contacts from receiving any emails until they are Yellow or placing your “Green Stop Light” contacts into a nurturing campaign.
Below are some suggestions that might help you decide how you are going to incorporate these filters into your system:

- Master exclude List - If you are experiencing issues where you don’t want any contacts who have received over a certain amount of emails to be emailed at all until they are within Yellow or Green ranges then placing the “Red Stop Light” filter into the master exclude area would be an option. The master exclude list can be accessed by Customer Administrators under the Setup->Management ->System Management tab but be warned that any contacts added to this list are EXCLUDED from any email sends in your system.

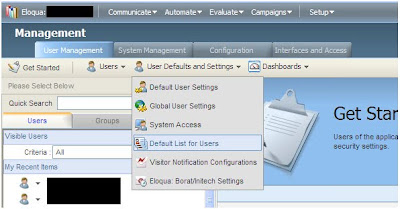
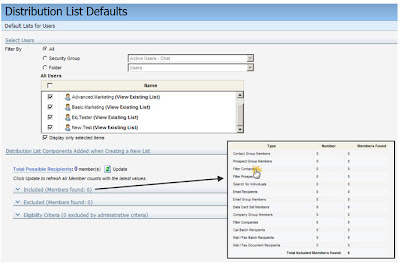
- Default Distribution Lists – Another exclusion option is to add the “Red” filter into default distribution list’s excluded area which would mean any NEW distribution lists will automatically have that filter as an excluded asset. The Default distribution list configuration is again only accessible by Customer Administrators and can be found in the Setup->Management->User management tab and from there just click the User Defaults and Settings menu:


- Nurturing Campaigns – What to do with the Red and Yellow filters is generally obvious but there are possibilities for your Green filter where you can combine activity criteria (opens, clicks,etc) as mentioned earlier in the post to pull contacts into a lead nurturing program. This allows you to engage a target audience who you know is interested in your product/service but has not been bombarded with recent emails.

Hopefully this had shed some light on the power and flexibility of our new Contact Filters and encourages you to try and think outside the proverbial box.

Wednesday, March 31, 2010

Ready to Welcome Your New Leads?


(Guest post from Heather Foeh, Eloqua's Manager of SMB Customer Success.)

====================


In this 1-minute video featuring Paul Teshima, SVP of Customer Strategy and Success at Eloqua, explains the benefits of a Welcome Program and why you should consider creating one:


(if this does not load, click here for the video on using marketing automation to create a welcome program)

Now, let’s dig in and build a 3-step Welcome Program in Eloqua. Just follow the instructions below and you’ll be on your way.

Step 1: Build 3 Emails

If you’re not sure where to start with your content, think of Who, What and How:

• Who: Introduce your company. Set the tone for welcoming the prospect into your “home” - this is your chance to be friendly and inviting. Be sure the user has a way to contact you via phone, email and social channels. Also, let them know why they are receiving this communication.

• What: Introduce your products and services. Think of this as the “grand tour” you give someone new when they come to your home. You may want to link to a comparison chart on your website which explains your different product options. If you’re a service company, consider adding a testimonial quote from a happy customer. Highlight your flagship product through visuals and links.

• How: Give the prospect a way to educate themselves further. If you have a Top Ten checklist-type of document, this is a great time to share it. Or perhaps a document outlining “Five Things You Need to Know Before You Buy a _______”?
We recommend putting all three of these emails in their own Email Group in Eloqua so that you can easily report off of them.

(P.S. - Remember to keep it fresh. Add a reminder in your calendar to look at these emails at least once a quarter and make sure that they are still up to date.)

Step 2: Create Your Workflow in Program Builder
Create a new Program and in the setup screen un-check the box that says “Allow members to enter the program multiple times”. In the Default Member Type field choose “Contacts”.

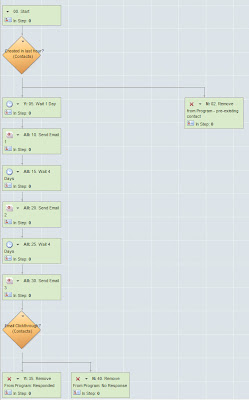
The simplest program will have this flow:

00. Start – entry step without an action, just a holding step
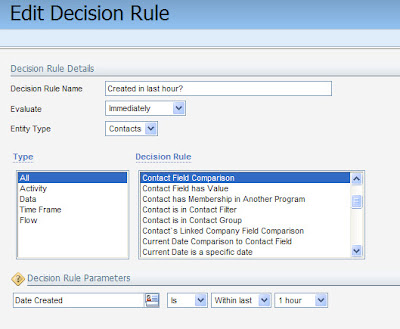
Decision Rule: Created in Last Hour? – This is a check to make sure that the contact is indeed new to your database:


02. No Path/Remove from Program - pre-existing contact

05. Yes Path/Wait 1 Day – this is an optional step but you may want to wait 1 day (or more) before sending someone the first email in your series

10. Send Email 1 – point to the first email that you created

15. Wait 4 Days – the timing is up to you, but we recommend not waiting more than 1 week. Your goal is to engage with people while they’re newly interested in you, so don’t wait too long.

20. Send Email 2 – point to the second email that you created

25. Wait 4 Days – again, the timing is up to you.

30. Send Email 3 – point to the third email that you created
Decision Rule: Email Clickthrough? – Check to see whether or not the prospect has clicked through any of the emails in the Email Group (another reason why it’s nice to have all three lumped together in their own Group)

35. Yes Path/Remove From Program: Responded – by creating two separate Remove from Program steps you’ll be able to easily report on the success of your marketing program.

40. No Path/Remove From Program: No Response

Here’s what it looks like:


Of course, you can get much fancier with this program by adding in decision rules along the way to see what the prospect has already downloaded from your site and then send them different assets. Or you may want to include only prospects who have a low lead score or who have certain titles. But if you’re just looking to get a program up and running, start simple then add complexity after that.

Step 3: Add Contacts to Your Program
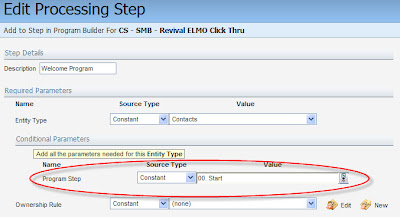
As you know, the beauty of Eloqua is building something once and then letting it run like a workhorse in the background. We lovingly call this “set it and forget it.” The best way to do that for this program is to edit your Forms to push people into it via a Form Processing Step. The Processing Step is called “Add to Step in Program Builder” and you’ll configure it to look for your Welcome Program and the first step (00. Start) in the program:


Another tip: If you are uploading a list and you’d like to drop those names into this Welcome Program, you can do this during Step 4 Upload Actions of the Upload Wizard in the “Add Contacts to Program Step” section.

That’s it! You now have a Welcome Program nurturing all of the new leads in your database. We’d love to hear from you… Drop us a note in the Comments section if you plan to implement this or if you have any ideas or questions.

Monday, March 29, 2010

The Postman always rings twice, but how often do you ‘ring’ the Postmaster?


Great post from Sweeney Williams, one of the Email Deliverability gurus who helps keep Eloqua head and shoulders above any other marketing automation platforms when it comes to the critical issue of getting your email delivered.

=================================

I get asked quite often about how / where I find out about best practices when delivering to an ISP, removing blocks, etc. and there are a few answers there. The main one is that ISPs tell EVERYONE who takes a bit of time to look.

How do they do this? Via Postmaster pages, which are sites set up to provide delivery information specific to those ISPs. The Postmaster is the person / group of people responsible for email traffic in and out of that ISP’s network.

Something I find gets lost all too often when discussing ISP delivery with clients is that ISPs do not have a bias against email marketers and by no means do they look to block as many as possible. They are also not tirelessly trying to find new ways to send your legitimate mail to the Junk folder. They are, by large measure good natured folks who simply want to ensure their clients get the mail they want, and none of the mail they don’t. Stop and think about that for a moment…it’s not about ‘blocking’ or ‘filtering’, it’s about ‘allowing’, but ONLY allowing WANTED mail. They are working to ensure the best possible email experience for their users, which means allowing only good email in.

This is an enormous task when you consider the sheer volume of email that is incessantly trying to enter their networks. Coupled with that is the economic reality of shrinking Postmaster teams, at times pared down to one or two individuals, in the face of an ever growing stream of SPAM email. One way to ensure that legitimate mail does not get erroneously flagged as SPAM is to tell legitimate marketers what is required to achieve the best possible delivery.

I am not going to list all Postmaster sites here, as that would take away the fun of searching (hint: there may be a Word to the Wise somewhere that could help), but do want to highlight a couple of my favorites: Yahoo! and AOL.

The Postmaster site for Yahoo! is http://help.yahoo.com/l/us/yahoo/mail/postmaster/ and provides information about their SPAM policy, SMTP error codes (I hope you’re checking that Bounceback History report every once in a while), and even My email is being blocked by Yahoo! Mail. What can I do?

By the way, you can even find out if there are inbound mail issues that can affect your mailings here:

http://tech.groups.yahoo.com/group/ymailadmin

The Postmaster site for AOL is http://postmaster.aol.com/ and takes things even farther. Not only does it list information about error codes, block removal, best practices, and authentication, it also has a relatively new and incredibly cool feature: AOL IP Reputation!

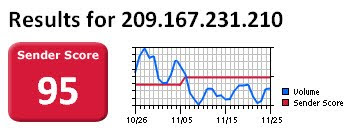
That’s right – you can find out EXACTLY how AOL views your mail via their internal reputation system located at http://postmaster.aol.com/cgi-bin/plugh/check_ip.pl. Simply plug in your IP address and you can see if your reputation is Good, Neutral, or Poor:


They then link to resources that can help you correct issues that may have led to a poor reputation. I think this is a great feature and hope that others follow suit.

As always, the best way to ensure you get into the Inbox is to keep your data clean and your content relevant, but too much information is never a bad thing. Visit the Postmaster from time to time and see what’s listed.

Thursday, February 25, 2010

Engage Search Visitors viaTriggered Campaigns


Guest post from Chad Horenfeldt from Anything Goes Marketing

===========================================

At the recent MarketingSherpa’s 2010 Email Marketing Summit, Carolyn Nye, Marketing Manager at S&S Worldwide discussed a number of must-have triggered email programs for all businesses. One of these programs included tracking visitors whose last page on the site was the search results page. She explained that in this situation, the visitor didn’t find what they were looking for and left your site. This post explains how to create a simple automated marketing program that will send a helpful email to these visitors assuming they have opted in to receive communication from you.

1. Create the email. Build a simple email that includes helpful advice such as “Couldn’t find what you’re looking for? Please contact us at 1-800…”. You may also want to include links to your blogs or other social media sites like LinkedIn or Twitter so the visitor can find other sources of information that they may not have been aware of.

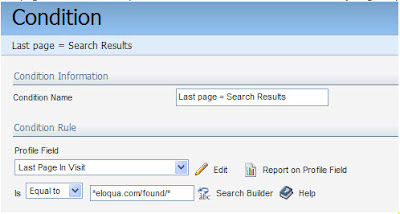
2. Create a Condition that reports on visitors whose last page was the search page. Go to Automate > Web Profiling > Segmentation. Create a new Condition called “Last page = Search Results”, choose the Last Page in Visit as the Profile field and enter the name of your search results page. You can use wild cards as you only need a small part of the search results page URL so Eloqua knows what you’re talking about. I’ve used *eloqua.com/found/* so Eloqua looks for any last pages that has that as part of the URL. Each site is a bit different so just go to your search results page and grab what you think you need.

3. Create a Condition Visitors Report. Create a report that returns all the web visitors that have visited this page in the last day and save it.


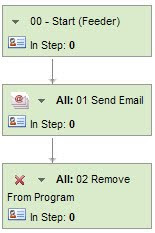
4. Create the marketing automation program. Create a simple program in Eloqua that has a Start step, a Send Email Step and an Exit step. It should look like this:

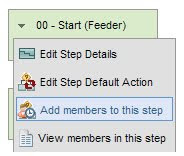
5. Create the program feeder. In the first step of the marketing automation program, select “Add members to this step” and then choose “New” in the Program Feeder area.

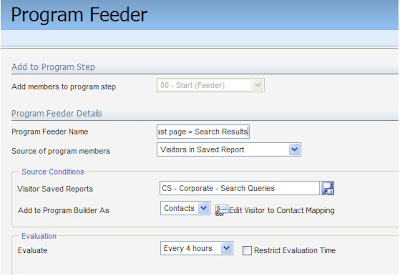
Create the feeder and choose “Visitor Saved Reports”. Use the Saved Report you created earlier and set the feeder to evaluate every 4 hours. Turn the program on and you’re all set.

For more information on feeders see this post on connecting with new contacts in your marketing database.

One last note – you don’t need to worry about Eloqua's sending repeat emails as you can set the email step to only send the email once.

This is a good example of how you can build very simple triggered automated marketing campaigns to engage your prospects and customers. Let us know if you have created other types of campaigns like this.

Chad

Tuesday, February 9, 2010

Distribution List Defaults


(Guest post from Leigh Oxley)

Working in Product Support, we often identify common requests from clients on certain topics; ideas that they’ve heard about at user groups, in our online Customer Central community, or know they should be able to do, but just aren’t quite sure how to implement. Many organizations want easy ways to ensure their teams are reaching the right audiences, and one way to do this in Eloqua is to use some quick (and easy to set up!) customization by configuring default distribution lists for your users. Today, we’ll walk through the concept of distribution list defaults in Eloqua, and quickly review how to set these up for your team. Keep in mind this is something that is only available for Customer Administrator-level users, so if you don’t have access, speak with your Eloqua administrator about implementing this idea for your team!

Default distribution lists were introduced in late 2008 to allow Customer Administrators to set restrictions on users sending batch emails. For example, if you want to be sure that your marketing team in Texas is only able to send batches to contacts in Texas, you can use distribution list defaults to configure this. These defaults can be configured by individual user, security group, or users within a certain folder. To access the interface where you’ll set these up, navigate to Setup > Management > User Management and use the “User Defaults and Settings” drop-down at the top to access “Default list for Users”. Here, you’ll be presented with a screen to choose which users you want to setup the defaults for, and the same distribution list configuration screen you’re used to seeing.

This looks somewhat familiar, but not entirely…

You will notice that the Included/Excluded criteria settings in this interface may be larger than what you will be used to when working with standard email distribution lists. This is because these default lists can be configured for all entities using lists – Eloqua PrintMail, Call onDemand, and Fax. This allows you to really customize your database to your requirements, and define who on your team can reach out to which prospect/client markets, across all possible outbound communications from Eloqua!

One part of this functionality that we often get questions about is the two options at the bottom of the page where you’d normally see a save button: “Add Defaults” or “Replace Existing Defaults”. If you’re unsure about what settings this user may currently have, we recommend building the settings you’d like, then using the “Replace Existing Defaults” button. You can, however, use the “View Existing List” link beside each user listing above to see what defaults are currently configured, and then simply add new settings to the current setup.

What will my users see, and how do I know if this functionality is right for our team?

When creating a new distribution list, your users will be presented with the defaults you’re now configuring for them. They can add to these settings, but cannot remove the defaults you set. For example, let’s set up the Elq.Tester user up to include the “State = NY or New York” contact filter as a default. That user can still add other components to their lists, like contact groups or other filters, but they cannot remove that “State = NY or New York” filter when creating new distribution lists. This is important to keep in mind, as any list this user now creates moving forward will be affected by this. When Elq.Tester creates a new distribution list, they will always have the above filter included in all emails.

Of course, the one thing we all want to know, if this is something that will be useful for our own team. Here are some scenarios to consider:

• If you have a team of people who should always be copied on every batch that is sent from Eloqua, you should be using default lists! Simply set them in the “Include” section for each user’s default lists.

• If you have your teams broken up into prospect and customer marketing teams, you should be using default lists! Simply create contact filters and user folders, and set the customer marketers up to always exclude prospects, and vice versa.

• If you want certain members of your team to only be able to send emails internally, you should be using default lists! Simply set your own internal domain in the eligibility criteria area!

• If you maintain a list of contacts who should only be contacted by your main power user, you should be using default lists! Simply drop those contacts into a contact group and set them in the Exclude section for all other users.

Don’t forget to check out Eloqua’s Customer Central user community for more information on default distribution lists and how this functionality can work for your team!

Tuesday, January 26, 2010

Email Marketing and the Preheader


In this week's guest post, Sweeney Williams, Eloqua's Email Deliverabilty and Privacy Specialist looks at another great topic around email marketing - the preheader, and what it can do for your open rates. If you haven't already, be sure to also look at Sweeney's last guest post on doing an Email Deliverability health check.

==========================

I spent the latter part of 2009 with my agent looking at homes in downtown Toronto (glad that’s over) and I thought to myself; what better way to kick off my posts for 2010 than with a discussion about real estate. Specifically, that nice little piece of land right at the top of your email called the preheader. This area, usually reserved for your “View as a webpage” link is actually a powerful venue for increasing open and click rates if used correctly. Marketers who have placed their call to action in the preheader have seen response rates increase dramatically.

Consider this; popular email clients such as Gmail, Outlook (with autopreview enabled), and even the iPhone display preheader information BEFORE the email itself is opened.

Here’s how one looks in the Gmail preview:


In Outlook:


And on the iPhone:


As you can see, even with limited space you can get valuable information across without the email being opened, or having images displayed if it is. Note that in the Gmail example above, the amount of preheader text that is displayed depends wholly on the length of the subject line. Take a look at the difference with a longer subject line:


In Outlook, the display of preheader text is altered based on the justification used. The original example used left justify. Here’s how the same email displays if the text is centered:


So, adhere to these best practices to ensure your preheader is optimized:

• Left justify
• Keep subject lines short to maximize the area available for your preheader in clients like Gmail
• Place the most pertinent information in the first few words since those are the ones which will display in preview
• Ensure it is no longer than two lines, without extra line space
• Reinforce the main message of the email, and add a call to action. Most people just want to go straight to your site and skip the rest of the email (if the call to action is compelling enough)


Where can you set them up in Eloqua? In your predefined Headers. Navigate to Communicate->Email Marketing->Tools & Content Components->Headers. Create a new header or copy an existing one, then place your preheader message before the “view as a webpage” text:


Keep in mind that unlike the usual scenario these headers should NOT be reused as the message likely would not pertain to future emails. Name them appropriately so that they are not reused by others in your organization who may mistake them for reusable headers.

That’s your real estate tip for today. See you next time.

Tuesday, January 19, 2010

Astadia's Proper Pasting Party


Our friends at Astadia have maintained a great series of Eloqua tips, based on their work with 1000s of great marketers around the world. They covered a very important topic - Pasting in order to avoid Microsoft Word formatting - and I wanted to share that tip with you as it is a quick win that can save a lot of time and headaches.

I encourage anyone interested to sign up for Astadia's tip of the week, view all the past Eloqua tips, or visit their marketing best practices blog.

==============================

You're invited to the Proper Pasting Party!
Where: Your Eloqua install
When: Now and Forever
Why: To avoid looking like you lack attention to detail by blasting out emails from Eloqua that look unclean and unprofessional because of your bad, improper pasting habits.
BYOC (Bring Your Own Content or Cocktail if you'd like)

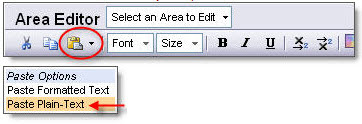
There's an often-overlooked button in Eloqua's email editor toolbar: Paste:

In this Tip of the Week, we're going to show you how to make use of this unsung hero to avoid pasting bad content into your Eloqua emails.

Your usual workflow probably goes something like this:

1. Write the text for your email in Microsoft Word and receive revisions and approval from your team.
2. Create a new email in Eloqua.
3. Open your Word document and select all of your text. Click CTRL+C (or right-click and select "Copy") to copy all of the text.
4. Click over to Eloqua and click CTRL+V (or right-click and select "Paste") to paste all of the text into your email. NOTE: DO NOT DO THIS! Read further to learn why...

But when you run the email checker in Eloqua, you get this annoying error:


You may also notice some strange characters or empty boxes in a few places in your email when you test it on a non-Microsoft email client. Not testing on multiple email clients? Well saddle up cowgirl/boy and get 'er done! It is a best practice to test your emails in various email clients since your readers are not likely to be using the same one (no, not everyone uses Microsoft Outlook). The ugly email content is caused by some of the HTML formatting in Microsoft Word which is not compatible with all email clients.

But fear not friends – there's a solution!

Steps 1 through 3 above are all the same. But when you get to Step 4, you need to make a small yet muy importante change (that's very important for you non-Spanish readers):

In Eloqua, click the small black arrow next to the Paste button on the email editor toolbar.
From the menu for Paste Options, select Paste Plain-Text.


Now, all of your text will be dropped into your email, but without the problematic Microsoft Word formatting. If you choose Paste Formatted Text, it will continue to create the problematic Microsoft formatting.

Party on, Pasters!

Friday, December 11, 2009

Grow Your Database Organically with Eloqua ‘Refer a Friend’


Today's post is a guest post from our own Amber Stevens, Marketing Programs Manager. In this post, Amber looks at ways of encouraging sharing that seamlessly complement the social sharing features of Eloqua.

Amber is focused on our SMB account base, and as such is always looking for new ways to help small and mid-sized companies get the most out of Eloqua and connect with their peers. Connect with her at amber.stevens@eloqua.com with ideas, suggestions, or comments.

==========================

Many marketers are enabling content sharing with Eloqua’s Social Sharing features - a great way to expand reach beyond traditional channels. But, did you know that Eloqua ‘Refer a Friend’ allows your prospects to share valuable content among their networks without requiring Twitter, Facebook, LinkedIn or any other active social media accounts? ‘Refer a Friend’ allows recipients to recommend content to a friend and automates a personalized request encouraging opt-in from the “referrals”. This is a great way to grow your database organically and ultimately drive more leads to the top of the sales funnel. The process works best when combined with internal contests or external incentives in order to increase the likelihood of friend referral.

You only need to complete the four step set up process once – then, you’ll be able to quickly add to any email header and start capturing new referred contacts. The amount of time to do this will vary depending on whether you use existing templates or create custom content. I used existing forms and layouts and was able to complete the process in about fifteen minutes on my first try.

Overview: in six steps, you’ll create a web profile field to capture the ‘Refer a Friend’ information, create the actual ‘Refer a Friend’ form (from an existing template), create a query string to capture unique email forwards, insert the form into a hypersite, insert the hypersite URL into an email header, and finally, insert the header into an email to put ‘Refer a Friend’ into action.

Here’s how it is done step-by-step:

First, you’ll need to create a *Profile Field to collect the Refer a Friend ID.

*This method requires the use of Web Profiling Fields to be created and modified, so check with an administrator to ensure you have access to these fields.

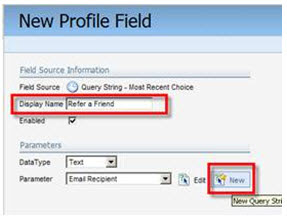
1) Navigate to Automate -> Web Profiling. Click on Profiling -> Profile Fields -> Expand Query Strings and then select the drop down next to Query String – Most Recent Choice, New Profile Field.

Enter a display name and under parameter, and make sure the ‘Force Profile Update’ is checked. Click on New. This will open the parameter detail window.

In Parameter Details, enter a display name, and set the parameter as “RAF”. Leave the rest other options as set by the default and save and close the window.

Next, create the Refer a Friend Form – there is pre-created form you can use to save time!

2) Navigate to Automate -> Forms -> Generic -> Refer a Friend (Save Referrer and Friend) -> Select Form Details.

From the task bar, select Fields and New Profile Field.

Enter a display name and select your Refer a Friend profile field that you created in the first step. Save and Close.

Then, publish the Refer a Friend Form to a hypersite

3) From the Layouts menu on the Task bar, select New Layout (Custom or Standard). (If using a New Standard Layout, in the bottom menu bar, select ‘Add Existing Form Field’ and then click All Existing Form Fields – this saves loads of time).

Enter a form layout name and then save the layout. Save and close the dialog box.

Select Layouts and List Layouts. Locate your saved layout, then click the arrow next to it and select “Publish Layout”.

Finally, choose the hypersite that you would like the form to be published on, enter the name of the page, the title that you wish to have display in the web browser and then click publish.

Create the Master ‘Refer a Friend’ URL with a query string

4) Your ‘Refer a Friend’ form is available for use immediately after you publish it. However, to ensure that each email can be forwarded from many users, you need to identify each unique email to be managed by the single form. To do this, you’ll create a query string.

Our sample ‘RAF’ form URL is:

http://trainingservices.eloqua.com/forms/02RH_RAF

A query string adds tracking parameters to a URL starting at a “?”, followed by identifying characteristics. Our query string is:

?RAF=elqReferFriendID

The complete URL for this example would be:

http://trainingservices.eloqua.com/forms/02RH_RAF?RAF=elqReferFriendID

NOTE: When adding this link to an email, do not make it a redirect link. This link is trackable.

Save this query string somewhere, we’ll use it in the next step.

Now that all of the set-up work is complete, we’ll add the ‘Refer a Friend’ functionality to an email header. This is the step that you will follow for all future uses of ‘Refer a Friend’ – the hard work is now done.

5) Navigate to your headers Communicate -> Email Marketing -> Email -> Tools & Content Components -> Headers and create a new or modify an existing header. Once you have identified your header, click “insert hyperlink” and select a “Text Link” as the type.

Set it to Send to Hypersite/Hosted Forms

Select Area Editor > Source Editor

After the first “?” in the URL, add the query string:
RAF=elqReferFriendID&

Click Save.

The last step is to configure the ‘Refer a Friend’ Details and Insert into your email

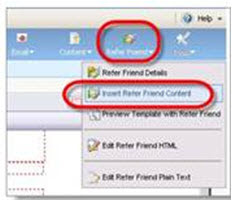
6) From within your email, select Refer Friend -> Refer Friend Details
The from email address and name will be auto-populated with the contact information of the person who is referring. However, in the event that their information is not available, you need to set default information. Save Details.

Insert Refer Friend Content into your Email from the Refer Friend menu.

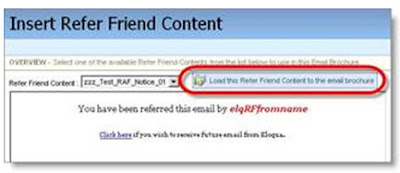
Load the ‘Refer a Friend’ content into your Email. It will show you the preview, and no save is needed.

THAT’S IT! You’ve created the ‘Refer a Friend’ form, enabled unique tracking with query strings, and added the functionality into an email.

Note: The referred friends email is saved into a “friend” table, which is kept separate from the contact table so you cannot market to “friends” until after they’ve opted in. This allows you to remain CAN-SPAM compliant.

For more information and advanced tips on using ‘Refer a Friend’ forms as well as testing, reporting and tracking, view these related materials:

Subscribe to “Did You Know” for Eloqua How-To’s Like This One
Customer Central – How To Set Up Refer a Friend
Customer Central - Viewing Refer a Friend Reports

Wednesday, December 9, 2009

Email Deliverability Health Check


Today's Eloqua Artisan post is a guest post from Sweeney Williams, Eloqua's Deliverability & Privacy Specialist. As a resident guru of email deliverability, Sweeney is responsible for managing Eloqua's network sending reputation, as well as providing deliverability and privacy consultation to Eloqua clients.


====================


We all talk about Digital Body Language in the Eloqua world, but there is an aspect of the digital body that is rarely discussed – the health of your IP reputation. As many are aware, the chief determining factor of where your email will end up (Inbox, Junk filter, or SPAM filter) is the reputation of your sending IP. If your data and data management practices are healthy, your IP reputation will be healthy too. If they are out of shape, your IP will be as well and those email metrics will follow suit. How can you keep things in tip top shape? Here are a few easy guidelines to follow:

1 Checkup:

Yes – this is basic but much like the yearly trip to the doctor most put it off due to time constraints, or for fear of what they might find out. Not to worry; this should be painless and relatively brief.

Visit http://www.senderscore.org/. Sign up for a free account and plug your dedicated IP(s) into the search bar. You will see the current score, risk rating, accepted rate and problem areas. Note that you can also see this information from right within Eloqua with our Boost package.


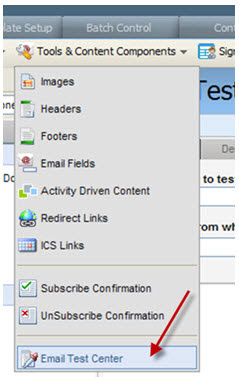
Test campaigns before deploying. Navigate to Communicate->Email Marketing->Email->Tools & Content Components->Email Test Center and click the Deliverability tab. That handy General Deliverability option will show you how your campaign will perform in the real world and is a reflection of IP reputation, authentication, and content.


If your Inbox rate at a particular provider is sub par, check into the symptoms and remedies below.

2. Symptoms:

Don’t ignore those test results. If your checkup didn’t go well, you have to get to the root of the problem and take some good, strong medicine. The two most common maladies are:

Complaints – The cough, the sneeze, the chest congestion. These are the loud and painful signs that something is amiss. Complaints primarily arise when contacts have been sent email that they have not opted in to receive, or have opted in to previously but have not been sent in a long period of time (4+ months). Complaints carry a very high weight when it comes to IP reputation and as a result the threshold is very low. In fact, if complaints amount to more than 0.01% of your total sends, your IP will take a hit. You can see your complaints in Eloqua via the ‘SPAM Unsubscribe List’ report (Evaluate->Reporting->Report Console->Find a report).


Take a good look at the contacts in there. Did they come from a purchased list? You should consider segmenting all contacts from the list source if they have caused your complaint rate to rise above that 0.01% threshold. Are most from a particular ISP? If they are largely from, say Hotmail, that could be the reason for bad performance at Hotmail in the General Deliverability test you ran during your checkup. Did they complain about that concert email when their opt in was for a sporting event? Time to use Subscription Management and better segmentation.

Bouncebacks- Bounce messages provide a wealth of information about the health of your list, DNS setup, and IP reputation. Hard bounces let you know that your lists have quality issues, and if you are seeing a hard bounceback rate over 4% you have either acquired a list of questionable origin, or you have activated an old house list. Either way, segment contacts from the problem list source so that they do not continue to generate bounces and harm your IP reputation. Soft bouncebacks on the other hand do not impact your reputation, but they can provide you with details about other issues. If, for example there is a problem with your branded domain and it is not publishing your Eloqua SPF record, you will see information about this in your soft bounce messages. If your IP has a bad reputation at the receiving network, you will often see a soft bounce message stating that. If you are blocked as SPAM, the soft bounce message will provide you with a web location where you can remediate the block. Take some time out every week to check into your Bounceback History report (Evaluate->Reporting->Report Console->Find a report) and take careful note of the information provided in the Message column. If you need help, there is a handy guide in Customer Central called ‘Auditing the Bounceback History Report’ which can help you make sense of the data.

3. Prevention:

We have all heard the saying that an ounce of prevention is worth a pound of cure. This holds true here as well, as preventing issues is much easier than correcting a full blown crisis.

Authenticate – The first thing a receiver will look at is whether authentication is enabled, and of what type. With Branding & Deliverability, Sender Policy Framework (SPF) authentication is required as part of the setup process. This tells the receiver that the IP you are sending from is authoritative to send on the behalf of your branded domain. Branding & Deliverability also provides Reverse DNS authentication which allows a receiver to validate the IP against its domain name. A third level of authentication which is NOT provided by default but can be requested is DKIM signing. DKIM (Domain Keys Identified Mail) verifies the sending domain through encryption and is rapidly gaining popularity at ISPs such as Gmail and Yahoo!. In fact, your email is not eligible to be added to the Yahoo! feedback loop without it.

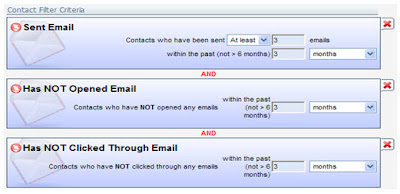
Segment Inactives – Our Chief Privacy Officer, Dennis Dayman brought the concept of the ‘Emotional Unsubscribe’ with him when he started here at Eloqua. This is the theory that if someone is continually being sent email and is never opening or clicking through, they have unsubscribed without taking the time to physically click the Unsubscribe link. These individuals pose a significant complaint risk (at some point, they will flag the email as SPAM out of annoyance). Inactives can also be SPAM Trap addresses. Either way – it’s best to get them out of your general marketing sends before they cause problems. To do this, use Inactivity Based Filters to check for contacts that have been sent a certain amount of email over a set period amount of time and have not opened or clicked through. My standard recommendation is three emails over three months. Navigate to Communicate->Email Marketing->Contacts and select New Contact Filter from the Contacts dropdown. Choose the Inactivity option.


Then set your filter criteria


The resulting contacts can be sent a re opt in or manage subscriptions campaign to re-engage them or allow them to explicitly unsubscribe. If that fails, they should be added to a group and the group added to the Master Exclude list. They can also be exported and vetted via an outside service such as those offered by Eloqua referral partner Fresh Address http://biz.freshaddress.com/.

Cheers to your good health!

Sweeney
Deliverability & Privacy, Eloqua Corp.

Tuesday, July 14, 2009

Perfecting Delivery and Viewing of your Emails


Ensuring that your emails are delivered as intended, are not flagged as junk, and appear correctly regardless of the recipient’s inbox is a critical thing to consider in managing your communications.

There are many critical things you should do in order to maximize your email deliverability, and ensure that your email content is highly relevant to your recipients. To understand where you are and where you need to make more progress on, however, there is no substitute for frequent testing.

To make this easy for you, Eloqua comes with a built in suite of tools to allow you to test and analyze a variety of these key areas. We talked about the analysis and reporting tools for email deliverability a few weeks back, but now we'll look at more proactive tools for understanding your email prior to sending.

For any email you are interested in analyzing, choose QuickSend Email to bring up the QuickSend interface and use the External Testing tab. This allows you to run a number of tests against that email to verify how it is delivered and presented to the recipients. For most clients, these tests are included in your subscription (up to a set number per month), talk with your customer success manager to verify.

The Inbox Viewer test shows you a preview of exactly what that email looks like in a particular inbox or email service provider. Many clients render images, layouts, backgrounds, or styles differently, which can alter the way your email appears, and hence its effectiveness. When you run the inbox preview tests, you are given a report which displays exactly what the recipient will see.


Whereas we would all like it if there was a single standard for what content can be displayed in an email client, and how it should be rendered, the reality is that there are significant disparities. The combination of browser and email service provider for web-based providers adds a new dimension as Gmail under IE may render differently than Gmail under Firefox.

On top of this complexity, rendering images may be prevented by the email client, by being offline, or by not being supported on a mobile device. Viewing how your emails render with and without images is crucial to ensuring that they connect with your recipients.


The Email Content test analyzes the content of your emai looking for known issues in your content, the format of your HTML, or your writing that will cause issues with recipient systems.

This is a very deep and powerful test, very much worth looking at. It analyzes your content for potential viruses (even embedded forms can be seen as viruses by some filters, due to credit card scams), and then looks for known triggers of spam flags as well as using common Bayesian (adaptive) filters to look for common flags.

Also included within this report are a variety of accreditation and authentication tests to ensure that your IP address is properly identified as yours. As this is managed by Eloqua, you are unlikely to see any problems in this area, but should any arise, be sure to notify your customer success manager.


The Domain Deliverability seed list tests will attempt to send your email to a pre-defined list of email inboxes on a variety of service providers. You can select from a seed list that is focused on B2B, B2C or International email inboxes. The test results will display whether the email was delivered, whether it was flagged as junk, or was blocked entirely. Results will also show an indication of why any problems are taking place, which gives you a good indication of where to look in order to fix any discovered problems.


The report will show a number of ISPs, the time of receiving emails (some ISPs will throttle suspect emails), and the percentage of emails that are delivered, missing, or flagged as spam.


All three types of tests are worth running a few times each month or before any major campaign in order to understand whether there will be any issues that can be easily avoided.

Note that the tests may take up to 2 hours to return results as they are actually sending emails and retrieving results from a variety of system, each of which may have delays, so give yourself time for the results to be delivered.