Showing posts with label Data Services. Show all posts

Tuesday, May 3, 2011

Math Equations within Marketing Automation


When you begin to build a high performance revenue engine for your business, you can often run into situations where you need to do a little bit of basic math with your lead data. Perhaps it’s a lead scoring algorithm that needs to find the maximum score across a few sub criteria. Perhaps you want to find the revenue per employee for a business by dividing one number by another. Perhaps you want to analyze your leads based on an average score across 5 product lines. Perhaps you want to calculate the distance from a store location to a contact’s location by looking at their longitude/latitude. Whatever the case, having access to a completely generic set of math functions that you can run against your contact data is valuable in many ways.

Now, with a new Cloud Connector, Eloqua makes that possible. As the first marketing automation platform to offer a completely generic mathematical expression language that can be used to create any formula you want, you can now do the nurturing, analysis, and scoring that you want by creating exactly the mathematical expressions that you need.

To get started, you’ll need to snap the Math Function Contact Cloud Connector into your install. This is available on the cloudconnectors.eloqua.com library, and you can snap it into your Eloqua install using the standard Cloud Connector installation steps that we covered earlier.

With the generic Math Function Cloud Connector installed, you can then add any step you’d like to any program you are running. The Cloud Connector will run any mathematical equation you specify against the data in any contact that flows into that step and return the result to another field within the contact.

Within the step in your marketing automation program, choose Cloud Connector as a type and then select the Math Function connector from the dropdown list. This will then show a configuration button that you can then use to configure what fields the connector uses for input data and the output result, and what the function is that will be run on the steps.
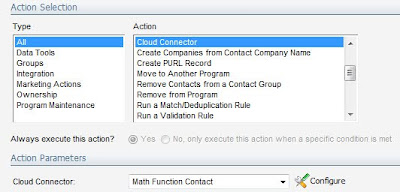
Once you have input your credentials and created the step, the configuration screen is very simple. It provides you with a text box to define any math function you want. Use any combination of basic or advanced mathematical operations (you can access a full list from this screen using the help link), including +, -, *, /, and ^ for simple math, any type of parenthesis for grouping, Boolean operations <, >, =, &, |, !, trigonometry functions like SIN, COS, and TAN, logarithmic functions and many more.
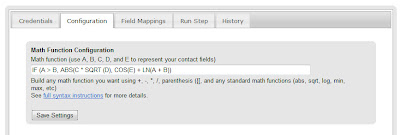
Write out the expression that you want using A, B, C, D, and E to represent up to 5 variables that will be input from the contacts in the step, and then move to the field mappings page to select those fields.

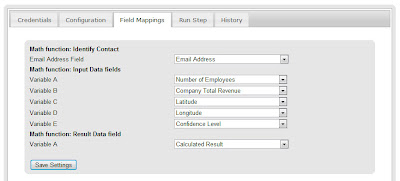
On the field mapping page, select the contact fields (must be numeric fields) that these variables will be populated from. If you need less than 5, just leave the values blank. Also select the field that the result will be written back to.
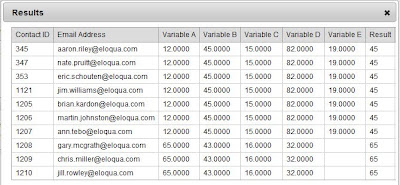
You can use the “Run Step” tab to experiment with the contacts in your step and ensure that you’re getting the results you expected. If there are any errors in the formula that you keyed in, they will show up in the error field of the results page.
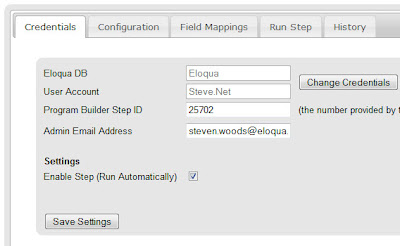
When you are ready, go to the Credentials tab and check off the “Enable” checkbox to allow this step to run automatically.

That’s all you need to do to have immediate access to a completely generic set of mathematical expressions within your marketing automation programs. Please keep the feedback coming, and I look forward to seeing at least one creative use of advanced math expressions being celebrated at next year’s Markie gala.

Monday, April 18, 2011

Rapleaf Consumer Interest Data within Marketing Automation


If you’re marketing to consumers, understanding their interests, demographics, and location is important if not vital. However, when working online, you are often challenged with the fact that you’re working with little more than an email address. Translating a bare email address to that level of insight requires a database that is specially built for the purpose. That’s where Rapleaf, a provider of demographic and interest data from social media comes in.

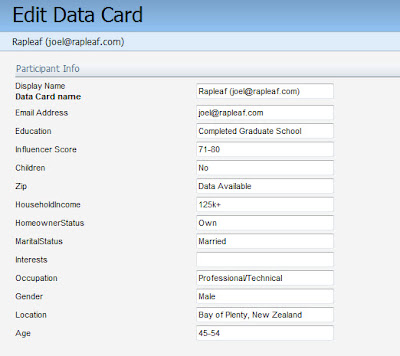
Rapleaf works from an email address to parse the social web and return data on an individual’s location, age, gender, interests, and other data. This data is now immediately available via a Cloud Connector from within your marketing automation programs in Eloqua. With the data available, you can then communicate, personalize, nurture, and score accordingly, resulting in a significant boost in your results.

To get started, just snap in the Rapleaf Cloud Connector into your Eloqua instance using the typical way to install a Cloud Connector. You’ll find it on cloudconnectors.eloqua.com, Eloqua’s library of Cloud Connectors, under Contact Data. With the connector installed, you can begin building a marketing automation program to take advantage of the connector.

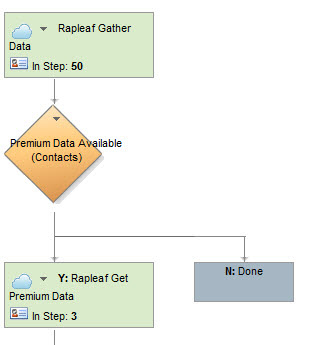
To do that, add in a step into your program that grabs data from Rapleaf. The data on age, gender, and location is provided for free, and with it, a flag of “Data Available” is provided for any data field that has premium data available for it. Rapleaf will provide you with “API Keys” to access your data, and each key has access to different data fields with different price points per query. Be sure to start with a key that only has access to free data so you can first see if any data is available. If data is available, you can requery for it with a different key that has access.

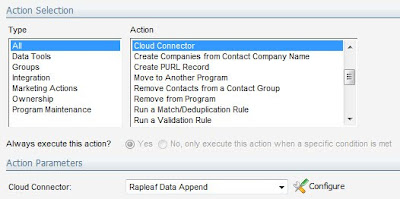
For each step that queries Rapleaf, select Cloud Connector as your step type, and select Rapleaf Data Append as the connector type. This will give you access to the configuration button that lets you configure the connector.

For configuration, paste in your API key from Rapleaf, and indicate whether you want to store the returned data in contact fields or in an attached custom data object (data card).

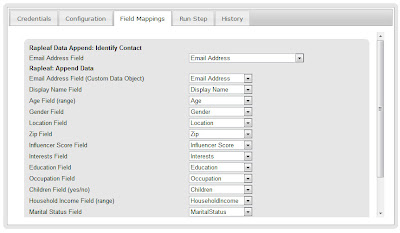
With that selected, under the field mappings tab, you can select what fields, on the contact or the custom data object, you would like your data returned into. Note that most of the data fields, even if they appear to be numeric (like Age and Income) are actually delivered as ranges ("35-40"), so they are text fields not numbers.


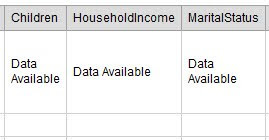
If data is available, but your Rapleaf API key does not have access to it, you will see a value of “Data Available” returned. You can use this value in guiding decision rules within your marketing automation programs in order to decide whether to requery Rapleaf to get the additional data.


With that set up, you can use the “Run Step” tab to manually run the connector a few times to make sure it all works as intended, and then when you are happy with it, move to the Configuration tab to check off the “Enable Step” checkbox to allow the step to run automatically.

Now, Rapleaf data on demographics, age, interests, and a variety of other fields will flow into your Eloqua marketing database automatically. As soon as it’s there it is immediately available for segmentation, scoring, analysis, and nurturing.


Please keep your feedback coming on this Cloud Connector and any others you’d like to see.

Monday, December 20, 2010

Junk Scan - look for bad form data


Anyone who has put up a web form has suffered from bad form data. We all know what it looks like, "aaaaa", "test@test.com", "1@1.com", "asdf", "mickey mouse", "donald duck", "555-1212", the list goes on.

Sure, one option is to only provide access to an asset after sending a person a link, in order to ensure that the email address is valid, but there are many situations where you don't want to (or can't) add in this secondary step. Generally, these are real people submitting the form, so the various tools to prevent bots and spammers are of no use either.

However, having this data in your marketing database does no good either. With it there, your analytics will show incorrect results, segments might pull in bad data, and any of this data that gets passed to sales will immediately decrease marketing's credibility.

Now, to solve this problem, we have a Cloud Connector that does a "junk scan" on your data to look for the typical problems that are seen. It scans first name, full name, email address, and phone number looking for data that is known to be bad or looks suspect, and flags the record in your Eloqua marketing database.

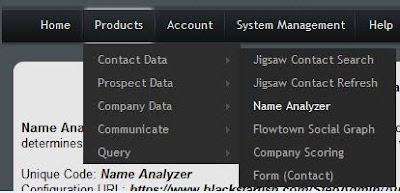
To get started, you’ll need the Cloud Connector installed in your Eloqua instance. This is very easy to do, see the recent post on Cloud Connector Installation instructions for how to add a new Cloud Connector to your install. The Cloud Connector we’ll be looking at here is available on Black Starfish, our repository of interesting connectors. Go to cloudconnectors.eloqua.com and create an account. Under Contact Data, you'll find Name Analyzer - that's the connector to install.


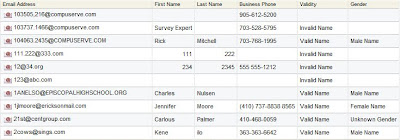
With the name analyzer cloud connector installed, all you need to do is create a step in your marketing automation program - after a web form is submitted, as part of your contact washing machine, or when you analyze your contact data and detect data quality issues. This step will take in contacts, and then the cloud connector will flag them as valid, invalid, or unknown (in a specific field in the contact data), and will also, as a bonus, flag their gender (useful for geographies like Germany where gender is important in building a salutation).


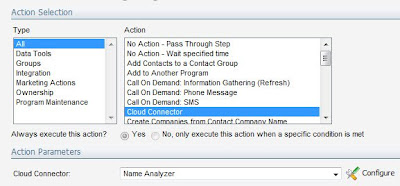
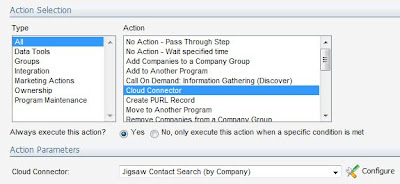
For the step, select "Cloud Connector" as your step type, and you will see a drop-down list of options below. You'll see the "Name Analyzer" cloud connector you just installed via the setup interface in this list. Choose that, and click the "Configure" button to begin setting up the step.


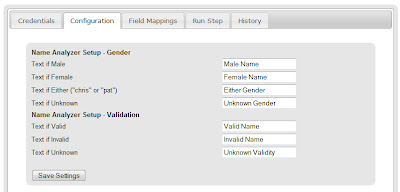
The popup window gives you your configuration options, the majority of which are how you want to flag the contact. You can choose what text you want to mark each contact with for a) gender, and b) validity. For gender, remember that there is an option for first names that could be either gender (ie, "Chris" or "Pat").


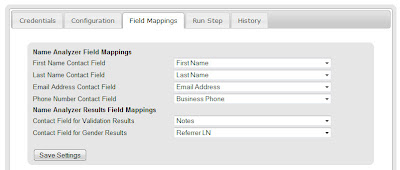
Click save on that screen and move to the field mapping tab. As inputs, it will take first name, last name, email address, and phone number, and as outputs, it will write the text you just selected to fields for gender and validity.


You're now ready to go. The validity analyzer looks at the following to figure out whether a person's contact information is valid:

- First Name: to understand if the name is known to exist (by cross-referencing against a database of known names

- Full Name: looking for known bad names ("mickey mouse" or "donald duck" where the first name may be valid itself ("mickey" or "donald")

- Email Domain: looking for @test.com or @1.com

- Email Name: looking for aaa@ or 111@ as invalid email names

- Phone Number: looking for numbers that are too short, all the same number (11111, 22222), or known to be bad (555-1212)

On the "Run Step" tab, you can run the step manually to pull in a few members from the step, and see what the results are, or, if you go to the "Credentials" tab, you can check off "Enable Step" and have the step run automatically.


And that's it, you're done. Now, the contacts that flow through the step will be marked with validity and gender.


Looking forward to your feedback on this. Is this catching and flagging the right garbage names that are input? What other factors do you look for when you're looking at your names manually?

Tuesday, December 14, 2010

Eloqua and Jigsaw Integration for Better Marketing Data


If there is one common challenge that is faced by every marketer who thinks about marketing automation, it is access to up-to-date, complete, clean, and comprehensive data. Asking for data on web forms is tricky in that the more you ask for, the more visitors tend to abandon forms. Similarly, data collected via web forms generally suffers from being less clean and standardized than marketers might like.

For anyone who joined us at Dreamforce last week, you may have seen our Jigsaw integration and realized that it makes some significant strides in solving this challenge. Salesforce.com’s Data-as-a-Service solution, Jigsaw, has one of the best and most accessible stores of crowd-sourced data that is kept up to date and clean. Now, in an easily configurable way, you can access this data source directly from your marketing automation programs in Eloqua.

The Cloud Connectors for Eloqua/Jigsaw integration accomplish three separate integration tasks, but all are set up in roughly the same manner, so the instructions should be easily translatable between the three different connection options.

Contact Search – When you have companies that you’re interested in, whether you want to flesh out the list of the key people at an account that has shown some interest, or to proactively target a territory or a list of named accounts, this connector allows you to find the contacts at those companies who are in key roles. Simply by specifying the role (ie, marketing, sales, finance), level (ie manager, director, vice president), and geography, you can retrieve as many contacts as you specify at each company that flows through a given program builder step

Company Info – When the information on companies in your database goes little farther than a name, you will be very limited in your ability to market to them. This is a common problem when the information comes in via web forms though as company questions like revenue, industry, number of employees, or stock ticker tend to bulk up forms and drive visitors away. With the Company Info cloud connector, you can quickly append and correct this type of information directly from the Jigsaw company database.

Contact Refresh – when a contact enters your database, its information begins to go out of date immediately. Titles change, phone numbers are updated, and new information may be gathered that you don’t yet have. The Eloqua/Jigsaw Cloud Connector allows a contact refresh to append and update any information that Jigsaw has on any contact that flows through a step in your marketing automation program.

To get started, you’ll need whichever of the three Cloud Connectors you are interested in installed in your Eloqua instance. This is very easy to do, see the recent post on Cloud Connector Installation instructions for how to add a new Cloud Connector to your install. The Cloud Connectors we’ll be looking at here are available on Black Starfish, our repository of interesting connectors. Go to cloudconnectors.eloqua.com and create an account. Under Contact Data, you'll find Contact Search (by Company) and Contact Refresh, and under Company Data, you’ll find Jigsaw Company Info. Those are the connectors you’ll need, and the instructions for each one will be relatively similar from here on.

With an account set up and the connector installed into your Eloqua instance, you're now ready to quickly add in data from Salesforce.com's Jigsaw service into any program.


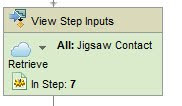
Add a step to your program, in this case we'll look at retrieving contacts at a specific company. The program step, in this case, will contain the companies, and we'll feed the contacts back into a contact group (obviously, if we want to process those contacts, we can just feed that contact group right into a program, but that's another topic).

For the step definition, choose "Cloud Connector", and you should have a drop down of options appear below. If the Jigsaw Contact Search option is not in that list, make sure you added the cloud connector definition to your Eloqua instance as we looked at earlier.


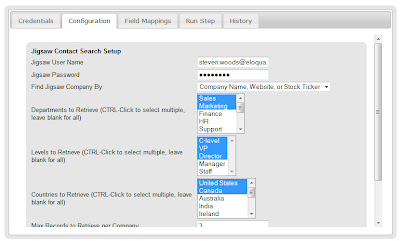
Click on the "Configure" button to pop open the configuration window. This connector will need your credentials for Eloqua (must be API-enabled), and for Jigsaw (it uses whatever license you have with Jigsaw so you will be charged for data accordingly).

In the configuration screen, choose what roles, levels, and geographies you are interested in, how many contacts per company you would like to retrieve. Hit save on this page to save your selections.


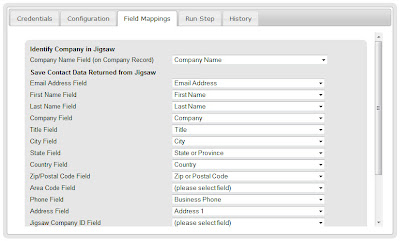
On the next tab, field mappings, pick the contact field you would like to save the data in. Jigsaw returns a lot of great information, but if you don't want any particular field, just leave that blank.


When you're ready, you can either go to the "Run Step" tab to run a few trial runs and see what data you'll get back, or just go right to the "Credentials" tab, check off "Enable Step", and click "Save" in order to have the step running automatically.


That's all that's needed. With that enabled, you'll have Jigsaw returning data on the right contacts at the companies you're interested in. The two other Jigsaw connectors, for company information, and for contact refresh, work in a very similar manner. Enjoy, and please don't hesitate to provide any feedback on what's working for you and what's not.

Thursday, August 20, 2009

Address Validation and the User Experience


It’s challenging to optimize the forms on your landing pages to make sure that you maximize both your conversion rate and the quality of the data flowing into your marketing database. The more fields we require, the worse our conversion rates are.

Similarly, performing inline validation on form data that prevents a submit can be very dangerous if done incorrectly as it will prevent submissions or frustrate visitors. One area that offers great promise to optimize is in the realm of address correction. If you are collecting physical addresses, either to use for direct mail marketing or for management of sales territories, you want the addresses to be correct.

However, we have all had experiences with websites that attempt to force an inline correction of our address and end up frustrating us as visitors.

Luckily, there is an approach that balances data quality with customer experience. Using a built-in function within your marketing automation programs, you can leverage Pitney Bowes global address standards database to automatically correct your addresses. This allows you to let visitors to your website experience a very flexible free-form approach to entering their addresses, but allows you to quickly correct those addresses to ensure that your data is very accurate.

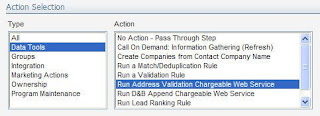
To do this, from your marketing automation program, create a step that is an "Address Correction" step, into which your contacts, prospects, or companies will flow. The action, available under the "Data Tools" set, is "Run Address Validation". Note that this is a paid service, but the per-hit fee is very reasonable.

Within the program builder step, that is all you need to configure. However, if you want to configure the fields that are sent/returned for correction, you can configure them in the Setup area.

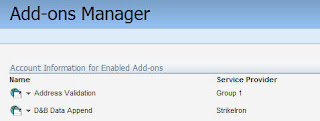
Go to Setup->Management->System Management->Add-on Manager to manage the address validation add-on.

Select the Address Validation add-on.

Within the setup interface for the Address Validation add-on, you will see a Task menu in the upper right corner, under Tasks, select Set Field Mappings.


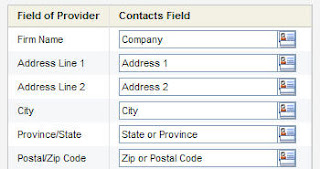
This then gives you the mapping interface for the set of fields that are sent out to the address validation service and returned in a corrected manner. Select the fields from your own marketing database that you would like to use, or use the defaults that are already set.


If you use an address validation service, rather than forcing the user to wrestle with an inline validation, you allow the 5% of new or unknown addresses to pass through without causing user frustration.

Tuesday, May 26, 2009

Discovering Contacts in Key Roles with Reachforce


We would all like to have perfect data on all the key contacts at the organizations we are marketing our services to. However, this is often not the case in reality as we all know. Even once we have cleaned the data that we do have, often we are missing crucial contacts, or we are unsure of who is responsible for the area of concern. We may have information on individuals’ titles, but often title does not tell us exact responsibilities.

The great news is that this dual challenge, of missing data and missing information on roles can be solved simply.

Through a partnership with Reachforce, Eloqua is able to leverage Reachforce’s role-based contact discovery technology directly. This allows you to specify a company you are interested in and have Reachforce discover the individuals at that organization who perform the role you are most interested in targeting. For example, if you are looking for the individual who is responsible for network security within an organization, they may have a title of “IT Administrator”, “Network Manager”, “Director of IT”, or may other options.

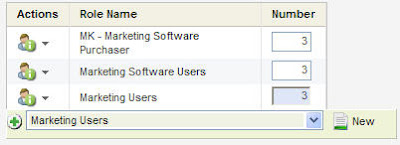
The connection to the Reachforce service is done through the Data Servcies area of Eloqua (go to Evaluate->Data Services->Reachforce). A “Call Project” is built to define the exact individual you are looking for. You may specify a series of titles that are likely to be associated with the role you are looking for. You can also specify titles that, although sounding similar, are not associated with the role you are looking for. To clarify further, you can specify questions to ask to ensure that you are connected with the right person.

With the Call Project defined, you can then specify how you would like to map the outgoing and returning data on a field-by-field basis. For example, if you were going to pass company information across to the Reachforce team in order to retrieve Contact information, you would map both the Company fields required (perhaps Company Name, Address, etc), and the Contact fields expected (name and contact information).

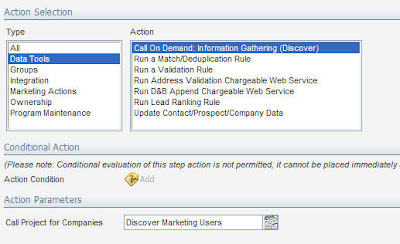
When the Call Project is defined and the data is mapped, it can be used similarly to any other marketing asset with Eloqua. You can run a batch manually to retrieve a list, or, perhaps more interestingly, you can add the Call Project to Program Builder. This is where the options become interesting. By adding the Call Project to Program Builder, you are able to have a marketing automation program automatically leverage a role-based contact discovery process. If you do not have the correct set of contacts at an organization, you can immediately and automatically have the contacts in the right role discovered.

Note that in adding the Call Project to Program Builder, you should be aware of the types of data being sent and returned. For example, if Company records are sent and Contact records are returned, be sure that your Program step allows both Contact and Company records.

As this is a service outside of Eloqua, there is of course a per contact fee for the execution, but if discovery of contacts in the key roles is required, this is a great service to consider.