Monday, June 6, 2011

Kwanzoo and Eloqua Integration: Engaging Polls, Surveys and Social Promotions


As we've built out our Cloud Connector program, we've had a number of partners build out interesting extensions to Eloqua that you might find interesting. We're happy to see this, as understanding and interacting with them across the entire buying process is a core part of revenue performance management. We'll highlight these solutions from time to time here, and I hope you find them of value. Today, please find a guest post from Kwanzoo.

=======================================


Marketers everywhere are wrestling with a significant challenge - how to get users, whether visitors to their website, or prospects on their lead nurturing email lists or paid media placements to engage! The catchword of the moment is “Attention!”

Eloqua’s newest partner Kwanzoo provides highly engaging marketing units (polls, surveys, social sharing promotions, opt-ins) that improve demand generation, increase conversions from lead nurturing emails and grow word-of-mouth mentions by customers. How does it work? See an example below of a 3-question survey, combined with a social sharing promotion that’s triggered from inside Eloqua emails, to drive conference registrations.


How to Improve Engagement, Clicks and Conversions from Eloqua Emails

Embed Kwanzoo’s smart poll, survey / quiz, social share and opt-in units into your Eloqua lead nurturing emails. You can present a targeted offer to a user, based on the response to a poll or survey. Alternately, you can offer incentives to users and drive them down a conversion funnel (download a whitepaper, register for a webinar) right from inside the email!

Extend the Top of Your Demand Generation Funnel

Kwanzoo opens up many more options for you to grow your base of leads for further nurturing. Besides your own website or blog, Kwanzoo’s marketing units can be placed on third party blogs, community pages, affiliate sites, Facebook pages, or paid placements. All the Kwanzoo units allow for lead data capture in their engagement flow. So start with a poll or survey, and then prompt the user to connect with your business and drop their contact information. See an example illustrative flow below.


Marketing Creative Sizes and Placement Options

Kwanzoo offers in-email units of any custom size and web marketing units that are 300x250 (300 pixels wide, 250 pixels high). Each unit can function as interactive content inside an email, on a website, blog or Facebook page. It is also easily served as an “IAB standard medium rectangle” ad unit, as a replacement for your traditional display or banner ad on a third party publisher site, affiliate site, or an ad network (such as the Google Display Network). You can also use Kwanzoo’s interactive units for retargeting. Bring back prior visitors to your site as they bounce off to visit different websites.

Capture Lead Data and Drop Into Eloqua

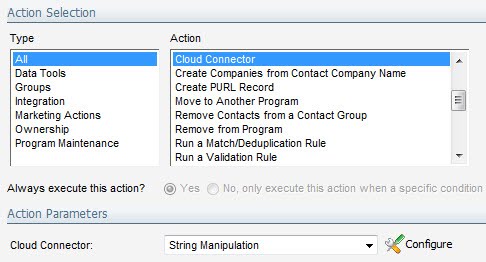
With Kwanzoo’s LeadConnect for Eloqua, you can now capture lead data directly inside a 300x250 ad unit, and drop it into Eloqua for ongoing lead nurturing. Setting up the LeadConnect link between Kwanzoo units and Eloqua is really simple. See below for the point-and-click interface on Kwanzoo.com for marketers.


Quick Tip: Please be sure to check with the publisher partner or ad network where you are placing a media buy, to confirm what lead data may be captured directly in the ad. If a specific placement will not allow prospect data capture within the ad unit, simply re-direct the user to your landing page once the ad qualifies the user. Capture lead data on the landing page instead.

Augment Your Lead Data with Progressive Profiling

Your lead nurturing emails just got more interesting for your customers! Imagine a relevant, targeted poll or survey inside your outbound nurturing emails. Kwanzoo’s in-email poll and survey campaigns have seen an engagement lift of 30% or higher, versus emails that do not include an embedded Kwanzoo unit. See the example illustrative flow below.


Now you will be able to engage John from Acme Medical Industries, who has gone cold on you, in a dialog on industry trends, by answering your survey questions. Engage in an online dialog, find out when they’d be ready for a sales demo, what’s their buying time frame, and capture all that data for your lead! John will answer these questions so he can get the survey results. All of this, even before you hand off the lead to your sales team!

Missing data on prospects? You can now augment your data with progressive profiling over multiple email touches. Over each touch, as new data is collected for the same user, Kwanzoo tracks the specific campaigns that resulted in data augmentation.

You will find a step-by-step guide that explains how to setup the Eloqua LeadConnect link to a Kwanzoo marketing unit here. Enjoy this new capability, and keep that feedback coming!

Friday, May 27, 2011

Integrating Eloqua With Slideshare - Making it Easy


It's no secret that Eloqua is a big fan of Slideshare (allows you to upload power points and other docs to the web). It's not just that we create a ton of presentations (which we do) and need some place to store them but we've achieved some great results. This includes Greg Thorne of JMP Securities publishing an article on Revenue Performance Management based on something he downloaded from our Slideshare site. I also recommend checking out "4 Reasons B2B Marketers Should Love SlideShare" to get a better understanding of the benefits of Slideshare.

Example of a form in Slideshare
How can you make Slideshare even better? Integrating it with Eloqua of course! What does this mean? It means easily passing leads that are generated from forms on Slideshare back to Eloqua. This saves you time as a marketer and gets your leads to sales faster.

Now that they're in Eloqua, these leads can be sent a follow up email, entered into a nurturing campaign, scored and/or sent to sales for follow up. This post assumes that you have set up a Pro Slideshare account.

Integrating Eloqua with Slideshare - Step by Step
  1. To get started, you’ll need an Eloqua user account that is API enabled. This is very easy to do, see the post on Cloud Connector Installation instructions and follow the first step only.

  2. The Slideshare Cloud Connector we’ll be looking at here is available on our repository of interesting connectors: cloudconnectors.eloqua.com. They are free to use, just create an account and login. Please note: This account is different from your normal Eloqua login. Under Products > Feeder, select the Slideshare Lead Query option.

  3. Enter in your credentials: In the first step, enter in your Eloqua login credentials and keep going

  4. Configuration: Enter in your Slideshare username and password, the Slideshare CampaignID (it's the number at the end of the URL. For example: http://www.slideshare.net/business/lead_campaigns/12928) and the Eloqua Contact Group / Shared List that you want to add the contacts to (you'll want to pop into Eloqua and create a Contact Group / Shared List).
  5. Field Mappings. Map the fields from your Slideshare form to Eloqua fields. You may want to create some new Eloqua fields that you can pass the Slideshare Campaign ID to. Make sure you click on Save Settings.
  6. Test it. Fill out the form on Slideshare and then in the Run Step tab, click on "Full Run". Run a few tests to see if it's working. When you're happy with the results, just go to the Credentials tab to click "Enable Step" to enable it to run automatically. That's it!
You can also go into Eloqua and see if a contact has been added to the Contact Group / Shared List. To pass these contacts to your CRM, you can add this Contact Group / Shared List as a feeder into your CRM integration program. You can also create a Program or a Campaign and feed in these contacts to a nurturing program - the sky is the limit.

Monday, May 16, 2011

ReadyTalk and Eloqua Integration


The vision of revenue performance management is one that we've been talking about for a while now, and I often find myself in conversation where people are asking what it means tactically. What needs to change in the day to day world that we're used to if we are to drive towards the strategic vision of RPM. One of the easiest examples there is webinar integration. Webinars are a core part of most B2B marketers' daily activities. More importantly, however, engagement in an webinar provides very relevant digital body language on buyers throughout their education process.

If you use ReadyTalk as your system for webinars or virtual events, you will be happy to hear that it is the latest addition to our suite of webinar cloud connectors. Now, Eloqua can be used as your marketing automation platform to promote and drive attendance for events, while ReadyTalk is used to run the event itself. The data on who registered and who attended can be seamlessly and automatically moved between both systems.

A prospect who registered but did not attend can be sent a “sorry we missed you” rather than a “thanks for attending” email, while a prospect who dropped off after only 5 minutes might respond well to a follow-up proposing a different set of topics that might be more appealing. Similarly, lengthy attendance combined with engagement such as asking and answering a number of questions is a great indicator of high interest and likely purchase intent.

Specifically, to integrate Eloqua's marketing automation capabilities with ReadyTalk's webinar capabilities, you now have 3 cloud connector steps to use at your convenience:

- Register Attendee: Registers a contact who is in that step of a program with a specific event in ReadyTalk.

- Query Attendance: Looks at each contact in that step of the program and queries ReadyTalkto see if they attended the event and for how long.

- All Attendees Feeder: Automatically pulls a list of all people who attended a particular ReadyTalk webinar and feeds them in to Eloqua as contacts and places them into a group (where of course they can be fed automatically into a program for follow-up nurturing). Again, for each attendee, the information captured includes how long they attended the event.

To get started, you’ll need the Cloud Connector installed in your Eloqua instance. This is very easy to do, see the recent post on Cloud Connector Installation instructions for how to add a new Cloud Connector to your install. The Cloud Connector we’ll be looking at here is available on our repository of interesting connectors: cloudconnectors.eloqua.com. They are free to use, just create an account.

Under Communication, you'll find ReadyTalk: Register, and Query Attendance, while under Feeder, you’ll find ReadyTalk: All Viewers – those are the connectors we’ll be working with, and the ones to install.

Once you have them installed, you can begin using them within your webinar invitation and management program. The cloud connector steps for ReadyTalk integration can be plugged into your marketing automation program at whatever points make sense, so be sure to whiteboard what you want to have happen and use the steps accordingly.

Likely, you’ll want to use a ReadyTalk: Register step when the buyer has indicated that they are interested in attending, perhaps by clicking a link or submitting a form.

You’ll want to run the ReadyTalk: Query step after the event has taken place to see who attended and for how long. That data can be used to guide prospects down unique follow-up paths depending on their behavior.


Now, for each step, you’ll need to configure the Cloud Connector to do what you need. Each connector is roughly the same, but with slightly different options, but once you have one figured out the rest will be simple. For the sake of simplicity, we’ll walk through the ReadyTalk: Query step. Choose Cloud Connector as a step type, and pick ReadyTalk Query from the drop-down below (if you have installed the connector in your Eloqua instance as we discussed earlier). Click the Configure button to launch the configuration UI.

The connector will need to be configured with your ReadyTalk credentials, including the Toll free number, Access Code, and PIN. These are the same credentials that you would use to access your ReadyTalk account normally.

A final setting is where you want to store the returned information, in the contact record or in a custom data object (data card). If you're running many events, you'll want to use custom data objects to keep a full history of attendance.

With that configured and saved, move to the field mappings tab, and choose the contact fields or custom data object fields that you want to read data from or write data to.

That's all that's needed to have full integration between your ReadyTalk webinars and your Eloqua marketing automation. You can go over to the Run Step tab to run the integration manually a few times to make sure it's all working. This shows you the results you will be pulling back into Eloqua or lets you manually run the step to check that it's all configured correctly.


When you're happy with the results, just go to the Credentials tab to click "Enable Step" to enable it to run automatically.


We'd love to hear your feedback on this connector, what can be improved, and what else you need it to do.

Tuesday, May 3, 2011

Math Equations within Marketing Automation


When you begin to build a high performance revenue engine for your business, you can often run into situations where you need to do a little bit of basic math with your lead data. Perhaps it’s a lead scoring algorithm that needs to find the maximum score across a few sub criteria. Perhaps you want to find the revenue per employee for a business by dividing one number by another. Perhaps you want to analyze your leads based on an average score across 5 product lines. Perhaps you want to calculate the distance from a store location to a contact’s location by looking at their longitude/latitude. Whatever the case, having access to a completely generic set of math functions that you can run against your contact data is valuable in many ways.

Now, with a new Cloud Connector, Eloqua makes that possible. As the first marketing automation platform to offer a completely generic mathematical expression language that can be used to create any formula you want, you can now do the nurturing, analysis, and scoring that you want by creating exactly the mathematical expressions that you need.

To get started, you’ll need to snap the Math Function Contact Cloud Connector into your install. This is available on the cloudconnectors.eloqua.com library, and you can snap it into your Eloqua install using the standard Cloud Connector installation steps that we covered earlier.

With the generic Math Function Cloud Connector installed, you can then add any step you’d like to any program you are running. The Cloud Connector will run any mathematical equation you specify against the data in any contact that flows into that step and return the result to another field within the contact.

Within the step in your marketing automation program, choose Cloud Connector as a type and then select the Math Function connector from the dropdown list. This will then show a configuration button that you can then use to configure what fields the connector uses for input data and the output result, and what the function is that will be run on the steps.

Once you have input your credentials and created the step, the configuration screen is very simple. It provides you with a text box to define any math function you want. Use any combination of basic or advanced mathematical operations (you can access a full list from this screen using the help link), including +, -, *, /, and ^ for simple math, any type of parenthesis for grouping, Boolean operations <, >, =, &, |, !, trigonometry functions like SIN, COS, and TAN, logarithmic functions and many more.

Write out the expression that you want using A, B, C, D, and E to represent up to 5 variables that will be input from the contacts in the step, and then move to the field mappings page to select those fields.

On the field mapping page, select the contact fields (must be numeric fields) that these variables will be populated from. If you need less than 5, just leave the values blank. Also select the field that the result will be written back to.

You can use the “Run Step” tab to experiment with the contacts in your step and ensure that you’re getting the results you expected. If there are any errors in the formula that you keyed in, they will show up in the error field of the results page.

When you are ready, go to the Credentials tab and check off the “Enable” checkbox to allow this step to run automatically.


That’s all you need to do to have immediate access to a completely generic set of mathematical expressions within your marketing automation programs. Please keep the feedback coming, and I look forward to seeing at least one creative use of advanced math expressions being celebrated at next year’s Markie gala.

Monday, April 18, 2011

Rapleaf Consumer Interest Data within Marketing Automation


If you’re marketing to consumers, understanding their interests, demographics, and location is important if not vital. However, when working online, you are often challenged with the fact that you’re working with little more than an email address. Translating a bare email address to that level of insight requires a database that is specially built for the purpose. That’s where Rapleaf, a provider of demographic and interest data from social media comes in.

Rapleaf works from an email address to parse the social web and return data on an individual’s location, age, gender, interests, and other data. This data is now immediately available via a Cloud Connector from within your marketing automation programs in Eloqua. With the data available, you can then communicate, personalize, nurture, and score accordingly, resulting in a significant boost in your results.

To get started, just snap in the Rapleaf Cloud Connector into your Eloqua instance using the typical way to install a Cloud Connector. You’ll find it on cloudconnectors.eloqua.com, Eloqua’s library of Cloud Connectors, under Contact Data. With the connector installed, you can begin building a marketing automation program to take advantage of the connector.

To do that, add in a step into your program that grabs data from Rapleaf. The data on age, gender, and location is provided for free, and with it, a flag of “Data Available” is provided for any data field that has premium data available for it. Rapleaf will provide you with “API Keys” to access your data, and each key has access to different data fields with different price points per query. Be sure to start with a key that only has access to free data so you can first see if any data is available. If data is available, you can requery for it with a different key that has access.

For each step that queries Rapleaf, select Cloud Connector as your step type, and select Rapleaf Data Append as the connector type. This will give you access to the configuration button that lets you configure the connector.

For configuration, paste in your API key from Rapleaf, and indicate whether you want to store the returned data in contact fields or in an attached custom data object (data card).

With that selected, under the field mappings tab, you can select what fields, on the contact or the custom data object, you would like your data returned into. Note that most of the data fields, even if they appear to be numeric (like Age and Income) are actually delivered as ranges ("35-40"), so they are text fields not numbers.


If data is available, but your Rapleaf API key does not have access to it, you will see a value of “Data Available” returned. You can use this value in guiding decision rules within your marketing automation programs in order to decide whether to requery Rapleaf to get the additional data.


With that set up, you can use the “Run Step” tab to manually run the connector a few times to make sure it all works as intended, and then when you are happy with it, move to the Configuration tab to check off the “Enable Step” checkbox to allow the step to run automatically.

Now, Rapleaf data on demographics, age, interests, and a variety of other fields will flow into your Eloqua marketing database automatically. As soon as it’s there it is immediately available for segmentation, scoring, analysis, and nurturing.


Please keep your feedback coming on this Cloud Connector and any others you’d like to see.

Tuesday, April 12, 2011

Cvent Integration with Marketing Automation


As the leading event management platform, Cvent serves the needs of event marketers everywhere. Many marketers work with both Eloqua and Cvent; Eloqua marketing programs providing the drive to compel attendees to register, and Cvent managing the event attendance, payments, and logistics.

What is needed, however, is a way to immediately know, within Eloqua, when a person registers for the event in Cvent. This is critical as you will want the marketing automation programs that you are using to drive event attendance to cater themselves to the fact that the person has already registered.

To do this now is easy, as there is an Eloqua/Cvent connector that automatically feeds registrants from Cvent into Eloqua and places them within a contact group. From there, they can be fed into a marketing automation program, used for analysis, or used as a reference in any follow-on communications.

To get started, go to Feeder -> Cvent Registrant Feeder within cloudconnectors.eloqua.com . Feeders do not require a Program Builder step as they just run on their own and feed data directly into Eloqua.


Create a new Cvent Registrant Feeder step, supply your Eloqua credentials, and specify how often you want the Feeder to run. Usually once a day is sufficient.


In the configuration screen that appears next, add your Cvent account details. Note that this MUST be an API enabled account. Talk with your Cvent account rep if you do not have an API enabled account.

In enabling your API account the Cvent team will need to specify which IP addresses should be allowed. Have them enable the following ranges:

65.55.*.*
65.54.*.*
65.52.*.*
70.37.*.*
207.46.*.*
209.240.*.*


For those familar with CIDR notation, the precise ranges are as follows (note that 65.55.80.0/20 does NOT mean 65.55.80.0 to 65.55.80.20):

65.55.80.0/20
65.54.48.0/21
65.55.64.0/20
70.37.48.0/20
70.37.64.0/18
65.52.32.0/21
70.37.160.0/21
207.46.192.0/20
65.52.0.0/19
65.52.48.0/20
65.52.192.0/19
209.240.220.0/23


With an API account specified, hit Save to refresh the list of available events in Cvent, and select the event you are interested in pulling data for. Specify whether you want the bulk of the attendance information stored in the contact record or within a custom data object, and select a Contact Group to place the retrieved contacts into.


On the Field Mappings tab, specify the contact fields, or custom data object fields that should be used to store the information from Cvent. A wide variety of demographic, attendance, and participation information is retrieved.


With this set up, you can use the Run tab to test run your feeder. You will see within Eloqua, the people who registered for, and/or attended your event show up automatically.


To have this run automatically on the schedule you originally specified, go to the Credentials tab and select the Enable Step checkbox.


With this automated connection set up, you will be able to better cater your event marketing to what is happening with your Cvent registrations in real time. Please don't hesitate to provide feedback as you explore better ways to run your events now that Cvent and Eloqua can be seamlessly connected.

Monday, April 4, 2011

String Concatenation in Marketing Automation


Recently we looked at a string manipulation Cloud Connector that allowed trim, search and replace, and regular expression (RegExp) functions against string values in Eloqua contact records. To add to this capability, we also have a Cloud Connector that allows for concatenating multiple values from different fields together into a combined value.

To add this connector, follow the normal process for adding a Cloud Connector, using the configuration URL you can find at cloudconnectors.eloqua.com under Product -> Contact Data -> String Concatenate.


With the connector installed, begin using it by simply adding a step to your marketing automation program at any point you'd like to concatenate string values within contacts in the program.


For this step, set its step type as Cloud Connector, and select String Concatenate as the Cloud Connector step type from the drop-down list. Now, click Configure to begin configuring the rules for your step.


Under the configuration tab, you can define the structure of the final string you're interested in creating. Use [A], [B], [C], [D], and [E] to represent the values you'll be passing in from other contact fields, and then add any other text you'd like to the string concatenation rule.


On the Field Mappings tab, simply configure the fields that you'd like to use for each variable, A, B, C, D, and E, and the field you'd like to return the results to.


That's all that is required, and you can use the Run tab to quickly check that the result is as you anticipate.


Once you're happy with the rule as you have it set up, use the Enable Step checkbox on the Credentials tab to set the step to run automatically. With it running automatically, any contacts that pass through the step will have the string concatentation values you specify automatically run.


With the combination of this step and the string manipulation step, you should be able to do almost anything you need to with string values in your marketing database. Don't hesitate to provide feedback if there are more areas that you feel necessary.

Monday, March 14, 2011

Adobe Connect and Eloqua Integration


Integration between Eloqua's marketing automation programs and webinar providers is an area we've covered quite a bit lately. Of course, for those who use systems other than WebEx or On24, the comments have been consistent - great structure, but can you support my chosen webinar provider. We're happy to add another popular provider to that community - Adobe Connect.

Adobe Connect, part of the Adobe family, provides an excellent platform for hosting large or small events for marketing, education, or sales. They also provide a robust way to tie the data on who attended webinar events into your digital body language on each prospect within Eloqua.

Like any other Eloqua Cloud Connectors, the connectors act as steps within Program Builder's marketing automation workflows, so the first step is to whiteboard what you would like to have happen. With Adobe Connect, to ensure that the individuals are uniquely tracked (by email address), you'll want to register them for the event via Eloqua.


This creates a guest user account in Adobe Connect that allows you to see who is attending. After the event has taken place, you'll likely want to pull information on who attended into Eloqua. To do this, there is a Cloud Connector step to Query Attendance.


With the plan set out on the whiteboard, let's look at how to get these Cloud Connectors set up in your Eloqua instance. We looked at how to install a Cloud Connector into Eloqua recently, and you'll need to do that for the steps you are going to use. Find these connectors at cloudconnectors.eloqua.com:

Register Contact with Adobe Connect: to create a user account and register them for the webinar.

Unregister Contact from Adobe Connect: if you want to remove people from the event automatically.

Query Adobe Connect Attendance: to get information on who attended after the event has taken place.

and also

Feeder of Adobe Connect Attendees: to feed in all Adobe Connect attendees directly into Eloqua for nurture and follow-up (without using a program step to query from)

Install any of these connector types you wish to use and then you are ready to add them into your marketing automation program. To add a step, put the step in the program as you would normally, then select “Cloud Connector” as a step action. You’ll then see a drop-down of installed Cloud Connectors below (if you have installed the Cloud Connectors into your Eloqua instance). For this post, we’ll look at just one of the connectors, but the flow is similar for all of them. Select the Adobe Connect Query Attendance connector for the step that looks to see if people actually attended the event.


Click the Configure button to begin setting it up. You will be asked for your credentials, and it will confirm the Program Builder step you’re connecting to, and from there it will go straight into configuration. The Configuration tab asks you for some options on configuring the Adobe Connect side of the connector. Important: you’ll need an account that is part of the Administrator group for this integration as user accounts (just guests) are being created.

If the account you are using is your own, you should see your meetings with the “My Meetings” option selected, but if you are using a system administrator account, you’ll want to select “All Meetings” and save to see your meetings. Also configure where you want to store the information retrieved by Adobe Connect; you can either use fields on the contact record or, better, store the information in a custom data object.


Move to the field mappings tab and select the fields on the contact record and/or in custom data objects that you are interested in using.


That’s all that is needed in order to configure the connector. You can run it manually a few times under the “Run Step” tab or go to the Configuration tab to enable it to run automatically. Follow the same flow for the “Register with Adobe Connect” step, and you now have your Eloqua marketing automation fully integrated with your Adobe Connect web conferencing.


Enjoy, and please keep the feedback coming, we’d love to hear from you what about this integration is working for you, and what you’d like to see us add, change, or improve.

Monday, March 7, 2011

String Manipulation in Marketing Automation


Advanced users of marketing automation software like Eloqua sometimes find themselves in a situation where they need to manipulate string data. This can be as simple as trimming the space characters from the start or end of a string or detecting whether a value exists in a string, and it can be as advanced as search and replace or even complex Regular Expression work.

Now, there's a Cloud Connector that allows you to do just that - any form of string manipulation - within Eloqua.

Add the string manipulation Cloud Connector to your Eloqua instance by following the normal Cloud Connector installation instructions. The URL for the step can be found under Contact Data -> String Manipulation in cloudconnectors.eloqua.com.


With this Cloud Connector installed, you're set to go. Add a step into a marketing automation program in Program Builder, and set it as being a Cloud Connector step type.


Choose String Manipulator from the drop-down list of Cloud Connectors, and click the button to begin configuring the settings for how you want your string data to be manipulated. The Cloud Connector will allow you to manipulate the string data in any one contact field for all contacts that flow through this step, and either return the data to that same field, or place it in another field.


Click the Configure button to begin configuring your string manipulation. The first thing you will need to select is what you want to do. There are a few choices:

  • String Find: Looks for an exact string that you input (not case sensitive), and returns "True" or "False"
  • String Replace: Looks for an exact string (not case sensitive), replaces that string with another string that you provide, and returns the final edited text
  • Regular Expression Find: Evaluates a regular expression (RegEx) against the string in the contact field and returns "True" or "False"
  • Regular Expression Replace: Evaluates a regular expression (RegEx) against the string in the contact field and then replaces it with the string or Regular Expression you provide. This allows replacing a string with a derivative of itself (ie, replacing any number with "(#)" where # represents the original number.
  • Trim (Left/Right/Full): Trims the whitespace from the front, end, or both of a string
Select this from the drop-down in the configuration screen.


With this selected, hit Save, and you'll be asked for the values (find/replace/etc) that your select requires. Use the help provided for syntax assistance on how to write Regular Expressions.


Use the Field Mappings tab to define which field you want to manipulate and which field you want to return the manipulated value to.


Use the "Run" tab to test your string expression against values in the contacts within the step. You'll see the final value that is returned in the Result column, and can make sure your Regular Expressions are performing as expected.


When you are happy with the configuration you have set up, use the "Enable Step" checkbox on the Credentials tab to set the Cloud Connector to run automatically. From here, any contacts that flow into the step will have the field you specified manipulated automatically.


Enjoy this new capability, please don't hesitate to provide us any feedback that you have as you begin working with this.