Wednesday, October 28, 2009

Custom Activity Tasks in CRM Integration


Guest post by Mike MacFarlane


Recently, Steve wrote about the various options for marketing automation/CRM integration – the integration between marketing and sales data. This got me thinking about how we at Eloqua use our integration capabilities with various CRM systems to help enable our sales team by passing over relevant, actionable information that we as a marketing organization can report on. One of the things we take a lot of advantage of are "custom activity tasks" that I can configure to do, or write, anything I need into Salesforce.com, our CRM system.

A while back, I wrote about setting up your Social Media GPS – showing a salesperson if a visit to your website (or Eloqua tracked page) was a result of click through from various social media sites, like Twitter, Facebook, LinkedIn, etc. This process was built on Eloqua’s ability for a marketer to create a simple activity task that fires over to the CRM once the activity occurs. This has been a great win for us at Eloqua, as we can now report and track social media activity within our CRM system in combination with what we are already reporting on in Eloqua (check out how to track Inbound Referrals in a past Artisan post). But this process can be used for many other functions in relation to what activities/action someone takes.

At Eloqua, we use this process in combination with our Lead Scoring program. Whenever someone is fed into our scoring program (either through a form submission or a website visit), they are scored and we will automatically create a task that is assigned to the appropriate salesperson that contains all the scoring details and explicit information.

To access the often called “Integration Tab” in Eloqua, simply click “Setup/Integration”


For the sake of keeping this brief and to the point, I am purposely by-passing a few steps here, but you can find all the documentation you need to do this within Eloqua’s Customer Central.

Simply select if you want to create/update an object in your CRM, then select the object you want to use (note that if you are “creating” an record within an object in your CRM and you want to update that record later on from Eloqua, you will want to store the CRM ID within a dedicated Eloqua contact field):


Next, you will need to choose which fields from your Eloqua database you would like to use to populate fields within the task record in your CRM. Notice that the mappings screen is broken out into two sections: the left hand side are the fields that reside on the object in the CRM – the fields on the right are the fields that exist in your Eloqua database. Simply drag the Eloqua field you would like to use and drop it into the object field on the left hand side. This screen will also highlight fields that are “required” in your CRM (if you have fields that are required to create a record in an object) and alert you if you have not mapped values to those fields.
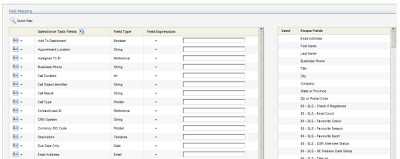

If you have done this successfully, you will see the Eloqua field name show up in red and in italics:


Another option that you have is to hardcode values into specific fields OR you can combine hardcoded values with Eloqua fields. A really good example of this would be in the Subject line of the task (this is what the salesperson would see initially when they receive the task). In this example, I want to make it obvious to the salesperson that this task is related to lead scoring, so I am going to construct my subject line to read “FIRST NAME LAST NAME just went through our scoring program”. Here is how it would look in the field mapping screen:


So when this call fires to the CRM, the task will pre-populate with the first and last name of the person that just went through the lead scoring program.

Once I have completed my mappings, I can then use the built in External Call tester which allows you to test the call you just made before you decide to push it live. Eloqua will show you the data that exists in the object before the call fires and what data exists after the call fires.

Once you are fully satisfied with how your new External call works, you can add it into Program Builder as an Integration Action to fire when someone hits that specific program step.

Monday, October 26, 2009

Capture the "Experience" and Win!


Next week we’re celebrating marketing excellence worldwide at Eloqua Experience, where the world’s best marketers will come together in San Francisco to share their experiences and discuss the future of marketing. Great content for both rising stars and rock stars will be presented by experts in the field, and the learning opportunities will be further enhanced with training on the first day.

But, the point of it all is the “Experience” itself. Talking with other marketers, exchanging ideas, challenging assumptions, borrowing approaches, and making new connections. We want you to share your experiences so everyone can get a feel for the event, so we are launching a “Capture the Experience” contest to add some encouragement to share.

Take pictures, shoot some video, or write about your Experience, and you can win a Kindle. All you have to do is share your pictures, videos, or posts on the Eloqua Facebook page and you are automatically entered to win. Judging and winner announcement will happen on the final day, but the more that the community likes the Experience you have captured, the more likely you are to win, so take your photos, shoot your videos, and get them onto Facebook early.
Follow along on the Twitter hashtag of #EE09 to see the Experience captured from the perspectives of everyone else at the event.
The contest is open to clients, partners, and industry analysts - anyone but Eloqua employees - so be sure to bring your cameras to the event.

We look forward to sharing a great Experience with you!

Thursday, October 22, 2009

Making your Email Content Searchable


Success in natural search optimization has a lot to do with the quality and frequency of the unique content you publish. As marketers, we often spend significant effort creating content that goes into emails, the landing pages they drive people to, and the marketing assets that these lead to, and we are not left with as much time as we would like to create content for blogs and other online properties that are searchable.

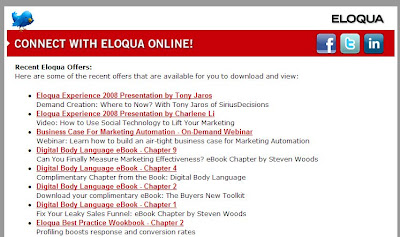
However, this does not have to be the situation. With Eloqua, it is very easy to repurpose any of your email content to make it publishable and discoverable by search engines. (see Eloqua's own feed of interesting content for an example)

The first step is to create an RSS feed that you will publish your content into. In the communication area, under Communicate-> Feeds, create a new RSS feed, and call it something like “Marketing Events and Promotions”. This is where we will keep a running feed of all the marketing content that would be interesting for people to discover in a search. Be sure to select that this is an internal feed (a feed that his hosted within Eloqua) rather than capturing an external feed (such as from a Blog's RSS Feed as we talked about previously).


With this feed created, but empty, our next step is to feed content into it. We are creating a lot of content in email, but this content does not get found by Google as it does not generally end up hosted on the Internet in a way that it is linked to and discovered by Google. We’re going to change that by generating a publicly available feed of email content that might be interesting.

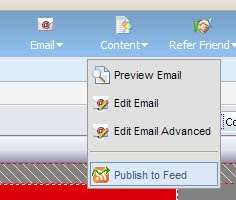
For each email that is interesting and non-promotional; new whitepapers, notices of events and webinars, thought leadership articles, or case studies, the email that you use to announce it can be added to the RSS feed we have just created. To do this, from the email editor, select Publish to Fee from the Content menu. Select the RSS feed you just created, make sure the title and description are accurate (it will default to the title and description from your email) and click Publish.

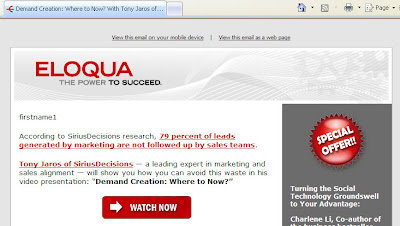
Now, the email is linked into the RSS feed. The feed will show the title and description of the email, and the link will guide the user to a hosted landing page that is the exact content of your email. The feed itself can be very useful for internal constituents, like your sales team, who are interested in knowing what marketing communications are happening. Adding the feed to a web desktop such as iGoogle, or an RSS feed reader, gives a very quick and easy way to stay on top of the communications that are happening.

However, this feed can be used to create a web friendly, hosted portal that highlights the events and promotions your marketing team is running, and makes them all immediately searchable by Google. Simply build a landing page on an Eloqua hypersite, and insert the RSS feed into it. By adding a style to the feed, and some creative around the feed, you can create a more accurately branded experience. Make sure that this page is linked to from somewhere, such as your main web site, so that it can be found by the search engines, and all the content within it will be found by them.

Now, each email that you send out can be dropped into the RSS feed and will appear on your landing page without any extra work on your behalf. You gain the search benefits of creating a rich, consistent flow of content, without having to duplicate effort or write any new material. Of course the more interesting and non-promotional your material is, the more likely it is to have other people find it interesting and link to it, which further increases its search friendliness.

When the article in the feed is clicked on, or crawled by Google, the full content of your email shows up, cleanly formatted and fully searchable by Google:

Tuesday, October 20, 2009

Social CRM meets Marketing Automation


Much of our conversation around marketing automation tends to focus on the new revenue side of the business. Understanding digital body language allows us to understand which prospects are ready to buy, and which need to be further nurtured. However, the same concepts apply to the understanding of existing customers.

Understanding which customers are engaged with your knowledge portal and online community in order to learn more, which are struggling, and which are advocates allows you to use similar principles in order to better guide all of your customers towards success and ultimately renewal. I wrote recently about the ideas behind renewal marketing and social CRM, and the opportunity that it provides us to focus on maximizing customer satisfaction.

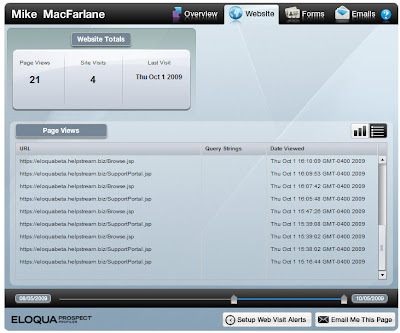
Since that time, I’ve had a number of conversations with the folks at Helpstream (who power our Customer Central online community), and we have a strong collaboration in the works. Recently, the Helpstream team announced the ability to integrate marketing and social CRM by adding Eloqua tracking to any pages (or all pages) within a Helpstream-power portal that you would like.

By doing this, activities within the social CRM community can be used as part of your lead nurturing strategies to guide your communication based on what level of engagement an individual has, or as part of lead scoring algorithms for looking at renewal or upsell.

If you have both Eloqua and Helpstream, it is worth ensuring that you are receiving the insights into your customers’ engagement with your social CRM system by integrating Eloqua scripts into the portal.

Thursday, October 15, 2009

Lead Scoring, Update Rules, and Comparisons


As you get deep into lead scoring and begin to implement some of the lead scoring best practices, you might run into situations where you need to make a comparison. For example, if you have an existing lead score, and want to re-score that lead when they visit your website again, but you only want to keep the highest score, you need to be able to compare a new lead score against an old lead score.

To do this in Eloqua is quite easy, and leverages the ability for update rules to perform basic mathematical functions. (If you haven't looked at update rules in a while, it's worth having another look as both the capabilities and the user interface have been enhanced; drag and drop ordering and new update actions)

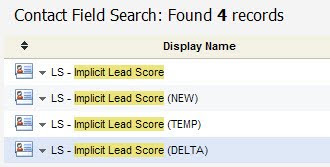
If, for example, you want to see if a new lead score is greater or less than an old lead score, you would create a field called "Lead Score (New)" for the new lead score and "Lead Score (Delta)" for the difference between "Lead Score (New)" and "Lead Score".

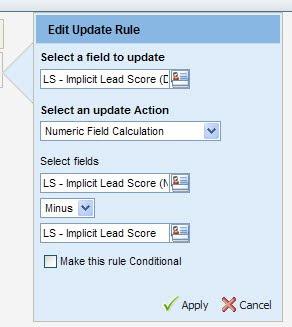
With those fields in place, create an update rule to find the difference. Select "Lead Score (Delta)" as the field to update, and then for the update action, select "Numeric Field Calculation".

Note that the contact field types MUST be numeric for this option to exist, as this will be working with the fields as numbers.

When you have selected that update action, you will then need to select the fields to operate on, and the operation to perform. To find the difference between the new and the existing lead score, select "Lead Score (New)" minus "Lead Score".

That's all you need to do, and when this update rule is run (usually in a marketing automation program), it will calculate the difference for you.

This delta value can then be read by a decision rule to see if the new score is higher (>0) or lower (<0)>

Monday, October 12, 2009

Easily Offending Most of the World - Data Validation Errors


I'm a huge fan of clean data, anyone who has read this blog for long knows that. However, clean data can never trump customer experience. Many times, simple tactics that you use to manage your incoming data can have large and unintended consequences.

The example that prompted this post was a Zip Code validator on a web form. The form did not specify country, and it was for the download of a whitepaper, so it was not something that seemed likely to be restricted to only viewers from the United States. However, the Zip Code field had a validation javascript on it, and required a Zip Code that was correct according to US standards.

I'm from Canada, and we have Postal Codes that use numbers and letters in a A9A 9A9 format, so clearly this did not pass the test, and I received an error alert. I dashed off a quick note to the site owner, and then filled in the only Zip Code I have top of mind - 90210.

This is an interesting example, as it highlights a mis-match between the user experience on that web form, and the quality of the data. Bringing the data management in house into an inline data management process like a contact washing machine is usually the best bet, while minimizing the burden placed on web form visitors. For address information, using address validation to balance the user experience can often be better than restrictive forms.

In thinking about the experience of your landing page visitors, be sure to balance the need for quality data with the need to deliver a great experience to your visitors.


Thursday, October 8, 2009

Prospect Profiler - As an AutoHotKey Shortcut


In the second post in a two-part series on Prospect Profiler, one of our keys to sales enablement, Ben McPhee continues exploring the topic he introduced in his first post; Prospect Profiler as a stand-alone. This time, Profiler is accessed as a AutoHotKey shortcut from within your email client.

==============================================


Option 2: Take a shortcut from your email client!


This is REALLY cool. We don’t officially support or have any direct integration with this software, but if you run AutoHotkey®, you can easily jump from your email client (e.g., Outlook) straight to a contact’s Prospect Profiler record with just the press of a few buttons.

Click the following link to download the custom AutoHotkey script that we wrote: http://www.mediafire.com/?sharekey=58ec0aca75258a2ac79b87b207592a1ce04e75f6e8ebb871

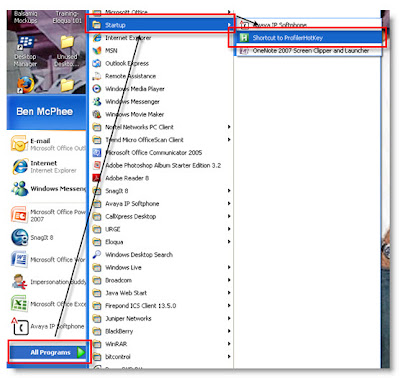
When you are prompted, Save the file to your desktop. Once it is saved to your desktop, select it and drag it into your Start Menu > All Programs > Startup. Drop the file there so that the file runs every time you start up your computer. Having this script run on startup allows you to always use a hotkey combination to view a Prospect Profiler record for a contact.


Once the script has been ‘installed’ successfully, the next time you start up Windows, you should see an AutoHotkey icon appear in your toolbar:


Now all you have to do is the following:

1. Select an email address from your email client (make sure you select the entire email address, rather than the address book display name):


2. Copy the address: CTRL + C
3. CTRL + SHIFT + Z: This runs the AutoHotkey script
4. Select “Yes” to the prompt confirming that you want to look up the activity for the contact with the email address you copied


Your internet browser will now automatically load up with a view of the Prospect Profiler for the contact you identified! Going forward, all you need to do is copy an email address and then hit the hotkey combination above and you can load up an activity overview of your lead or contact in seconds.


Again, if you have not already logged into the Eloqua application or stored your user credentials with the Profiler, you will be prompted to enter your company name (no spaces), your Eloqua user name and your Eloqua user password. Make sure you select the “Remember Me” option, then log in.


Note: If your user account does not have access to Prospect Profiler (it is an add-on product offering), you will get a message to this effect. Contact your CSM if you are interested in Prospect Profiler.

Monday, October 5, 2009

Prospect Profiler - without a CRM System


Today's post on Artisan is another guest post, this time from Ben McPhee, on our Product Management team. Ben is most well known for his recent work on Prospect Profiler, one of our keys to sales enablement, but he is also responsible for our work with the sports marketing vertical where we work with a number of professional sports teams, arenas, and racing facilities.

In this post, Ben revisits Prospect Profiler, and looks at ways in which it can be used in stand-alone manner, without relying on being embedded in a CRM system as it normally is.


==============================================


No CRM system? No problem. While Eloqua’s Prospect Profiler is most effective in the context of a Lead or Contact record, we recognize that context may not always be ideal or available. There will be instances in which sales reps would like to simply see a contact’s activity without having to navigate through a CRM system and other instances where reps have not been provided a CRM tool at all.

Focused on making both marketing and sales as successful as possible in as many scenarios as possible, we want to let you know about some alternate routes/shortcuts your reps can take to get to Prospect Profiler and acquire a more in depth understanding of their prospect’s interests and behaviors.


Option 1: Just get on the internet and go to it!

Go to http://prospectprofiler.eloqua.com/
If you have not already logged into the Eloqua application or stored your user credentials with the Profiler, you will be prompted to enter your company name (no spaces), your Eloqua user name and your Eloqua user password. Make sure you select the “Remember Me” option, then log in.

You will then be presented with a search bar – going forward, when you go to the URL above, you will be automatically taken to this search interface. Type in the email address of the contact whose profile you wish to view (notice that once you type in the ‘@’ symbol you’ll get a list of possible contacts from which to choose), then hit Search.


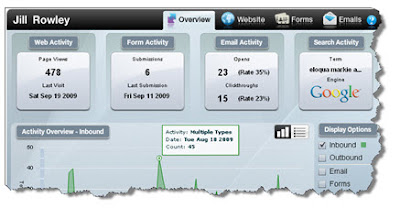
The page will then load that contact’s profile with all the standard features of the Prospect Profiler – hover-overs, drilldowns, previews, etc.


Option 1B. If you’re a Mac user, set up a dashboard

In case you’re a Mac user, we thought we’d point out a quick and easy trick so that you can have quicker access to the great information available in Prospect Profiler.

Open Safari and navigate to http://prospectprofiler.eloqua.com/
Login to the profiler using your Eloqua login info (make sure you select the “Remember Me” option)
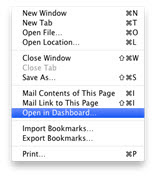
Choose "File" and "Open in Dashboard..."


A purple bar will drop down from the top of your browser window - click on the "Add" button at the right end of that purple bar.

You'll now see prospect profiler living on your OS X dashboard making it instantly accessible at the click of a button (or swipe of your mouse if you're using expose)


Styling Tip: You can change the style of the dashboard frame by clicking on the small "info" button located in the bottom right corner of the Profiler dashboard.

With these techniques, you can make Prospect Profiler, and the insights it provides into prospect buying behaviour, available anywhere, without needing the context of a CRM system.

Note: If your user account does not have access to Prospect Profiler, you will get a message to this effect. Contact your CSM if you are interested in Prospect Profiler.