Showing posts with label Activity Filters. Show all posts

Thursday, May 20, 2010

“Stop Light Program” – Filters for controlling Email Frequency


Guest post from Carlos Cerqueira, a senior product specialist on our Premier support team.

==========================


Have you been enjoying the new Contact Filter options but want some ideas for incorporating them into your Email Marketing, beyond simple segmentation?
A great way to incorporate the new filter options into your email campaigns is to use the concept of Email Frequency or as one of my client’s has coined it: “The Stop Light Program”. This allows you to address issues with over saturating prospects/contacts with emails by automatically having them removed from email sends once they reach an appropriate number of email receptions.

The need to create a program is no longer required but the idea is still much the same: Create a series of Filters based on email frequency ranges that assign contacts a Red, Yellow or Green value. Based on the color assigned to the contact you can then implement these filters into various areas of the application to either block or allow email sends to these contacts.

Prerequisites for Filters

What you want to do is to decide beforehand what amount of email sends should classify a contact to be placed into the Red, Yellow or Green categories. You will need to input those values in your filters when you create them.

There are valuable reports in Eloqua that will help you decide as an organization what are acceptable email ranges to assign to your different colors.

An Example would be as follows:

Red – received over 10 emails in last month

Yellow – received between 4 and 9 emails in last month

Green – received between 1 and 3 emails in last month

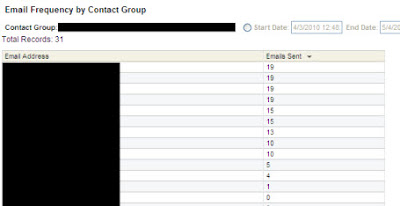
A Valuable report is the Email Frequency by Contact Group (which is also a great report to look at on your Contact Group Dashboards) which will show you all the contacts in that group and how many emails they received within a certain time range:


Creating Filters

To create a new filter head over to the Contact Tab and select the Contacts dropdown. Select Create a new Contact Filter.

Once you are in the Contact Filter canvas you can see all your criteria options on the right hand side which can be dragged and configured on your canvas area.

The criteria we are interested in is the “Have been Sent an E-Mail”:


Click and drag that criteria onto the canvas and a configuration window will pop up:
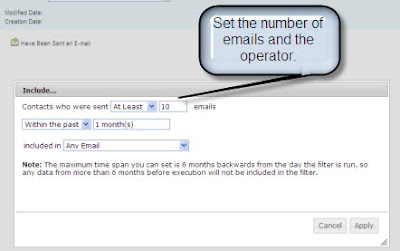

Each color will be its own filter and the email amounts can be altered at any point as your initial ranges may be re-thought.

Additional criteria such as Contact Data may be used to further segment out your contacts to target specific industries, companies or countries, i.e. Adding a criteria to only see contacts that are part of a certain company:
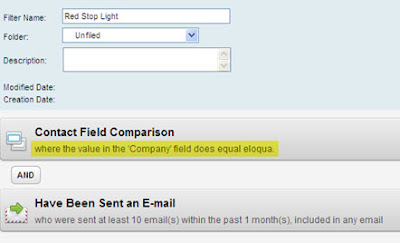
Another good tactic is to incorporate other activity based criteria into the filter such as Opened emails, clicked and E-mail, etc. This allows for granular filtering and also then allows for more flexibility in how you leverage these new filters.

Leveraging the Filters

Now that you have these filters built you want to know how to implement them into your current process to possibly prevent “Red Stop Light” contacts from receiving any emails until they are Yellow or placing your “Green Stop Light” contacts into a nurturing campaign.
Below are some suggestions that might help you decide how you are going to incorporate these filters into your system:

- Master exclude List - If you are experiencing issues where you don’t want any contacts who have received over a certain amount of emails to be emailed at all until they are within Yellow or Green ranges then placing the “Red Stop Light” filter into the master exclude area would be an option. The master exclude list can be accessed by Customer Administrators under the Setup->Management ->System Management tab but be warned that any contacts added to this list are EXCLUDED from any email sends in your system.

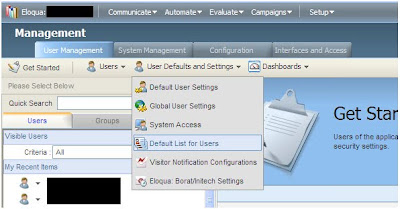
- Default Distribution Lists – Another exclusion option is to add the “Red” filter into default distribution list’s excluded area which would mean any NEW distribution lists will automatically have that filter as an excluded asset. The Default distribution list configuration is again only accessible by Customer Administrators and can be found in the Setup->Management->User management tab and from there just click the User Defaults and Settings menu:

- Nurturing Campaigns – What to do with the Red and Yellow filters is generally obvious but there are possibilities for your Green filter where you can combine activity criteria (opens, clicks,etc) as mentioned earlier in the post to pull contacts into a lead nurturing program. This allows you to engage a target audience who you know is interested in your product/service but has not been bombarded with recent emails.

Hopefully this had shed some light on the power and flexibility of our new Contact Filters and encourages you to try and think outside the proverbial box.

Tuesday, May 11, 2010

Separating your Marketing Database into Active/Inactive


Given the new advanced contact filters that were just released within Eloqua, here is a refresh of an older post on the topic of separating your active and inactive contacts. Thanks Chad Horenfeldt for the refresh:

One of the most important goals of Lead Nurturing is to maintain permission to stay in front of your audience with your communications. Data from Marketing Sherpa on content relevance and unsubscribes has shown that many prospects will not necessarily click on an unsubscribe link when they lose interest in your messaging. However, far worse, they may become emotionally unsubscribed, reflexively ignoring and deleting your messages as they arrive.

If you continue a rapid pace of marketing to this emotionally unsubscribed segment, they may at some point click the “this is spam” button, causing you a significant deliverability headache, even if they had originally subscribed legitimately.

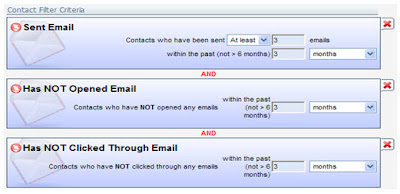
The first step in avoiding this situation is to identify the inactive members of your database. To do this within Eloqua is very easy. You can create a filter and use Activity and Inactivity criteria that will tell you which contacts are not active. If you’re not sure where to start, check out the following article: “Contact Filters - Creating Contact Filters”. In your filter, choose the following criteria:

• Has been sent at least 3 email in the last 6 months
• Subscription Comparison: Contacts who are subscribed as of now
• Has not opened 1 email in the last 6 months
• Has not clicked on 1 email in the last 6 months
• Has not visited the website at least once in the last 6 months
• Has not submitted at least 1 form in the last 6 months

It should look like this:


The last step is to use advanced logic so it looks like the following:


Therefore, all active contacts are those that have been sent at least 1 email and have not unsubscribed and have not performed any activity.

With this segment defined, you can then suppress them against regular email distributions, in order to ensure that they are not communicated to more than they would appreciate. You could even set up Default Distribution Lists that would automatically suppress these contacts.

Depending on their level of disengagement, you can target them with special re-engagement offers (How To - Create an Automated Reengagement Program) or campaigns using other media types such as direct mail or a calling campaign.

The critical point, however, is to identify and monitor the inactive segment of your database. By understanding its size and any trends in its growth, you can begin to understand how your messaging is resonating with your audience, and adjust accordingly.

Thursday, April 22, 2010

Powerful New Contact Filters


Eloqua's spring release had a number of very interesting new capabilities to explore, and over the next few posts, I'll look at a few of those. The first to look at, and perhaps the most powerful, is the integrated filtering engine.

Defining a target segment based on demographic or firmographic information has been a mainstay of marketing for many years, but over the past few years, the ability to add in the psychographics of online behaviour has added a new dimension to the mix that allows you to capture not just who a person is, but how interested they are, or even what they are interested in.

This has been possible within Eloqua for a long time, but now, the new integrated filtering engine brings demographics, firmographics, and psychographics together in one easy to use interface.

Building Combined Filters

As you always have, click "New Contact Filter" to begin creating a contact filter. Now, the interface shows a palette of options on the right hand side. These options range from data on the contact itself, data on attached custom objects, associated company information, or activity information.


Select a filter option and simply drag it onto the main canvas. A configuration window pops up, giving you the ability to set the details of that filter option. Note that for data field, you can use lists of criteria, such as titles, to match if the contact meets any of the criteria in that list.


To build an integrated filter that includes activity, inactivity, company, or custom data object information, just drag in one of those items as a filter option.

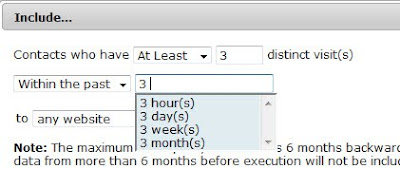
For time related criteria, such as activity, the simplification is taken one step further. Just begin typing the amount of time you have in mind, and the auto-suggest feature will provide you with possible options ranging from hours to months.


Keep dragging the criteria you require onto the canvas until you have created the contact filter that you need. By default the conditions you choose will work together as "ANDs" - all criteria must be met to return the contact - but you can configure this logic (including brackets and more advanced boolean logic) by pressing the "Advanced" button at the bottom of the page.

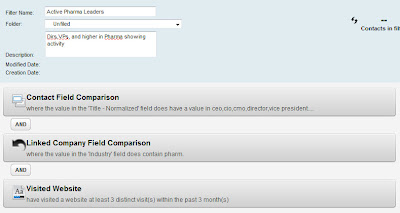
With your filter complete, you can see all criteria displayed for you in natural text form, giving you a very clear sense of what you are looking at:


And to ensure that you are returning the number of contacts you expected, you can always click the "refresh" button and see exactly how many contacts meet the criteria you have specified.


These new integrated contact filters that combine explicit data on the contact, the company, and any custom data objects with implicit information on an individual's activity are extremely flexible and powerful, while also being very simple to use. I look forward to hearing from you how you have used these filters to better target your audience, and any enhancements you see being of further value.

Monday, January 11, 2010

Who didn't submit the form?


Today's guest post is another from Joel Rothman, one of our Senior Product Consultants. In this post, Joel looks at landing page to form submit conversion rates, and how to understand who showed up, but did not submit. It's one of those little techniques that make the difference between just doing okay and truly seeing success in a marketing automation initiative.


===============


Who landed on the form page but didn’t submit the form?

So, you crafted a campaign to drive people to submit your form, but they did not? That’s ok. Within Eloqua, you can easily set up a follow up email to target people who landed on a specific page, but did not submit a form. In fact, there are several ways to do this, but I like the way I am about to outline below. This way allows someone to click onto the page from multiple sources. It requires 2 activity filters, and a program for automation.

For this example, lets use the following URL:

http://www.eloqua.com/contact/

And we’ll call the form “Contact Us”.

First, create 2 Activity Filters.

For the first one, select “Visited Website”. In the “included in” section, choose “specific URL”, and select the URL of the landing page (remember to click “Add”):


This will display everybody who has visited the specific URL in question.

For the second Activity Filter, select “Submitted Form”. For this one, select “Individual Form” for the “included in” criteria, and select the form (again, click the “Add” button):


Now that we have the filters, we need an easy way to overlap them. I like to create a simple program. This allows for automation to be built on top.

See the screencap below for the simple program:


The nice thing here is you can now follow up in 3 different ways! For people who have submitted the form (step 300 above) you can send follow up information, such as event information. For people who have not clicked through on your offer (step 200 above), you can send them a follow up email. For people who viewed the offer, but did not submit the form (step 400), you could follow up through another channel, such as a print mail piece, or a phone call.

As well, you could include other events, such as opened email, did not click through etc…

Wednesday, December 9, 2009

Email Deliverability Health Check


Today's Eloqua Artisan post is a guest post from Sweeney Williams, Eloqua's Deliverability & Privacy Specialist. As a resident guru of email deliverability, Sweeney is responsible for managing Eloqua's network sending reputation, as well as providing deliverability and privacy consultation to Eloqua clients.


====================


We all talk about Digital Body Language in the Eloqua world, but there is an aspect of the digital body that is rarely discussed – the health of your IP reputation. As many are aware, the chief determining factor of where your email will end up (Inbox, Junk filter, or SPAM filter) is the reputation of your sending IP. If your data and data management practices are healthy, your IP reputation will be healthy too. If they are out of shape, your IP will be as well and those email metrics will follow suit. How can you keep things in tip top shape? Here are a few easy guidelines to follow:

1 Checkup:

Yes – this is basic but much like the yearly trip to the doctor most put it off due to time constraints, or for fear of what they might find out. Not to worry; this should be painless and relatively brief.

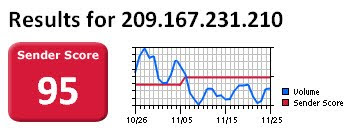
Visit http://www.senderscore.org/. Sign up for a free account and plug your dedicated IP(s) into the search bar. You will see the current score, risk rating, accepted rate and problem areas. Note that you can also see this information from right within Eloqua with our Boost package.


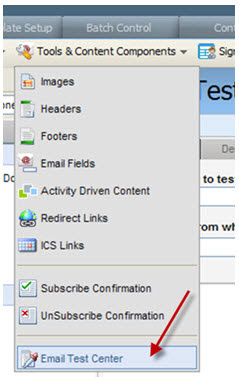
Test campaigns before deploying. Navigate to Communicate->Email Marketing->Email->Tools & Content Components->Email Test Center and click the Deliverability tab. That handy General Deliverability option will show you how your campaign will perform in the real world and is a reflection of IP reputation, authentication, and content.


If your Inbox rate at a particular provider is sub par, check into the symptoms and remedies below.

2. Symptoms:

Don’t ignore those test results. If your checkup didn’t go well, you have to get to the root of the problem and take some good, strong medicine. The two most common maladies are:

Complaints – The cough, the sneeze, the chest congestion. These are the loud and painful signs that something is amiss. Complaints primarily arise when contacts have been sent email that they have not opted in to receive, or have opted in to previously but have not been sent in a long period of time (4+ months). Complaints carry a very high weight when it comes to IP reputation and as a result the threshold is very low. In fact, if complaints amount to more than 0.01% of your total sends, your IP will take a hit. You can see your complaints in Eloqua via the ‘SPAM Unsubscribe List’ report (Evaluate->Reporting->Report Console->Find a report).


Take a good look at the contacts in there. Did they come from a purchased list? You should consider segmenting all contacts from the list source if they have caused your complaint rate to rise above that 0.01% threshold. Are most from a particular ISP? If they are largely from, say Hotmail, that could be the reason for bad performance at Hotmail in the General Deliverability test you ran during your checkup. Did they complain about that concert email when their opt in was for a sporting event? Time to use Subscription Management and better segmentation.

Bouncebacks- Bounce messages provide a wealth of information about the health of your list, DNS setup, and IP reputation. Hard bounces let you know that your lists have quality issues, and if you are seeing a hard bounceback rate over 4% you have either acquired a list of questionable origin, or you have activated an old house list. Either way, segment contacts from the problem list source so that they do not continue to generate bounces and harm your IP reputation. Soft bouncebacks on the other hand do not impact your reputation, but they can provide you with details about other issues. If, for example there is a problem with your branded domain and it is not publishing your Eloqua SPF record, you will see information about this in your soft bounce messages. If your IP has a bad reputation at the receiving network, you will often see a soft bounce message stating that. If you are blocked as SPAM, the soft bounce message will provide you with a web location where you can remediate the block. Take some time out every week to check into your Bounceback History report (Evaluate->Reporting->Report Console->Find a report) and take careful note of the information provided in the Message column. If you need help, there is a handy guide in Customer Central called ‘Auditing the Bounceback History Report’ which can help you make sense of the data.

3. Prevention:

We have all heard the saying that an ounce of prevention is worth a pound of cure. This holds true here as well, as preventing issues is much easier than correcting a full blown crisis.

Authenticate – The first thing a receiver will look at is whether authentication is enabled, and of what type. With Branding & Deliverability, Sender Policy Framework (SPF) authentication is required as part of the setup process. This tells the receiver that the IP you are sending from is authoritative to send on the behalf of your branded domain. Branding & Deliverability also provides Reverse DNS authentication which allows a receiver to validate the IP against its domain name. A third level of authentication which is NOT provided by default but can be requested is DKIM signing. DKIM (Domain Keys Identified Mail) verifies the sending domain through encryption and is rapidly gaining popularity at ISPs such as Gmail and Yahoo!. In fact, your email is not eligible to be added to the Yahoo! feedback loop without it.

Segment Inactives – Our Chief Privacy Officer, Dennis Dayman brought the concept of the ‘Emotional Unsubscribe’ with him when he started here at Eloqua. This is the theory that if someone is continually being sent email and is never opening or clicking through, they have unsubscribed without taking the time to physically click the Unsubscribe link. These individuals pose a significant complaint risk (at some point, they will flag the email as SPAM out of annoyance). Inactives can also be SPAM Trap addresses. Either way – it’s best to get them out of your general marketing sends before they cause problems. To do this, use Inactivity Based Filters to check for contacts that have been sent a certain amount of email over a set period amount of time and have not opened or clicked through. My standard recommendation is three emails over three months. Navigate to Communicate->Email Marketing->Contacts and select New Contact Filter from the Contacts dropdown. Choose the Inactivity option.


Then set your filter criteria


The resulting contacts can be sent a re opt in or manage subscriptions campaign to re-engage them or allow them to explicitly unsubscribe. If that fails, they should be added to a group and the group added to the Master Exclude list. They can also be exported and vetted via an outside service such as those offered by Eloqua referral partner Fresh Address http://biz.freshaddress.com/.

Cheers to your good health!

Sweeney
Deliverability & Privacy, Eloqua Corp.

Thursday, September 17, 2009

Quick Tip: Activity Filters based on Campaigns


Activity filters are getting progressively more powerful within Eloqua. As marketers have started using them for lead scoring, lead nurturing, and deeper analysis, the feedback has been clear on where we have needed to extend them.

Back in June, we added increased activity filter granularity to let you build contact filters based on a much more precise definition of what email, form, or content area a person interacted with. This was well received, but for those using campaigns, the need was clear for filtering based on an asset in a campaign.

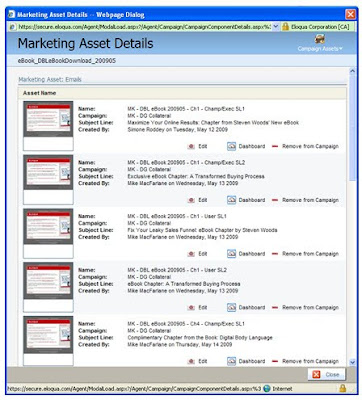
It's now available, and getting great comments. If you have a campaign, say a webinar or an eBook series, that has a set of emails in it, you can now build a filter that identifies just the emails in that campaign.

Add the emails (or whichever other marketing asset you are looking to filter against) to your campaign as you normally would. If you are doing any A/B testing, and want to also include those results, be sure to include all test version within the campaign.

Then, when you are building your contact filter, select an Activity-based filter, and the action you are looking to filter against. For example, we might be looking for individuals who have clicked through emails in our campaign.

Add your criteria of how many emails, over what period of time you are interested in looking at, and then select Campaign from the "Included in" menu. Select the campaign you are interested in looking at in the search & select menu below.


With this in place, your filter will only select contacts who have clicked through emails in the specific campaign you choose. This makes it much easier to define the rules you need for your scoring or nurturing campaigns.

This was developed based on very clear feedback from you on what our priorities should be, so please keep that feedback coming.

Thursday, June 25, 2009

Separating your Marketing Database into Active/Inactive


One of the most important goals of Lead Nurturing is to maintain permission to stay in front of your audience with your communications. Data from Marketing Sherpa on content relevance and unsubscribes has shown that many prospects will not necessarily click on an unsubscribe link when they lose interest in your messaging. However, far worse, they may become emotionally unsubscribed, reflexively ignoring and deleting your messages as they arrive.

If you continue a rapid pace of marketing to this emotionally unsubscribed segment, they may at some point click the “this is spam” button, causing you a significant deliverability headache, even if they had originally subscribed legitimately.

The first step in avoiding this situation is to identify the inactive members of your database.

To do this within Eloqua is very easy. Using an Inactivity filter, you can look for contacts who are showing less than a certain amount of activity. A recommended technique is to build a group called “Inactive Contacts”. By looking for contacts who have had no clickthroughs, no web visits, no form submits, and less than a few email opens in the past few months (preview panes may still render an open for someone reflexively deleting your email in a few email clients), you can define a group of inactive contacts.

It’s recommended to regenerate this group every month or quarter in order to ensure that you capture any newly inactive contacts, or allow any contacts showing a resurgence of interest to leave the group.

With this group defined, you can then suppress them against regular email distributions, in order to ensure that they are not communicated to more than they would appreciate. Depending on their level of disengagement, you can target them with special re-engagement offers, or campaigns using other media types such as direct mail or a calling campaign.

The critical point, however, is to identify and monitor the inactive segment of your database. By understanding its size and any trends in its growth, you can begin to understand how your messaging is resonating with your audience, and adjust accordingly.

Tuesday, June 9, 2009

Activity Filters With Increased Granularity


With the upcoming release on June 14th, there is now the ability to define an activity based filter that looks at very granular information, such as opens from a particular email, email group, or campaign. This level of granularity extends across all the different criteria that are possible within Activity-Based Filters.


This is a powerful capability, as it allows you to define filters that look very precisely at a person's activity. This can be used for many marketing options. For example:


  • To discover a list of people who had clicked through any email from the Newsletter series within the last 3 months, for targeting with a special offer

  • To define a lead scoring system that gives 5 points for a Newsletter email clickthrough, but 10 points for a Case Study email clickthrough

  • To sub-segment a Contact Group to remove people who had already visited a Hypersite or submitted a specific form

These filters can be used from all areas of the application; in designing feeders to add contacts to Programs, in decision rules within Programs, when manipulating Contact Groups to define a report, or when defining a Distribution List for a marketing effort.

Be sure to experiment with the new granularity on Activity-Based Filters, as many rules can now be expressed with the ability to look at activity at the level of individual forms, emails, or Hypersites.

Wednesday, February 25, 2009

Dynamic Dashboards with Groups and Programs


I wrote a little while ago about using Group Manipulation to set up very customized reports that show interesting cuts of your data. We used the combination of Activity-Based Filters and normal Contact Filters to find a list of Executives (Director, VP, CxO) who had shown a minimum level of web activity/interest in the last month. This was just an introductory example of the technique of using Group Manipulation to find, and report on, almost any cut or slice of your marketing data.

I was chatting with Nate Pruitt the other day who is a very smart Eloqua user, and VP Marketing at Asure software, and we were discussing the next level of this technique. How do you make a continuously update dashboard of this data rather than manually manipulating Groups to perform the analysis once.

The good news is that this is also easy to do. The overall philosophy is the same, using Contact Groups and multiple steps to perform the analysis and create the right set of members in a Group. However, instead of doing this just once, manually, we'll use Program Builder to perform the manipulation of Group members.

Step 1 is removing existing members from the Group in order to start from zero. This is simple, we'll just add a Program Step that removes Contacts from a Contact Group (our "Interested Exec" Group), and use the Group itself as a Feeder for that step in the Program. This lets us automatically empty the Group each time we start the process.

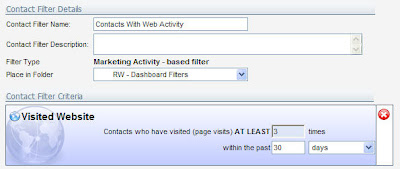
Next, we'll use our original Activity-Based Filter to feed the Program with any Contacts who have shown Web Activity of a certain amount in the last month. The rule for that is all built into the filter, so all we have to do is set up a Program Feeder to pull those members in on a daily basis.

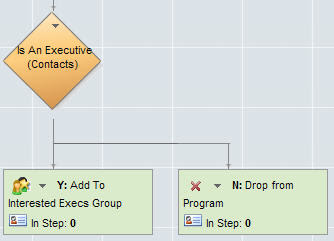
Now we have members in the program who are showing the right level of activity, but we're not sure if they are Execs. In the static example we used a Group/Filter combination to determine this, but since we have the active contacts in a Program already, all we need to do is apply a Filter through a Decision Rule.

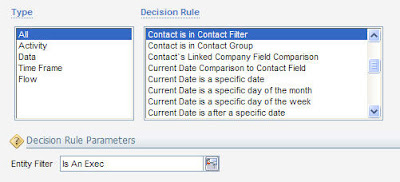
The Decision Rule will use our pre-existing "Is An Exec" Filter that looks for the appropriate titles, and uses a wildcard search to include execs from any line of business (sales, marketing, finance, etc).

Use the "Contact Is In Contact Filter" Decision Rule and select the existing Filter, and the Contacts flowing through the Program will be split based on whether they are in an executive role or not.

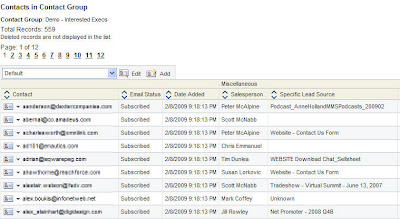
For those who are executives, one final step adds them into the "Interested Execs" Group, and for those who are not, we can just drop them from the Program. Now we have a continually updating list of executives who have shown a minimum level of web interest in the last month.

This is an ideal situation for creating a custom dashboard that shows the members of the group and can be accessed at a glance. It is also a general technique that can prove very valuable in tackling all sorts of interesting analysis and dashboard challenges.


I look forward to your comments on how you have applied this technique in your marketing analysis.

Monday, February 16, 2009

New Ways To Think About Reporting - Group Manipulation


One of the most common reports we all want as Eloqua users is a list of Contacts where X and Y are true. It may be as simple as the list of people registered for the next event, or as complex as the list of East coast execs in manufacturing companies who have shown interest in the last month.

The good thing is that whether it is simple or complex, you can usually create the list quickly and easily. For the more complex requests though, the best place to start is with the manipulation of a Contact Group. Rather than trying to create one report that will provide exactly the set of Contacts you want to include or exclude in your report, start with a Contact Group.

For example, if we want to create a report that lists executive level contacts (VP, Director, or C-level) in any field who have show web activity in the last month, it would be a difficult report to put together. However, it is simple to put this report together with some group manipulation.

The reason this is an easier path is that you can break a complex report into steps, and deal with each step on its own. For this example, we'll start by creating a Group of we'll call "Interested - All". Using the "Add Contacts" option allows us to add Contacts to that Group, and we'll use a Filter to add them.

As the second step in our process, we'll create an Activity-Based Filter that identifies all Contacts who have had web activity (let's say greater than 3 visits) in the last month. Selecting this Filter in the Add Contacts step now gives us a Group with all Contacts who have shown web activity.

For the next step, we'll create a Filter that is called "Is An Executive" that uses wild cards to look for "*Vice Pres*" or "*Director*" or "C*O".

In a third, and final step, we'll create a second Group, "Interested Executives" and choose the "Add Contacts" option again. This time we'll use the "Contact Filter and Contact Group" option, and choose our "Is An Exec" Filter and our "Interested - All" Group.

Running this now adds all the Contacts who are executives and have also shown web interest.

From here, the reporting is simple, as you can use the regular reporting available on Contact Groups to provide you with lists, data profiles, or geographic views of the interested execs.

This example is a simple one, but it gives you a new technique that you can use in creating the right slice of your marketing database. By breaking it up into separate steps, and using the filtering, overlap, and activity-based tools available to you, you will find that a lot of new analysis options become possible.

In the next post on this general topic, we'll look at making this whole concept dynamic and continually updating: http://eloqua.blogspot.com/2009/02/dynamic-dashboards-with-groups-and.html


Friday, February 13, 2009

Looking at Interest - Activity-Based Filters


In many areas, interest is equally or more important than explicit data such as title, role, or industry. Whether you are targeting an outbound campaign or scoring leads, an ability to build rules on interest is critical.

That is easy to do in Eloqua with Activity-Based Filters. If you haven't tried them, they are worth getting familiar with as they are useful in so many scenarios. Activity-Based Filters work like the Contact Filters you are familiar with, but look at data on email, web, and form activity.

Again, similar to regular Contact Filters, you can use Activity-Based Filters in many areas, Distribution Lists, Program Decision Rules, Group manipulation, and reporting.

To create one, select "Activity-Based Filter" when you are presented with options in the first screen you see in creating a new Contact Filter. Select the type of filtering you want to do - Clicked through an Email, Opened an Email, Was Sent an Email, Submitted a Form, Visited Hypersite, or Visited Website. Each selection presents you with a further set of options where you can refine the amount of activity and the time over which you want to look.

In combination with tools such as Content Tags, which identify specific areas of a website, this becomes a very powerful tool. By tagging the pages on the Eloqua Artisan blog with a Content Tag, I can now define a Filter to identify people who have seen at least 3 pages on the Eloqua Artisan blog in the last 4 weeks in order to identify people showing interest in the blog.

The ways in which this can be used are numerous, so it is worth exploring to gain familiarity with it. Comments on how you've used it are greatly appreciated.

Thursday, December 18, 2008

Reading and Responding to Web Interest


On the topic of personalization, one of the most effective ways to understand what type of message a prospect is most interested in is to use their web activity to identify the topic of interest, and then use that to trigger a communication.

I'm going to again borrow from our own Chad Horenfeldt, who blogs at Anything Goes Marketing http://anythinggoesmarketing.blogspot.com/, and share one of his videos that walks through creating this process here: http://www.eloquasm.com/eloqua/wallboard/real_time_custom/real_time_custom.htm .


The idea is simple, and has three main areas. First, identify an area of your website that you want to "watch", perhaps it's product specifications, or customer case studies. Some of our real estate clients have even used this for monitoring specific floor plans in individual building projects.


Second, identify the visitors to those pages, with a specific level of interest you're looking for. Maybe you want to identify people who looked at more than 3 case studies, for example.


Third, define what you want to communicate to them when they show interest in the way you've identified. Perhaps this is a special offer, or a push to attend a very topical webinar. You can easily feed the invididuals who meet your defined criteria into a program that communicates the right message to them, at the right time.


Chad goes through the process for building this in Eloqua in detail in this video: http://www.eloquasm.com/eloqua/wallboard/real_time_custom/real_time_custom.htm


Enjoy, and I look forward to your feedback and comments.

Monday, December 8, 2008

Leaks in the nurture process


Most marketers I know build their campaigns with a segment in mind to target. Maybe it's geographic, like people in Western Europe, maybe it's verticalized, such as a specific list of industries, maybe company size, etc. The challeng with this, is that there are always cracks in the coverage - people who are not in any targeted segment. These people fall through the cracks of a well-intentioned marketing program.


Here's an interesting experiment - we do this for a lot of clients if they haven't looked at the data themselves, and almost all of them are shocked at the results. How many of the contacts in your database have not received any communication from you in many, many months?


To find out, it's quite simple. Create a new Contact Filter, make it an Inactivity Based filter. Add a criteria for Sent Emails, and select no email in the last 6 months (or whatever timeframe you want to look at). Save it, and look at the results (click "View Contacts In Filter" for the full list if you want to eyeball it and see if there are great prospects there) . I'd be willing to bet it's a higher number than you expected.


Most marketers tend to think that they are overcommunicating, and that might be true for some segments. But there can still be a lot of perfectly good people who connected with you 18 months ago, and have fallen through the cracks.


If you don't have a general, catch-all nurture marketing campaign that is suitable for, and connecting with, all your contacts, you might want to run this analysis to see where you're at. If the list is small, excellent, but if it's larger than you'd expected, have a look at the data to see if there are opportunities you are missing.