Showing posts with label Social Media. Show all posts

Monday, April 18, 2011

Rapleaf Consumer Interest Data within Marketing Automation


If you’re marketing to consumers, understanding their interests, demographics, and location is important if not vital. However, when working online, you are often challenged with the fact that you’re working with little more than an email address. Translating a bare email address to that level of insight requires a database that is specially built for the purpose. That’s where Rapleaf, a provider of demographic and interest data from social media comes in.

Rapleaf works from an email address to parse the social web and return data on an individual’s location, age, gender, interests, and other data. This data is now immediately available via a Cloud Connector from within your marketing automation programs in Eloqua. With the data available, you can then communicate, personalize, nurture, and score accordingly, resulting in a significant boost in your results.

To get started, just snap in the Rapleaf Cloud Connector into your Eloqua instance using the typical way to install a Cloud Connector. You’ll find it on cloudconnectors.eloqua.com, Eloqua’s library of Cloud Connectors, under Contact Data. With the connector installed, you can begin building a marketing automation program to take advantage of the connector.

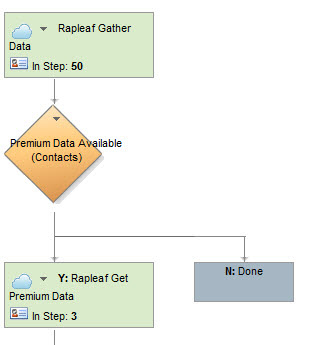
To do that, add in a step into your program that grabs data from Rapleaf. The data on age, gender, and location is provided for free, and with it, a flag of “Data Available” is provided for any data field that has premium data available for it. Rapleaf will provide you with “API Keys” to access your data, and each key has access to different data fields with different price points per query. Be sure to start with a key that only has access to free data so you can first see if any data is available. If data is available, you can requery for it with a different key that has access.

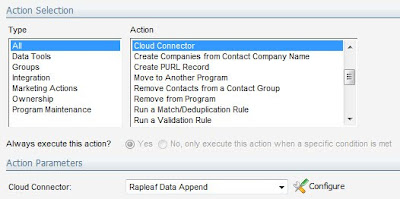
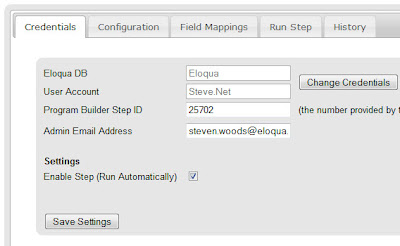
For each step that queries Rapleaf, select Cloud Connector as your step type, and select Rapleaf Data Append as the connector type. This will give you access to the configuration button that lets you configure the connector.

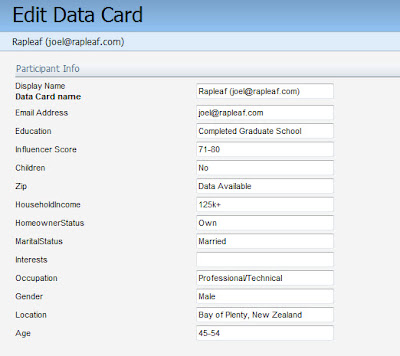
For configuration, paste in your API key from Rapleaf, and indicate whether you want to store the returned data in contact fields or in an attached custom data object (data card).

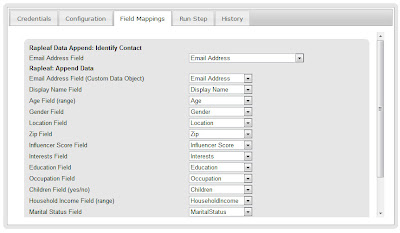
With that selected, under the field mappings tab, you can select what fields, on the contact or the custom data object, you would like your data returned into. Note that most of the data fields, even if they appear to be numeric (like Age and Income) are actually delivered as ranges ("35-40"), so they are text fields not numbers.


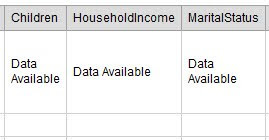
If data is available, but your Rapleaf API key does not have access to it, you will see a value of “Data Available” returned. You can use this value in guiding decision rules within your marketing automation programs in order to decide whether to requery Rapleaf to get the additional data.


With that set up, you can use the “Run Step” tab to manually run the connector a few times to make sure it all works as intended, and then when you are happy with it, move to the Configuration tab to check off the “Enable Step” checkbox to allow the step to run automatically.

Now, Rapleaf data on demographics, age, interests, and a variety of other fields will flow into your Eloqua marketing database automatically. As soon as it’s there it is immediately available for segmentation, scoring, analysis, and nurturing.


Please keep your feedback coming on this Cloud Connector and any others you’d like to see.

Tuesday, August 17, 2010

Adding and Tracking Facebook ‘Like’ buttons in Eloqua emails


(Guest post from Vince Lockyer, Demand Gen Specialist, Avid)
vince (d0t) lockyer (at) avid (dot) com

There have been a lot of blog posts recently about Facebook ‘Like’ buttons and how to use them in marketing emails.

While it’s easy to add a link to a Facebook group or page from an email, it’s not been so easy to integrate a fully working ‘Like’ button into an email in a similar way it works with a webpage – and also accurately track who’s clicking it and what they are ‘liking’.
So far only one or two vendors have come up with an embedded solution to this – which of course only works with their platform. Now using the method described here you can get the same functionality for your Eloqua emails. This solution requires a bit of HTML tweaking in the final step.

How it works
From your Eloqua email, a blind form-submit sends the email address of the recipient, the URL, and the name of the webpage being ‘liked’ to an Eloqua form. After logging and tracking these details the form confirmation page then displays the webpage overlaid with the Facebook Like Button Social Plug-in.

Try it out!
Try out this example form with your own data to see how it looks.

How to build it

Create two new contact fields:
• Facebook – Last Like URL
This will contain the URL of the last thing that the contact liked. It’s required also because the form confirmation page will need the URL to display the webpage in the final step.

• Facebook – Last Like Name
(Optional but highly recommended.) Contains the name of the last thing that the contact liked. Required to make the reports more readable and also to be displayed in the form confirmation page.

Create a new form with the following fields. Keep the form name and the HTML names of the fields short as they will be used in the blind form submit URL. Try something like ‘fb’ or ‘like’ for the form name.

• ‘e’ – Email Address
• ‘l’ – URL
• ‘n’ – Name

Add a ‘Update Contact Data’ processing step to update the two Facebook fields from the form submissions.

Add a confirmation page processing step. Here you will need to build the HTML for displaying the webpage overlaid with the Facebook Social Plug-in.

Confirmation Page HTML
The confirmation page displays the webpage being ‘liked’ in an iframe embedded in the Eloqua confirmation page. A semi-transparent layer is overlaid on top with the Facebook Social Plug-in contained in another layer (see image).

A close button is included in the top-left that hides the overlaid layers and reveals the webpage beneath.

Download the HTML for the confirmation page, you can use it as-is or customise it to your requirements. Note: you will need to edit it to update the field merges and locations of the graphics files in your Eloqua instance.

To add-in your own field merges for the ‘Facebook – Last Like URL’ and ‘Facebook – Last Like Name’ use the Insert Contact Field option in the Eloqua Confirmation Page editor. To upload the images use the Upload Images tool under Hypersites or Email Marketing > Tools & Content Components. You’ll need to copy the URL of the hosted image once uploaded and paste that into the HTML.

Adding the Like button to an email

Once the form fields, form and confirmation page is setup you can add the ‘Like’ button to your email. The button will trigger a blind-form submission in this format:


Make sure “?elqFormName=” equals the HTML name of the form you created and “&elqSiteID” equals your unique Eloqua site ID. “&l=” is the URL of the webpage being liked and “&n=” is the name.

Reporting

To get a report of who is liking what, view the Form Data report:


Liking or Recommending

The code described here will allow you to add a ‘Like’ button. You can also add-in a ‘Recommend’ button using the same code – you’ll just need to change the ‘action’ parameter in the Facebook Social Plug-in to ‘recommend’:
“&action=recommend”

Tuesday, July 20, 2010

Using Eloqua emails as social media content


(Guest post from Joel Rothman)

Out of the box, Eloqua allows you to create a link that will send someone to a Social Media site, such as Twitter, Facebook or Linked In. This functionality is great, and very easy to use. But, I have been asked a couple of times how we can create a link to the actual email itself that can be placed used for twitter etc… and there is a pretty easy way to do this, assuming you are just a little bit comfortable with HTML.

Most social sites have a specific URL type that can be used to push someone to the site, and prepopulate the content box with the text that you want. For example, for twitter, it’s this format:


Where you substitute what’s in the “content” are for what you want to pre-populate, with + signs instead of spaces in your text. So, what you need to do is come up with a line, such as “Check out this Newsletter for valuable B2B tips”, that would look like this:
(click for larger image)


But wait, it’s missing the URL! How do you get that, you might be asking? Simple, insert this code:
(click for larger image)


So, you’ll end up with a link that looks like this: (click for larger image)


And Voila:

Now, a couple of notes. Any personalization in emails will not show. In fact, it will just be blank (ie if you have Dear Joel, it will say just Dear). Also, these links expire after a few weeks.

Now, that URL says now.eloqua.com.. what’s up with that? Can you change that? Stay tuned…

Tuesday, June 15, 2010

Drake Brings you an iPad


If you’ve attended an Eloqua Customer Success Tour recently you may have met Drake. He’s our official “mascot” of Success Tours, and he’s done an exemplary job so far. He recently created a Facebook profile so that you can get to know him a bit better and last week he asked if he could run some Eloqua-related contests on his Facebook page. Of course we agreed. We love a good contest – especially when someone else does all of the work.

Over the next few months you can learn a bit more about Drake and his irreverent take on the art and science of marketing by viewing his Facebook wall posts (they’re not protected, so anyone and everyone can get to know him). He’ll be sharing some reading recommendations and I’m sure he’d love to hear your suggestions as well. Sometimes he might point you in the direction of a good blog post or marketing event. And sometimes he may simply share a good restaurant that he’s been to before or after a Success Tour.

But let’s get down to business and talk about Drake’s first contest. At the San Francisco Success Tour he saw Jill Rowley’s iPad and he’s decided he really needs one for his briefcase. Who can blame him? Since he’s going to buy one for himself he decided to be generous and buy one for a member of the Eloqua family too. But who to give it to? That’s where the contest comes in.

Download this PDF featuring a fantastic likeness of Drake. Print it and cut it out then take a picture of Drake somewhere interesting. Your photo can feature you and Drake together or just Drake alone in interesting surroundings. Post your picture to Facebook, friend Drake (“Drake at Eloqua”) and tag him in the photo. Voila!

On July 5 he’ll choose his favorite picture and send the winner a 16GB Wi-Fi iPad. Yep, it’s that easy. You can even enter more than once, which is highly recommended if you’re traveling. (Hint: Drake would really like to see the Eiffel Tower or some really awesome July 4th shenanigans.) Oh, and in case Drake can’t choose his favorite, he’ll see which photo has the most “likes” to help him make his decision.

Thursday, February 11, 2010

Five in 5: Web Visitor Profiling


The second of our Five in 5 series covers tips that you can use to get better insights out of your website visitors. From social media tracking, to real-time alerts and visualizing activity data, this set of tips will give you a good sense of what you can do to capture and provide more insights into online activity.

Each of the tips leads back to a more detailed overview of how to go about doing what is described.

Either click on the links in the Brainshark presentation, or download the Five in 5 Website Profiling PowerPoint to view the more detailed descriptions of the tips that are highlighted.

I hope you get a few good ideas out of this one:


(if this does not load, the original Five in 5 Website Profiling presentation is here)

Also, feel free to look at other presentations in the Five in 5 series:
Reporting Fundamentals: Accessing Data for Insight

The topics covered on Eloqua Artisan are both for you, as users, and from you. Please keep the ideas coming.

Thursday, January 21, 2010

Five in 5: Reporting Fundamentals


To help you get the most out of Eloqua, we're launching a series called Five in 5. These are five very quick tips on how to get the most out of Eloqua - small features or settings you may not have known about, quick tips, and ideas.

The first of this series is Reporting Fundamentals: Accessing Data for Insight, and highlights five reporting tips and tricks you can get started with today.

Each of the tips leads back to a more detailed overview of how to go about doing what is described. Either click on the links in the Brainshark presentation, or download the Five in 5 Reporting Fundamentals PowerPoint.

I hope you get a few good ideas out of this one:


(if this does not load, the original Five in 5 Reporting Fundamentals presentation is here)

The topics covered on Eloqua Artisan are both for you, as users, and from you. Please keep the ideas coming.


Monday, December 14, 2009

In-PDF Form Submission: Bridging the Social Media-Lead Generation Gap


I'm thrilled to have another great guest post on Eloqua Artisan, this time from Patrick Woods (no relation), who I've come to know well and respect greatly over the last year while talking about the evolving social media landscape and what it means for B2B marketers. In this post, Patrick shares one of his interesting techniques - PDF integration of Eloqua web forms - and in doing so, reverses the typical trust relationship for web forms.

Patrick is a Marketing Associate at Profiles International (http://www.profilesinternational.com/) where he explores new ways to use Eloqua for building demand for his company’s
employee assessments and talent management solutions. He resides online at patrickwoods.com.

==================================

Talking shop with other marketers at this year’s Eloqua Experience in San Francisco will go down as one of the highlights of my year. One topic that came up in almost every conversation was what has become the quintessential gray area for all B2B marketers: how do we generate leads using social media?

Marketers seem to love discussing social and its implications. Eloqua has even added some handy share-to-social functionality to its email system. But we marketers have found difficulty in moving from theory to practice, from how social may be leveraged to actually experiencing positive ROI from our social marketing efforts.

The tried-and-true method of generating leads from white papers and reports has failed to establish itself as a source of leads on the social sites. The traditional tactic of exchanging contact information for a deliverable often produces less than desirable results when promoted through social sites because this tactic fails to abide by the rules of the social space. User expectations are different on social media sites. In particular, everything is expected to be free.

In the rapid-fire universe of Twitter, no one wants to spend 5 minutes with your form.

A proposed solution

While I have by no means uncovered the Holy Grail of social media lead generation, I have developed a technique that I think will begin bridging the gap between your social assets and your lead gen efforts.

This method relies on forms built into your white papers, reports, or eBooks that, when submitted, integrate with Eloqua just like a typical HTML-based form. So users can click your bit.ly link on Twitter, access your content without jumping through the traditional hoops, and opt-in to your database on their own terms.

Here’s how to try in-PDF form submission yourself.

Create the backend in Eloqua

1. 1. Create a form in Eloqua as you would for any new campaign and click the Yes radio button that denotes your form as a non-Eloqua hosted form.

2. Clicking Yes will cause the Integration Details button to appear. Click it to get the necessary hidden fields for integrating your PDF-based form with the Eloqua backend. Copy this data for use in your PDF JavaScript.

3. .Create the processing steps to handle the incoming data and to redirect the user to the desired location

Create the PDF form

1. Because the Acrobat editing environment is clumsy at best, I recommend building the structure of your form directly onto the PDF page in your page layout program. Save it as a PDF and open it in Acrobat Professional.

2. You’ll want to use the Forms toolbar, so if it’s not open, click View -> Toolbars -> Forms. To add your first input field, select the Text Field Tool from the Forms palette and double click on your PDF close to where you want your first field to be located.

3. Doing so will open the Text Field Properties dialogue box:

Name the fields to match the HTML field names Eloqua will capture when the form data passes through your update rules. For example, my form will record “Fst” for First Name, so I’ve named my field accordingly. If you aren’t sure how to name your fields, either reference an existing form or click Fields à List Fields in your Eloqua Form Details view.

4. After closing, you’ll be able to position and size your text field. Repeat the steps for each field you’d like to capture.

5. To capture any hidden data, including elqFormName and elqSiteID and any other values you typically capture behind the scenes, add a text field as you did in previous steps, but select “Hidden” from the Form Field dropdown box. To insert the default value, click the Options tab and insert your value in the Default Value field. The data will pass to Eloqua with all the user-submitted values.


6. To add your Submit button, double-click the button tool on the Forms toolbar:

7. When the dialogue box appears, click the Actions tab. Choose “Submit a form” from the action and click “Add…” When the box appears, add the Form Integration Destination URL (from Integration Details from the earlier step) and choose HTML from the export format.

8. At this point, your form will submit the data. However, without additional JavaSciprt, error handling is clunky at best. For example, the only data validation method available is to determine if a field is empty or not. Keep reading to learn how to implement JavaScript for a richer user experience.

Adding the JavaScript

This is the last and most challenging phase of the project. Acrobat’s development environment is awkward, and apparently its usage of JavaScript isn’t as robust as what is available in typical browser cases.

The benefit of digging into the JavaScript functionality is to enable inline form validation, which is good for the user and good for your database.

The best way to insert your JavaScript is to attach it to your Submit button. Refer to Step 7 above. Instead of “Submit a Form,” choose “Run a JavaScript” then click the Edit button. Doing so will open a blank screen for typing your code.

Considerations

Be careful, however, since the editing environment only allows one level of undo. You may want to consider writing the code in a separate program, such as DreamWeaver or Coda, and copying it into the Acrobat box when ready for testing.

At this point, you can add all the desired functionality. There are some differences between real JavaScript and Acrobat JavaScript you should be aware of.

For example, for an alert box, your code would typically look something like this:

alert(Please enter your first name.');

But in Acrobat, you must prepend the app object thusly:

app.alert("Please enter a First Name.");

Also, I haven’t found a way to use event handlers, such as onClick, so you’ll want to consider building your validation into a chain of if…else statements, with the final else submitting the form. To submit form data in Acrobat JavaScript, you’ll want to use this method:

this.submitForm({

cURL: "http://now.eloqua.com/e/f2.aspx",

cSubmitAs: "HTML"

});

Hopefully this basic info will open a new world of PDF form interaction for you and your team. A good place to start exploring even further is Adobe’s PDF JavaScript Reference.

Final Thoughts

On a philosophical level, this technique completely reverses the trust relationship experience in the traditional model. Formerly, a lead would surrender their contact information and hope, based on a few summary bullet points, that your content would be worth the sacrifice of their data.

By allowing users to read first and opt-in later, you enable a more trusting first-date type of interaction with your content. Potential leads can mingle with your brand in a risk-free environment before committing.

Some marketers will criticize this approach because it’s entirely possible that most people will read the report and never contact you again. They would rather get a bit of contact info and let sales pound the phones until people give in.

Buying patterns, however, no longer follow this model. So the impetus is placed on marketers to create valuable content that connects with their target audience. The question now is will you create content so compelling that readers will willingly give up their personal information to learn more about your offering?

Friday, December 11, 2009

Grow Your Database Organically with Eloqua ‘Refer a Friend’


Today's post is a guest post from our own Amber Stevens, Marketing Programs Manager. In this post, Amber looks at ways of encouraging sharing that seamlessly complement the social sharing features of Eloqua.

Amber is focused on our SMB account base, and as such is always looking for new ways to help small and mid-sized companies get the most out of Eloqua and connect with their peers. Connect with her at amber.stevens@eloqua.com with ideas, suggestions, or comments.

==========================

Many marketers are enabling content sharing with Eloqua’s Social Sharing features - a great way to expand reach beyond traditional channels. But, did you know that Eloqua ‘Refer a Friend’ allows your prospects to share valuable content among their networks without requiring Twitter, Facebook, LinkedIn or any other active social media accounts? ‘Refer a Friend’ allows recipients to recommend content to a friend and automates a personalized request encouraging opt-in from the “referrals”. This is a great way to grow your database organically and ultimately drive more leads to the top of the sales funnel. The process works best when combined with internal contests or external incentives in order to increase the likelihood of friend referral.

You only need to complete the four step set up process once – then, you’ll be able to quickly add to any email header and start capturing new referred contacts. The amount of time to do this will vary depending on whether you use existing templates or create custom content. I used existing forms and layouts and was able to complete the process in about fifteen minutes on my first try.

Overview: in six steps, you’ll create a web profile field to capture the ‘Refer a Friend’ information, create the actual ‘Refer a Friend’ form (from an existing template), create a query string to capture unique email forwards, insert the form into a hypersite, insert the hypersite URL into an email header, and finally, insert the header into an email to put ‘Refer a Friend’ into action.

Here’s how it is done step-by-step:

First, you’ll need to create a *Profile Field to collect the Refer a Friend ID.

*This method requires the use of Web Profiling Fields to be created and modified, so check with an administrator to ensure you have access to these fields.

1) Navigate to Automate -> Web Profiling. Click on Profiling -> Profile Fields -> Expand Query Strings and then select the drop down next to Query String – Most Recent Choice, New Profile Field.

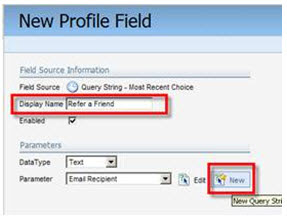
Enter a display name and under parameter, and make sure the ‘Force Profile Update’ is checked. Click on New. This will open the parameter detail window.

In Parameter Details, enter a display name, and set the parameter as “RAF”. Leave the rest other options as set by the default and save and close the window.

Next, create the Refer a Friend Form – there is pre-created form you can use to save time!

2) Navigate to Automate -> Forms -> Generic -> Refer a Friend (Save Referrer and Friend) -> Select Form Details.

From the task bar, select Fields and New Profile Field.

Enter a display name and select your Refer a Friend profile field that you created in the first step. Save and Close.

Then, publish the Refer a Friend Form to a hypersite

3) From the Layouts menu on the Task bar, select New Layout (Custom or Standard). (If using a New Standard Layout, in the bottom menu bar, select ‘Add Existing Form Field’ and then click All Existing Form Fields – this saves loads of time).

Enter a form layout name and then save the layout. Save and close the dialog box.

Select Layouts and List Layouts. Locate your saved layout, then click the arrow next to it and select “Publish Layout”.

Finally, choose the hypersite that you would like the form to be published on, enter the name of the page, the title that you wish to have display in the web browser and then click publish.

Create the Master ‘Refer a Friend’ URL with a query string

4) Your ‘Refer a Friend’ form is available for use immediately after you publish it. However, to ensure that each email can be forwarded from many users, you need to identify each unique email to be managed by the single form. To do this, you’ll create a query string.

Our sample ‘RAF’ form URL is:

http://trainingservices.eloqua.com/forms/02RH_RAF

A query string adds tracking parameters to a URL starting at a “?”, followed by identifying characteristics. Our query string is:

?RAF=elqReferFriendID

The complete URL for this example would be:

http://trainingservices.eloqua.com/forms/02RH_RAF?RAF=elqReferFriendID

NOTE: When adding this link to an email, do not make it a redirect link. This link is trackable.

Save this query string somewhere, we’ll use it in the next step.

Now that all of the set-up work is complete, we’ll add the ‘Refer a Friend’ functionality to an email header. This is the step that you will follow for all future uses of ‘Refer a Friend’ – the hard work is now done.

5) Navigate to your headers Communicate -> Email Marketing -> Email -> Tools & Content Components -> Headers and create a new or modify an existing header. Once you have identified your header, click “insert hyperlink” and select a “Text Link” as the type.

Set it to Send to Hypersite/Hosted Forms

Select Area Editor > Source Editor

After the first “?” in the URL, add the query string:
RAF=elqReferFriendID&

Click Save.

The last step is to configure the ‘Refer a Friend’ Details and Insert into your email

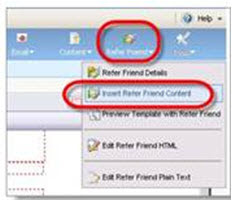
6) From within your email, select Refer Friend -> Refer Friend Details
The from email address and name will be auto-populated with the contact information of the person who is referring. However, in the event that their information is not available, you need to set default information. Save Details.

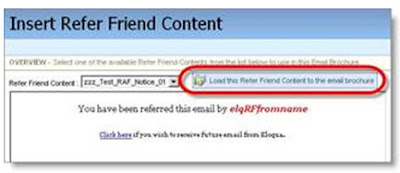
Insert Refer Friend Content into your Email from the Refer Friend menu.

Load the ‘Refer a Friend’ content into your Email. It will show you the preview, and no save is needed.

THAT’S IT! You’ve created the ‘Refer a Friend’ form, enabled unique tracking with query strings, and added the functionality into an email.

Note: The referred friends email is saved into a “friend” table, which is kept separate from the contact table so you cannot market to “friends” until after they’ve opted in. This allows you to remain CAN-SPAM compliant.

For more information and advanced tips on using ‘Refer a Friend’ forms as well as testing, reporting and tracking, view these related materials:

Subscribe to “Did You Know” for Eloqua How-To’s Like This One
Customer Central – How To Set Up Refer a Friend
Customer Central - Viewing Refer a Friend Reports

Wednesday, November 11, 2009

Building a Tweetboard - Social Media at a Live Event


(Another guest post from Mike MacFarlane, who may be better known as @eloquamike)
===============================================

In the Eloqua community, we just celebrated our 2nd annual Eloqua Experience conference in San Francisco. It was an absolutely amazing event and one of the highlights was the conversation happening on Twitter.

In Steve’s previous post about creating social media buzz at an event, he mentioned something about our “Tweetboard” – a large screen showing a live stream of conversations happening on Twitter in relation to Eloqua Experience. We set this up primarily so that those who were at the conference could see that they was another conversation happening online.

Setting up a Tweetboard is really easy and can be by using a small snipit of code provided by a website called Hootsuite and Eloqua Hypersites (and maybe a little design instinct).

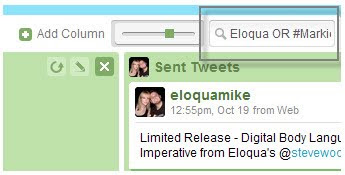
First, you need to create an account at http://www.hootsuite.com/. Once you have gone ahead and done that, you will be presented with a screen (that looks a lot like the popular tool TweetDeck). In the top right hand corner, there is a search button that you can use to enter in what key words or hashtags you want to search against:


(note that if you are querying multiple terms, you will need to use an “OR” statement)

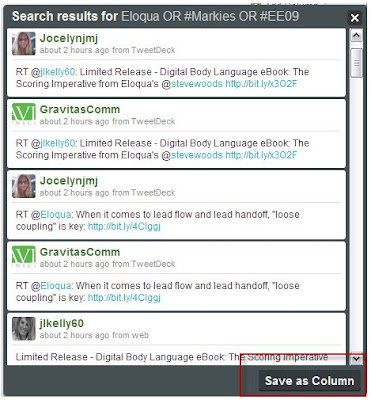
Once you have setup your search query, you will want to create a “Saved Column”:


Once your column has been saved, you can generate some source code in which you can add to your blogs, website, etc. Simple select the “Embedd” button (which looks like <>):


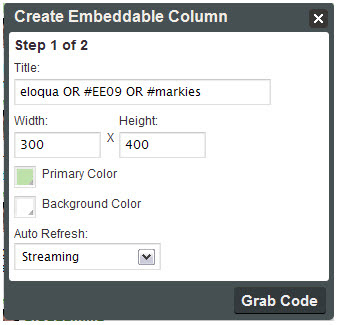
You will then be presented with a screen that will give you options to help customize the look and feel of the feed:


Once you have all your setting in place, simply select “Grab Code” and copy and paste the generated source code and place onto your blog, website, etc.

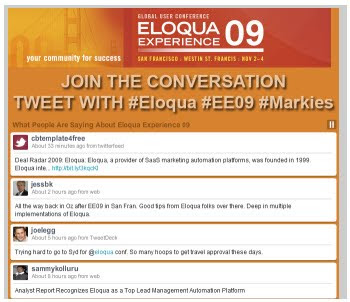
In my case, I took the code and placed it into our Eloqua Hypersite. We wanted to add a little branding and messaging to it, so I create a header image to sit above the feed that had the Eloqua Experience logo, as well as instructions on how to joing the conversation. The end product looked like this (you can also still see it live here):

Monday, October 26, 2009

Capture the "Experience" and Win!


Next week we’re celebrating marketing excellence worldwide at Eloqua Experience, where the world’s best marketers will come together in San Francisco to share their experiences and discuss the future of marketing. Great content for both rising stars and rock stars will be presented by experts in the field, and the learning opportunities will be further enhanced with training on the first day.

But, the point of it all is the “Experience” itself. Talking with other marketers, exchanging ideas, challenging assumptions, borrowing approaches, and making new connections. We want you to share your experiences so everyone can get a feel for the event, so we are launching a “Capture the Experience” contest to add some encouragement to share.

Take pictures, shoot some video, or write about your Experience, and you can win a Kindle. All you have to do is share your pictures, videos, or posts on the Eloqua Facebook page and you are automatically entered to win. Judging and winner announcement will happen on the final day, but the more that the community likes the Experience you have captured, the more likely you are to win, so take your photos, shoot your videos, and get them onto Facebook early.
Follow along on the Twitter hashtag of #EE09 to see the Experience captured from the perspectives of everyone else at the event.
The contest is open to clients, partners, and industry analysts - anyone but Eloqua employees - so be sure to bring your cameras to the event.

We look forward to sharing a great Experience with you!

Tuesday, October 20, 2009

Social CRM meets Marketing Automation


Much of our conversation around marketing automation tends to focus on the new revenue side of the business. Understanding digital body language allows us to understand which prospects are ready to buy, and which need to be further nurtured. However, the same concepts apply to the understanding of existing customers.

Understanding which customers are engaged with your knowledge portal and online community in order to learn more, which are struggling, and which are advocates allows you to use similar principles in order to better guide all of your customers towards success and ultimately renewal. I wrote recently about the ideas behind renewal marketing and social CRM, and the opportunity that it provides us to focus on maximizing customer satisfaction.
Since that time, I’ve had a number of conversations with the folks at Helpstream (who power our Customer Central online community), and we have a strong collaboration in the works. Recently, the Helpstream team announced the ability to integrate marketing and social CRM by adding Eloqua tracking to any pages (or all pages) within a Helpstream-power portal that you would like.

By doing this, activities within the social CRM community can be used as part of your lead nurturing strategies to guide your communication based on what level of engagement an individual has, or as part of lead scoring algorithms for looking at renewal or upsell.

If you have both Eloqua and Helpstream, it is worth ensuring that you are receiving the insights into your customers’ engagement with your social CRM system by integrating Eloqua scripts into the portal.

Tuesday, September 22, 2009

Pedowitz Group Ties in Twitter Activity to Marketing Automation


As B2B marketers, many of us are exploring social media. It is easy to understand the basics, but when it comes to integrating social media into other aspects of demand generation and marketing automation, it can be difficult to understand how to begin.


A few weeks back, Mike McFarlane highlighted a way to set up a social media GPS to get CRM visibility into social media activity that refers people to your web properties. This, however, was focused on the "periphery" that is the link between most B2B marketer's web properties and social media.


Now, Pedowitz Group takes this one step further by using their Sweet platform to capture general conversation about you, your products and your brand in Twitter, irrespective of whether this conversation resulted in a visit to your site.


This type of social media engagement can be highly relevant in determining who is a qualified lead when you build a lead scoring system, and who is already actively engaged when you think through your lead nurturing plan.


Essentially, what the Pedowitz Group's Sweet platform does is to capture Twitter activity based on a keyword. The keyword should be your brand name or a product name - something specific enough that it can be definitively identified as a conversation about you. This social media engagement is then captured and passed into Eloqua as a web form submit.


The information in the web form submit includes the keyword, the individual's Twitter ID, and the content of the Tweet that was captured. Within Eloqua, from here, you can do anythign with the web form submit that you would like. One thing that may be of use is to record the Twitter activities within custom data objects so that they can be filtered against for lead scoring or segmentation purposes.


Capturing a link between a person's contact information and their Twitter ID is necessary for some of the filtering to be possible, and there are a variety of techniques that can be used to make sure you capture that link. We'll discuss those in a later post.


Social media activity is highly interesting in its ability to determine a prospect's level of engagement. The Pedowitz Group's Sweet platform provides a great way to incorporate this level of engagement within Eloqua, so it can be used for all your marketing automation purposes.

Tuesday, September 15, 2009

Embedding Facebook into blogs


I wrote a while ago about our B2B Marketing strategy on Facebook, which was to connect on a more relaxed, social level with our customer community, many of whom are also friends. This has worked very well, and we do our best to share the latest event pictures and videos on that site.


The interesting challenge, however, is how to make sure everyone is aware of it as a venue. This is a challenge that a number of marketers I've chatted with have also shared.


There's a simple trick, which I've recently enabled on Eloqua Artisan (if you're reading this in a reader, you'll have to come to the blog itself to see it in action), which is to embed a Facebook gadget into your blog sidebar so that anyone who reads your posts will become aware of your Facebook presence, and can join you there.

It was a simple technique, so I thought it worth sharing here, as it can be of value to any marketer focused on incorporating social media within an overall marketing messaging approach. I personally use Blogger as a platform, so the instructions will be specific to that, but I suspect they are easily transferable to other platforms.

First, add an HTML widget to the sidebar of your main blog layout. Give it an appropriate title, and then add the Facebook embed code to that widget. (content for the embed code is available at this link, but as it's javascript, you won't see anything in a browser).

There are 3 things you may want to change. First, one that you must change, is the Facebook profile ID (highlighted in the image). Change this to your own Facebook fan page profile, which you can find in the URL for your fan page when you view it on Facebook.

You can also change the "width" parameter to set the size of the embedded widget, and the "connections" parameter to change the number of fans that are shown. With that completed, save it, and you are live with an embedded Facebook fan page in your blog, which will help you greatly with awareness of the page.

Tuesday, June 23, 2009

Setting Up Your Social Media GPS


Today's Eloqua Artisan post is a guest post from Mike MacFarlane, our own marketing operations manager. Mike is responsible for our own internal use of Eloqua, and is one of the best when it comes to innovative uses of the Eloqua platform.

I often get asked "how does Eloqua use Eloqua?" and Mike is the best person to answer that question.

Steve


==========================================================

As a Marketing Operations Manager with Eloqua, my goal is to use the app to its full potential. There is just so much functionality available today, I always feel the need to find new and cool ways to use all the tools that I have been given as a marketer.

The most recent challenge I have given myself is to help integrate all of our Social Media efforts into Eloqua that allow us to report on and react to activity that happens on the web. Steve wrote a great post a while back about how to setup Social Media Referral reporting so you can see how much traffic you are driving to your website. This information has been extremely valuable for us and has helped to validate that all the work we have done in terms of spreading our marketing message through Social Media is well worth the time and effort. Still, I thought that we could do more.

Keeping up with the Sales Enablement theme that we have been promoting through the use of our new tool, Prospect Profiler, I thought to myself “Hey Mike, wouldn’t it be valuable to our sales reps if they could see their prospect’s social media activity”? Agreeing with myself, I started to build out an integration between Eloqua and our CRM system that I like to call “The Social Media GPS” - know where your prospect started and where they ended.

The ingredients for the devilishly good recipe are:
- A dash of Program Builder
- A handful of Saved Visitor Reports
- A pinch of ability to create activities within the CRM system
- A sprinkle of data tools for use within Program Builder

The image to the right is what the program flow looks like.

To start, I created a single track marketing automation program with the feeder into this program being a saved visitor report of those that came from Twitter to our website within a hour of the visit. In this case, I am feeding these web visitors into our marketing automation program as Prospects (as this allows me to create unique entries that I can report on later). The key information that I want to map from the visitor to the prospect is:

- Most Recent Referrer
- Last Page In Visit
- Last Visit Date and Time

When the prospect is created within the marketing automation program, I can then see this visitor information stored on its record (seen in the image to the right)

My record then flows down to a step which I run a Match Rule that looks for an existing Contact in our database based on a matching Email Address. The purpose for this match rule is to append the CRM ID that is stored on the contact record and write it over to my prospect. This ID is what is used to uniquely identify the record within Salesforce.com, Oracle CRM on Demand, or Microsoft Dynamics CRM and write information over to it.

After I append the CRM ID to my record, I then flow down to an integration event that will write this activity over to the CRM system. You will notice that I have set this action up as a conditional action.


The condition in this case is that if there is no CRM ID in the associated contact record, I do not want to run the activity call over to the CRM system. If there is a ID, then I want to execute the call to the CRM system.

Once the call is made to the CRM system to create the activity within the associated Lead/Contact record, the sales rep can then see how the website activity was generated. Here is what the rep would see:


(you may need to click the image for a full size view of the record in your CRM system)
So in one snapshot, your sales rep can see:

a) What webpage/blog/online asset the prospect visited
b) Where the visit originated from
c) When the visit happened

The other benefit to this information is that the sales rep can view both the referring and visited page URLs (as shown in the comments). In this case, if I were a prospect, the sales rep could click on the referring URL and actually view my Twitter profile. They could also read over the blog post that I went to (which could be helpful in a call when determining what my interests are).

Just another way that Eloqua can help you read your prospect’s Digital Body Language.

Please feel free to connect with me on Twitter @eloquamike or on LinkedIn (http://www.linkedin.com/in/mikemacfarlane01)