Showing posts with label Lead Scoring. Show all posts

Monday, May 3, 2010

Company Level Lead Scoring - from 4Thought Marketing


Guest post from 4Thought Marketing's Mark LeVell. 4Thought Marketing has been a great "Expert in the field", having worked with Eloqua over a long period of time, and having developed Partner Relationship Management (PRM) and Facebook extensions for Eloqua, among other innovations.

In this post, Mark looks at the challenges and opportunities of company-level lead scoring.

========================================

For many B2B companies, traditional Lead Scoring programs have a weakness in that they typically score on an individual (contact) basis, or sometimes a summed individual basis, but often fail to consider the broader and more complex corporate digital body language that can signify a valuable lead. Today we explore how more complex Lead Scoring methodologies on a company basis, can result in higher quality leads for the Salesforce.

Most Lead Scoring programs start with the premise that there are two ways to look at an individual prospect’s potential value: their Profile Fit (or explicit data) and their Engagement Score (or implicit data). Marketing organizations review the data available about a prospective customer that has been obtained in a variety of methods (form submissions, website visits, webinar attendance, etc.) and then ascribe different weighted values to each of the different data elements. Based on the aggregate value of the activities, a score is calculated which the Marketing team can then use to either pass the prospective customer to the Sales organization as a Marketing Qualified Lead (MQL) or continue to nurture through various marketing nurture campaigns.

Why Look at Company Level Lead Scoring
While this traditional approach to Lead Scoring does a very good job of determining if a contact has reached the threshold of MQL in a Business to Consumer (B2C) environment, it does not take into account the notion that in the Business to Business (B2B) environment, very often the value of a prospective lead is actually based on the activities of not one, but several individuals at the target company.

When scoring the potential value of a company as a lead, it is very valuable to look at all activities for all individuals at the company. As a good sales rep knows, different individuals at a company have different interests and different hot buttons. When a rep is reaching out to a prospect, she will target presentations to these people with a message unique to the role each person is playing in the buying cycle.

Similarly, when scoring leads, a Marketing organization would be wise to ascribe different values to different types of activities performed by people in different roles at the prospect organization. If each of these individuals were scored independently, not one of them might reach the MQL level. However, when scoring a complete organization, it is possible to rewrite the Lead Scoring program to view activities across different individuals and different activities, and arrive at a point where the sum truly is greater than the whole.

One quick example will show what we mean. Let’s assume the target market consists of Finance organizations looking for new accounting software. There are several key individuals involved in the buying process: the Finance Manager, the Chief Financial Officer (CFO), and the IT manager. While the CFO is the ultimate target, the Finance Manager is more likely to become involved early in the buying process. The IT manager will also be involved early in the decision process as well. If the Lead Scoring program ascribed a high value to a CFO title, and lesser value to a Manager level title, this company may linger in the nurturing stage, while the selling company waits for the CFO to visit the site and submit a form. However, if Company Lead Scoring is utilized, it would be possible for the prospect to achieve MQL if both the Finance Manager and the IT Manager do certain activities – where neither of them alone would have reached the MQL level. This would give the sales rep the ability to call on the CFO knowing that much of the early information gathering has already occurred.

Company Scoring PLUS Individual Scoring
Note also that company level lead scoring doesn’t necessarily obviate the need for individual lead scoring, but rather is often best used in addition to individual lead scoring. However the presence of company lead scoring should often cause a company to “raise the bar” for individual lead scores. This may result in fewer contacts passing through as leads, but more companies passing through, and more importantly all the leads passed to sales are now higher quality.

Company Level Lead Scoring is not simply the aggregation of individual lead scores, but rather a set of values ascribed across an organization such that the organization reaches MQL even when no individual would be worthy of that level.

The question then arises, what are the various methodologies to score at the company level, what situations do they each apply to, and how do they compare?

Definition of Terms
So that we can talk about company level lead scoring algorithms we first need to define the various components that may contribute to that. I’ve intentionally only given high level meanings to these labels, and not specific calculation methods because they will be calculated differently depending on the corporate sales model. We’ve added the following lead scoring fields that are similar to the existing Contact lead scoring fields, except that they are determined based on data gathered across the organization

Company Lead Score – Implicit: A measure of the Level of Engagement at the corporate level. This looks at implicit activities at all contacts in the organization.

Company Lead Score – Explicit: A measure of the Profile Fit at the corporate level. This examines demographic information captured about the organization as well as a composite of profile data for all contacts.

Company Lead Rating – Implicit: The weighted rating of the company based on the Level of Engagement score

Company Lead Rating – Explicit: The weighted rating of the company based on the Profile Fit score

Company Lead Rating - Combined: The final lead rating we will attribute to this company – similar to the Lead Rating for a contact, this value will determine if the lead is Marketing Qualified

Corporate Recency: The overall recency of activity within the corporation. Just as with scoring at the contact level recency of activity should also apply at the company level.

At the company level the calculation of recency becomes even more complicated than at the contact level, because recency in some way needs to be evaluated and weighted across multiple contacts. After all, companies don’t visit your website, contacts do. So calculating corporate recency must involve a calculation based on contact recency. And here again, we may choose to apply a weighting by title to which contacts affect recency the most.

We can also automatically apply recency at the company level if we apply it to the individual contact scores before they are rolled up to the company level. However, if we don’t apply recency in some way at the company level, then several contacts from a company that visited you three years ago could combine with a recent scale-tipping visit resulting in an MQL that really shouldn’t go to sales.

Simple Company Lead Scoring
Obviously, scoring at the company level is primarily for B2B situations and Company Lead Scoring can be as simple or as complex as necessary. Often simple is optimal. In a short sales cycle situation, anytime 3 or more people from a single company hit the website within the last 3 months we have an MQL. Done! This Lead Scoring program would simply calculate a Company Lead Score – Implicit and combine it with a Corporate Recency value to ascribe a Company Lead Rating – Combined value.

Another situation where Simple Company Lead Scoring is optimal might be selling services for heating or air conditioners. In this situation simply focusing on a few key titles related to “maintenance” might be best. This program would include values based on contact titles as well as Company Lead Score – ExplicitCompany Lead Score – Implicit to achieve a Company Lead Rating – Combined value.

Complex Company Lead Scoring
A good situation for Complex Company Level Scoring might be a complex sales environment that requires multiple high level purchasers. In that situation, looking for multiple high level titles over a longer period of time (6 months) might be appropriate. B2B doesn’t always mean company level scoring… however complex B2B sales processes would almost always benefit from Complex Company Lead Scoring. This Lead Scoring program might use each of the values defined above, looking at Company Lead Score – Implicit and Company Lead Score – Explicit to calculate ratings based on weighted criteria, including which pages were visited and which forms were submitted by different individuals in the company. After a critical level was reached across the target company, the Company Lead Rating – Combined value would achieve MQL status, and the lead would be passed to the sales team.

Conclusion
Developing a Company Lead Scoring program can bring tremendous advantages to an organization provided it is implemented in a well thought through manner. It requires knowledge of the target market as well as the activities that signal a qualified prospective company Lead. Moving from contact level Lead Scoring to Company Lead Scoring also requires a collaborative effort between the Marketing and Sales organizations and should be reviewed periodically to ensure highly qualified leads are being scored effectively.

Monday, March 22, 2010

Denver Customer Success Tour Recap


(Success tour writeup by Jason Pemberton, Eloqua Customer Success Manager)

======================

Eloqua prides itself on having a vast community of innovative marketers and partners who are proving time again marketing value with their Eloqua instance. In some cases, clients are not able to attend our international user conference Eloqua Experience which brings together our users together to learn and share with great marketers, but also to celebrate marketing excellence with our annual Markie Event . A key point is that our clients never lose sight of community as throughout the world, we offer customer success tours. From a new user, to the more mature Eloqua ‘Maverick’, nothing brings the marketing user community together better than attending a success tour. Nothing beats networking with like-minded marketers in your neighbourhood to share ideas and best practices with!

Recently, I hosted the Denver Success Tour (see Facebook for pictures) which to date was the largest attended event for the area! We are spurred on to succeed by hearing the success of others! At this event we shared not only the successes of two of our clients, but also spent time learning some tips and tricks to turn our clients into reporting ninjas and providing insight into the upcoming product releases.

Some of the items that we highlighted during our event included:

- Product Overview and Success Story from Return Path – As Return Path is both a value added partner and also a client our group was able to take advantage of their deliverability expertise by providing insight into the functionality that was available in Eloqua and also highlighting the importance of our Boost package offering. From a marketing standpoint, Return Path blew us away with their ‘Wizardry’ program, demonstrating to the group that they were effectively using landing pages, forms, and a detailed integration with CRM to pass qualified leads to sales in a unique fashion!

- Use of Eloqua at Vaisala – A very compelling story of a client who has learned everything from our self help options! Vaisala has been able to implement multiple lead nurturing programs, create a contact washing machine, set up sales notifications and reports while looking ahead to developing their lead scoring program – ALL OF THIS IN HOUSE! Vaisala credits their CSM and Customer Central for their successes thus far! When asked – how much of your time does Eloqua take the client responded – “about 15% of my time!” This session spurred great discussion from the group! Everyone wants to be a Vaisala!

- Become a Reporting Ninja – Discussing a handful of reports that were accessible within Eloqua. It was great to see that some clients were currently using these reports, but to take it a step further, many discussed their favourite report, or began to get into discussions on how they could find their most wanted report.

- Product Roadmap and Demo – By the far the most exciting moment I have had as an Eloquan thus far! Out of the 34 in attendance, only 2 had seen the demo at EE09. Needless to say, the random outbreaks of applauds and hugs were enough to inform the Eloquans in the room that we were on the right track.

A great event was followed by drinks and laughs as we enjoyed the opportunity to speak and network with both the partners and clients that were present! To those in the Denver area, thank you for an amazing event and we look forward to our next visit in September. For those who have not taken advantage of this great experience, please visit http://user.eloqua.com to see when we’ll be coming to your city!

Friday, March 5, 2010

Report Highlight: Easily Slice & Dice Data from Your Multi-Touch Email Campaigns


(guest post from Amber Stevens)

Eloqua Report: Email Group Overview Grouped by Contact Field

My colleague, Mike MacFarlane (@eloquamike), is always showing me cool new ways to use the Eloqua application. This past week we were chatting about the performance of a new three part nurturing program that automatically “welcomes” net new names in our marketing database. I was curious about the best way to see how different segments or like contacts were converting in the program. Mike mentioned a report called “Email Group Overview Grouped by Contact Field” – it’s a mouth-full, I know, but I was quickly impressed with the little nuggets it yielded.

Even if you don’t have an automated lead nurturing program yet (here’s a nurture program idea to get you started), you can use this report to group similar contacts and evaluate their response against any group of emails. Some questions you might answer with this report would be – How many CTO’s (or any other job title) clicked through last week’s webinar invite and corresponding follow up? What sales reps by territory are getting the most inquiries? How are my best targets or highest scored leads engaging with a series of emails? Etc (just make sure that your emails are saved as a group).

To test out the report, navigate to Evaluate -> Reporting -> Report Console. Search for the report “Email Group Overview Grouped by Contact Field”.

Choose your report parameters and group by any contact field value that you track like job title, revenue, state, account owner/sales rep, etc. I was specifically interested in the click through rates sorted by prospects co-dynamic lead scores.


Run the report, and check out the results. I learned that in the last week, our “welcome” lead nurture program achieved a 25% click through rate within our best prospect group (A1 lead rank). This was great insight and confirms that the content is working to engage our community of marketers.

I also grouped by Normalized Job Title and discovered that few titles that we may wish to remove from this program due to poor click through conversions, or adjust the content to better relate to these contacts.

Try it this report and share any interesting data points you find by posting a comment below.

Friday, February 5, 2010

Report Highlight: Contact Field Value by Contact Group


(Guest post from Amber Stevens)

================================


Marketers are curious creatures. Luckily, Eloqua provides ways to find answers to your burning questions like who is responding to my marketing outreach? What size are the companies? What did they respond to? Etc. One way is to create a Contact Group and use Data Manipulation --> Field Summary. This is a fast and easy way to view high-level point in time summary data on key fields like "job title”, "last lead source" or “revenue” for example. But, what if you want to drill down on values to see the specific contacts that meet your criteria, export to manipulate further, or email and share with the team? For flexibility like this, you should leverage an Eloqua report template called “Contact Field Values by Contact Group”.

To use this report, you will need to have created a Contact Group with members whom you’d like to valuate. For this example, I’ve created a report of all contacts that went through our own Lead Scoring program over a certain time period. I’m curious to see the break out of lead scores – how successful were our marketing efforts in driving high quality responses?

Here’s how to do it.

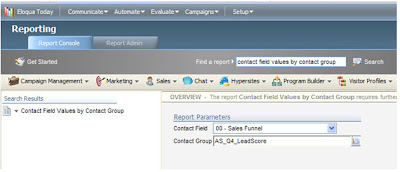
Navigate to Evaluate -> Reporting -> Report Console. In the “Find a Report” search field, query “Contact Field Values by Contact Group” and select the report template.


Next, select the report parameters – or specifically, the contact field and contact group you wish to analyze and then click “View Report” in the lower left hand corner.

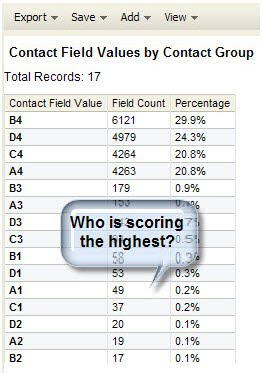
Your report will populate in window and look something like this.

I’m curious to learn a bit more about the A1 group, our highest scored contacts. To drill down, I click on the A1 value.


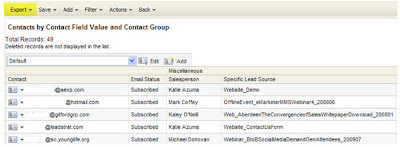
From here, I can see the specific program lead source that they came from, what sales rep received the lead and other more granular and insightful bits of information. If I wish to manipulate the data further or save as a point in time reference, I can export the data to excel (or another format) and save. I can also put the A1 leads in a new contact group by selecting “Actions -> Add Contacts to Contact Group” and work on developing a targeted campaign focused on driving conversions in this key group. Finally, I can email the report to my boss, and save it to “My Eloqua Today” so that I can access it regularly.

Although we looked at lead score as the summary in this example, you can use this report to analyze contacts on any field value that you are curious about. Another interesting view would be to look at lead source to see which contacts responded to which offers. The “Contact Field Value by Contact Group” report gives you additional flexibility over a more simplistic contact group manipulation. Both are a great way to get a sense for your data and key performance indicators, but it is important to know the use case for each of these features so that you can gain access to the information that you need, in the format that you need it in.

Wednesday, January 13, 2010

After the Call... sales lead disposition and marketing automation


Today's Eloqua Artisan post is a guest post from Mike MacFarlane, our own marketing operations manager. Mike is responsible for our own internal use of Eloqua, and as such he understands the detail needed in managing the full lifecycle of a lead, from scoring, to sales handoff, and back again.

In this post, Mike explores how to handle what happens after a salesperson calls a lead. As calls are completed, the custom sales/marketing business process for handling each possible sales outcome is managed by Mike's Program Builder workflow.

======================

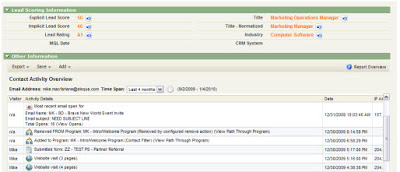
I previously blogged about how you can use Eloqua to create Custom Activity Tasks through your CRM integration. Here at Eloqua, we use this ability in help drive efficiencies within our Lead Scoring program by creating custom tasks in Salesforce.com (our CRM system) whenever a lead is scored. Within these tasks, we pass over all the explicit information that was used to score the lead and also show the Contact Activity Overview (which is generated by Eloqua) so that they can see the implicit activity that assisted in the prospect’s score.


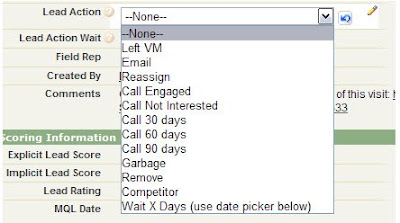
From a marketing standpoint, we have taken this process one step further by adding what we have called a “Lead Action” field on the task. This field is used by the sales team to provide an outcome to the follow-up on the scored prospect. We created a field on the lead scoring as a single select field so that there is consistency in terms of what the action was:


This information works in two ways:

1. Marketing can run reports within the CRM system to see how many prospects became “engaged” with the sales team after being scored
2. We can automate post-scoring processes within Eloqua to help limit the amount of reminder work that sales team needs to do

For example: a prospect is scored and a lead scoring task is generated within the CRM software from Eloqua. The sales rep follows up with the prospect but is only able to get their voicemail. The sales rep would then mark the Lead Action field within the task as “Left VM”. Once this Lead Action has been set within the task, using Eloqua’s Data Import functionality, we can pull this information back into Eloqua.

In this case, we have setup our import to pull in the Email Address stored on the task (this is what is used to uniquely identify the contact record within Eloqua), the Lead Action value populated by the sales rep and the Lead Action Wait field (which I will discuss below). The associated Eloqua contact is then pulled into a marketing automation program that we have created within Program Builder. From there, we have a series of decision rules setup to evaluate what Lead Action was selected within the task in the CRM. This is where it get REALLY powerful.

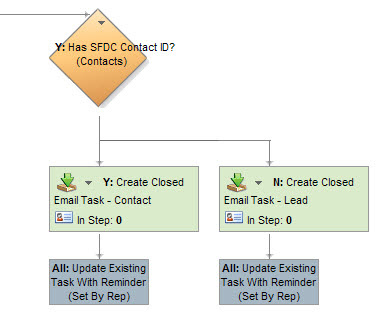
In the scenario above, the sales rep has chosen a Lead Action of “Left VM”. Based on that value, we have setup a series of post-scoring processes that will help the sales rep follow up with prospect (note that the processes shown below are based on our own internal business requirements, but you have the flexibility within Marketing Automation/CRM integration to customize this for your own internal processes):

1. Create a closed task indicating that the rep left a Voicemail for the prospect after being scored (this is done using the processes outlined in the Custom Activity Tasks in CRM Integration blog post)
a. This is done by setting the status in the task as “Completed” (or whatever value is used to indicate a closed activity within your CRM)
b. We customize the subject line of the task to “Voicemail” to help with reporting


2. Once the closed task has been created, we then take the original task that was created and do one of two things:

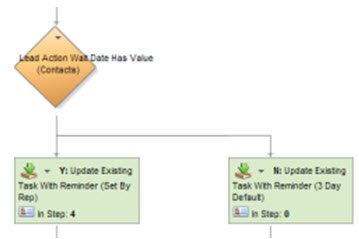
a. By default, we will place a 3-day reminder on the task for the sales rep to follow up on the voicemail (this reminder will automatically pop up on the 3rd day when the sales rep logs into the CRM software). We also customize the subject line of the task so that when it pops up within the CRM system, the rep knows exactly what the reminder is for.

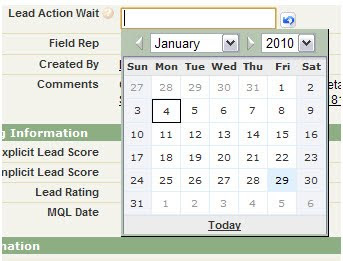
b. If the sales rep wishes to wait a little longer than 3 days to follow up, we have given them the option to select their own follow up date. We have called this field “Lead Action Wait”. This field within the CRM platform is set as a date field so that the sales rep can choose a date in which they want to be reminded to follow up with the prospect after leaving the voicemail:


3. If the sales rep has chosen to pick their own date for follow up, instead of setting a 3 day default reminder date, we will use the date as selected the sales rep. This option is really helpful if the 3rd day of the reminder happens on a Saturday/Sunday.


4. Once the reminder task has been set, we will remove the task from the reporting dashboards that we have setup. This is important because it helps keep the reports populated with prospects that need to followed up on.

After this new reminder task has been created, we then place the scored contact into a contact group that we have called “Lead Action Hold” and hold them in this contact group for either 3 days or until the date that they have selected in the Lead Action Wait field within the Lead Scoring task. The purpose for this is so that if the prospect is scored again before the reminder date, we can evaluate this within our Lead Scoring program and add this prospect back to the sales rep’s dashboard in Salesforce.com. This lets them know that there has been more activity from the prospect since their first follow up.


This entire process that we have setup within Eloqua and our CRM has truly allowed us to do data driven lead scoring. We can now make confident decisions on who and what we want to score as well as determine what changes we need to make to our scoring matrix. Having the flexibility within your Marketing Automation system is crucial for a process like this to work and Eloqua’s Marketing Automation and CRM Integration capabilities allow us to do that quickly, confidently and successfully.

Monday, November 30, 2009

Alerting Sales via a Marketing Automation Program


We've talked a lot about getting real time information to your sales team, and the value of the insight that provides. There are a number of easy ways to do it within Eloqua, each of which fits a specific situation.

The easiest is to set up a real-time web visitor alert for when key buyers visit your website. This triggers automatically off of web behaviour and known data.

Another way is to send lead alerts based on web form submits by looking at the data in the web form and alerting the appropriate salesperson.

A third way is to set up daily or weekly lead reports to be emailed to each salesperson based on all the configuration options available.

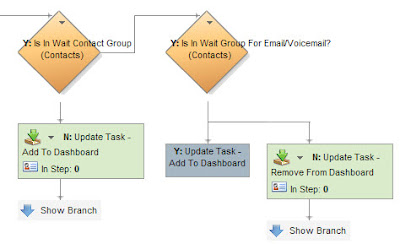
In this post, I wanted to introduce another way - based on the configuration of a marketing automation program in program builder. This technique is useful if you want to define specific, and deeper, rules to define when a sales person is alerted - such as only alerting when a certain lead score is reached, or based on more detailed territory assignments.

To do this, set up a step in your marketing automation program to Send Process Member Report to Owner. This will send an email to the "owner" of the contact as they pass through that step. We'll get to how "owner" is defined in a second.


In the configuration options, you have a few different Report options you can choose from, each of which sends a slightly different type of Report. If you just want the details of the contact (your most likely option), just select "Contact Details". Other options send information on the contact's membership in programs and groups, their known colleagues, or other history information on them. A topic for another post (or exploration if you're interested).


To define the "ownership" of the contact, you can build an ownership rule based on any data you have available. In a decision rule prior to the alert step, edit the ownership rules for whichever path leads to the alert step. In this case, it would be the "Yes" path.


You'll then want to either build a new ownership rule or use an existing one. Ownership rules take data that you have available, such as territory, field sales owner, industry, or revenue range, and map it to individual users. The user it is mapped to will be the one receiving the alert.
With this set up, you are all ready to go. When a contact reaches that step, an alert will be sent to them with the information in the default contact view. Very useful for knowing when a lead passed a certain threshold, or a person made it to the end of a lead nurturing routine.


Tuesday, October 20, 2009

Social CRM meets Marketing Automation


Much of our conversation around marketing automation tends to focus on the new revenue side of the business. Understanding digital body language allows us to understand which prospects are ready to buy, and which need to be further nurtured. However, the same concepts apply to the understanding of existing customers.

Understanding which customers are engaged with your knowledge portal and online community in order to learn more, which are struggling, and which are advocates allows you to use similar principles in order to better guide all of your customers towards success and ultimately renewal. I wrote recently about the ideas behind renewal marketing and social CRM, and the opportunity that it provides us to focus on maximizing customer satisfaction.

Since that time, I’ve had a number of conversations with the folks at Helpstream (who power our Customer Central online community), and we have a strong collaboration in the works. Recently, the Helpstream team announced the ability to integrate marketing and social CRM by adding Eloqua tracking to any pages (or all pages) within a Helpstream-power portal that you would like.

By doing this, activities within the social CRM community can be used as part of your lead nurturing strategies to guide your communication based on what level of engagement an individual has, or as part of lead scoring algorithms for looking at renewal or upsell.

If you have both Eloqua and Helpstream, it is worth ensuring that you are receiving the insights into your customers’ engagement with your social CRM system by integrating Eloqua scripts into the portal.

Thursday, October 15, 2009

Lead Scoring, Update Rules, and Comparisons


As you get deep into lead scoring and begin to implement some of the lead scoring best practices, you might run into situations where you need to make a comparison. For example, if you have an existing lead score, and want to re-score that lead when they visit your website again, but you only want to keep the highest score, you need to be able to compare a new lead score against an old lead score.

To do this in Eloqua is quite easy, and leverages the ability for update rules to perform basic mathematical functions. (If you haven't looked at update rules in a while, it's worth having another look as both the capabilities and the user interface have been enhanced; drag and drop ordering and new update actions)

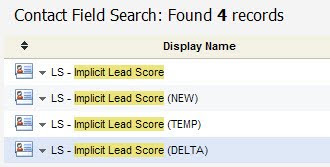
If, for example, you want to see if a new lead score is greater or less than an old lead score, you would create a field called "Lead Score (New)" for the new lead score and "Lead Score (Delta)" for the difference between "Lead Score (New)" and "Lead Score".

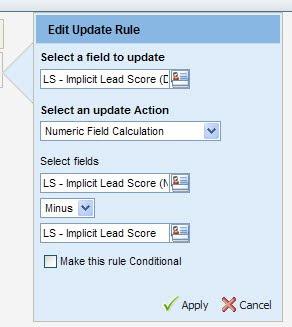
With those fields in place, create an update rule to find the difference. Select "Lead Score (Delta)" as the field to update, and then for the update action, select "Numeric Field Calculation".

Note that the contact field types MUST be numeric for this option to exist, as this will be working with the fields as numbers.

When you have selected that update action, you will then need to select the fields to operate on, and the operation to perform. To find the difference between the new and the existing lead score, select "Lead Score (New)" minus "Lead Score".

That's all you need to do, and when this update rule is run (usually in a marketing automation program), it will calculate the difference for you.

This delta value can then be read by a decision rule to see if the new score is higher (>0) or lower (<0)>

Tuesday, September 22, 2009

Pedowitz Group Ties in Twitter Activity to Marketing Automation


As B2B marketers, many of us are exploring social media. It is easy to understand the basics, but when it comes to integrating social media into other aspects of demand generation and marketing automation, it can be difficult to understand how to begin.


A few weeks back, Mike McFarlane highlighted a way to set up a social media GPS to get CRM visibility into social media activity that refers people to your web properties. This, however, was focused on the "periphery" that is the link between most B2B marketer's web properties and social media.


Now, Pedowitz Group takes this one step further by using their Sweet platform to capture general conversation about you, your products and your brand in Twitter, irrespective of whether this conversation resulted in a visit to your site.


This type of social media engagement can be highly relevant in determining who is a qualified lead when you build a lead scoring system, and who is already actively engaged when you think through your lead nurturing plan.


Essentially, what the Pedowitz Group's Sweet platform does is to capture Twitter activity based on a keyword. The keyword should be your brand name or a product name - something specific enough that it can be definitively identified as a conversation about you. This social media engagement is then captured and passed into Eloqua as a web form submit.


The information in the web form submit includes the keyword, the individual's Twitter ID, and the content of the Tweet that was captured. Within Eloqua, from here, you can do anythign with the web form submit that you would like. One thing that may be of use is to record the Twitter activities within custom data objects so that they can be filtered against for lead scoring or segmentation purposes.


Capturing a link between a person's contact information and their Twitter ID is necessary for some of the filtering to be possible, and there are a variety of techniques that can be used to make sure you capture that link. We'll discuss those in a later post.


Social media activity is highly interesting in its ability to determine a prospect's level of engagement. The Pedowitz Group's Sweet platform provides a great way to incorporate this level of engagement within Eloqua, so it can be used for all your marketing automation purposes.

Thursday, September 17, 2009

Quick Tip: Activity Filters based on Campaigns


Activity filters are getting progressively more powerful within Eloqua. As marketers have started using them for lead scoring, lead nurturing, and deeper analysis, the feedback has been clear on where we have needed to extend them.

Back in June, we added increased activity filter granularity to let you build contact filters based on a much more precise definition of what email, form, or content area a person interacted with. This was well received, but for those using campaigns, the need was clear for filtering based on an asset in a campaign.

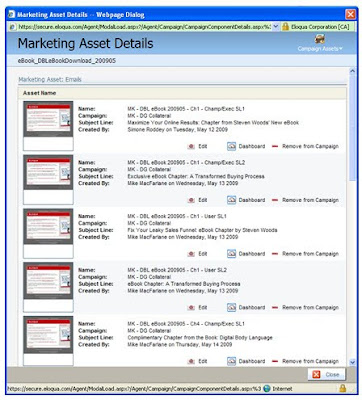
It's now available, and getting great comments. If you have a campaign, say a webinar or an eBook series, that has a set of emails in it, you can now build a filter that identifies just the emails in that campaign.

Add the emails (or whichever other marketing asset you are looking to filter against) to your campaign as you normally would. If you are doing any A/B testing, and want to also include those results, be sure to include all test version within the campaign.

Then, when you are building your contact filter, select an Activity-based filter, and the action you are looking to filter against. For example, we might be looking for individuals who have clicked through emails in our campaign.

Add your criteria of how many emails, over what period of time you are interested in looking at, and then select Campaign from the "Included in" menu. Select the campaign you are interested in looking at in the search & select menu below.


With this in place, your filter will only select contacts who have clicked through emails in the specific campaign you choose. This makes it much easier to define the rules you need for your scoring or nurturing campaigns.

This was developed based on very clear feedback from you on what our priorities should be, so please keep that feedback coming.

Thursday, August 13, 2009

Lead Scoring for Sales Enablement - Visual Cues in Salesforce.com


We all know that sales people are visual people. We touched on that quite a bit in last week's post on sales enablement. Rather than interpret a list or a number, they would much rather quickly look at a picture to indicate whether a person was qualified as an individual, or hot or cold as a prospect.

This visual orientation is one of the main reasons for the popularity of Prospect Profiler among sales professionals, as it provides this quick, visual view of what is happening with a prospect.

However, even without Prospect Profiler, these visual cues can be extremely valuable to your sales team. Having a visual indication of whether an individual is qualified and/or interested, is something you can configure quickly and easily within salesforce.com or your CRM system of choice, without any additional cost.

To do this is very simple. Essentially, you are building custom formula fields, where the "formula" returns an image that represents what you are interested in displaying.

To get started, go to the setup area, and under Leads->Fields, scroll down to Lead Custom Fields, and add a New field.

From here, you will be guided through a quick wizard to set up the field. The type of field you want to create is "Formula" as we will be applying some logic to the image display, and the output type is Text.

Provide a field label for your field, such as if we are building an image of 0-5 stars to represent how qualified a person is as a buyer (explicit score), we might label the field "Explicit Rating Image".

From here, you are presented with a Formula screen - select the Advanced Formula tab to get started. Note that we are just creating a formula to look at the Explicit Lead Score (which is already present) and return an image. We are not building a formula to actually score the leads, which will have been done in Eloqua, based on the best practices for lead scoring, and passed into Salesforce.com.

There is a small amount of code being used here, but nothing to be overly concerned about, as you can edit an existing code sample in order to build the exact image you require.

When we are looking at the explicit score, it may vary between 0 and 100, so we'll return 0 to 5 stars based on where it sits in that range. The first thing we need to do, however, is to tell the formula which field it is looking at to find your lead's explicit score.


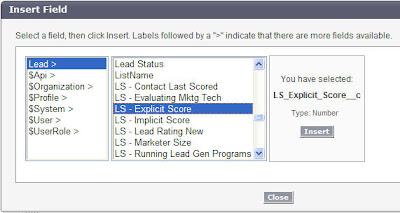
Click on "Insert Field" and a dialog box will give you a list of your fields. When you select it, the internal name for that field is inserted in your code. You'll need to replace the internal name in any of these examples with your own in order to have it work in your CRM system.

For this example, to look at an explicit lead score field called "LS_Explicit_Score" (replace this with your own), and display stars based on the range of values in the score field, the code would be as follows:

IF( LS_Explicit_Score > 80,
IMAGE("/img/samples/stars_500.gif", "5 star"),
IF( LS_Explicit_Score > 60,
IMAGE("/img/samples/stars_400.gif", "4 star"),
IF( LS_Explicit_Score > 40,
IMAGE("/img/samples/stars_300.gif", "3 star"),
IF( LS_Explicit_Score > 20,
IMAGE("/img/samples/stars_200.gif", "2 star"),
IF( LS_Explicit_Score > 10,
IMAGE("/img/samples/stars_100.gif", "1 star"),
IMAGE("/img/samples/stars_000.gif", "0 star")
)))))


You can see that this also takes into account the range of scores (ie 0-100) you have in your scoring, so it is important to make sure your lead scores don't grow with time more than appropriate, and that the right scoring caps are in place. This ensures that your scores remain cleanly between 0 and 100 as they should.

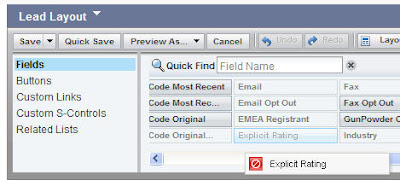
With this in place, you can then define who the field is visible to, and edit the Lead Layout to add in your field where appropriate. Generally, it is a good idea to drage the field for the images next to the number for the score so your sales team begins to get a feel for the underlying numbers.

This same process can also be followed for the other dimensions of lead scoring, such as implicit scoring (how interested a person is). Follow a similar process, but build your formula off of the implicit score. If you wanted a formula that would use a Consumer Reports style set of partially colored circles to represent the score, the following would work:

IF( LS_Implicit_Score > 80,
IMAGE("/img/samples/rating5.gif", "High"),
IF( LS_Implicit_Score > 60,
IMAGE("/img/samples/rating4.gif", "Med-High"),
IF( LS_Implicit_Score > 40,
IMAGE("/img/samples/rating3.gif", "Med"),
IF( LS_Implicit_Score > 20,
IMAGE("/img/samples/rating2.gif", "Med-Low"),
IF( LS_Implicit_Score > 10,
IMAGE("/img/samples/rating1.gif", "Low"),
IMAGE("/img/samples/s.gif", "no rating")
)))))


Again, you will want to replace LS_Implicit_Score with the name of the field in which you store your implicit score. Continue this process for any other fields you like.

If the field you are building a rule from has a ranking or stage such a Hot/Warm/Cold or A/B/C, rather than a score that comes in a range (0-100), you can use a slightly different way of writing the code, using a "Case" statement, as follows (again, in this example, replace "Rating" with your own field, and the A/B/C values with the values you expect in that field:

IMAGE(
CASE(Rating,
"A", "/img/samples/flag_green.gif",
"B", "/img/samples/flag_yellow.gif",
"C", "/img/samples/flag_red.gif",
"/s.gif"),
"status color")


With this in place, you can easily provide your sales team with the visual cues they need to quickly and easily understand which of their leads are qualified, which are interested, and which require follow-up.

Tuesday, July 28, 2009

Optimizing your Marketing Automation: Tips from the Guru


This week's post is a guest post from Andrea Corey, our VP of Systems Architecture, and the guru of Program Builder optimization. She and her team are responsible for all the scale and speed initiatives behind Eloqua's architecture, and were the key folks behind the work that was highlighted in the recent Dell case study on Eloqua's marketing automation platform performing at one billion transactions per day.


In this post, Andrea offers a number of great tips on how to think about your programs so that they operate as smoothly as you need.
Enjoy,

Steve


====================================


Program Builder offers two main processing modes: Regular mode and Batch mode. Each can be effective at enabling many Marketing Automation needs; what follows are some helpful explanations and suggestions for optimizing your programs.

Regular mode, the default mode, is ideal for lead nurturing, free trial follow-ups, event follow-up and similar processes where you wish to send out communications or evaluate contacts over the course of a period of time. Regular mode programs process program members at 15-minute increments. In case you are new to Program Builder, this means that every 15 minutes, program members will move from one step to the following step in the program (assuming they are not waiting in a step due to a time-based rule).


Whether there are one or more decision rules between the two steps, all decision rules are evaluated in sequence in the same cycle. Therefore, to optimize your programs, you may wish to employ decision rules in sequences, rather than placing steps between the decision rules.
You will also want to avoid “empty steps” such as the first step in the program – many new users don’t realize that the first step in a program can in fact perform an action.

Now you’re wondering how to avoid that first empty step if your first operation is to run a decision rule in order to branch the records… A tip to consider is to have your members enter the program at different steps – based on what you know about the records when you add them to the program. For example, if your members are flowing into the program from a form, consider multiple conditional steps that push members into specific program steps.
Alternatively, you can establish several feeders, instead of just one, in order to optimize where the members start in the program. These are advanced configurations, and may require extra planning and design consideration, but they can be useful for decreasing the time it takes to run your automated processes.

If you find that program members are taking longer than you would like to progress through to the end of your program, you may want to consider doing your marketing automation in Batch mode. Batch mode is often suitable for lengthy or complex workflows and for bulk data processing such as data normalization. In this mode, members are fully processed from the start of a program through to the end of the program every two hours.
Even better, you can prioritize Batch mode automation programs such that they are evaluated in a specific sequence. Some customers have set-up several programs sequenced in batch mode – very complex and granular lead scoring, lead rating, lead assignment programs that are modular, yet process this entire set of processing every two hours. You can see how this enables far more complex logic to be efficiently leveraged.


I must add a disclaimer regarding Batch mode. When running in Batch mode, marketing automation programs do not maintain the detailed step-by-step history that can be useful when initially building and testing programs, so I recommend that you enable Batch mode once you are satisfied with your program’s configuration.

I’d love to hear feedback on how we can improve Program Builder to make you more effective in your marketing automation.

Thursday, July 16, 2009

Sales Enablement: Account Traffic Light Dashboards


Enabling your sales team to succeed based on your marketing automation investments means ensuring that you can show them insights into their accounts and territories that they might otherwise not have been able to see.

An excellent way to do this is through the use of a "traffic light" dashboard that shows each salesperson, for their own territory, the hot, warm, and cold accounts that they own.

The use of a "traffic light" dashboard, to do this in green, yellow, and red has proven an excellent tool in many sales organizations as it allows salespeople to determine, at a glance, which accounts are showing buying interest.

To set this up in salesforce.com is quite easy. I've included the salesforce.com instructions here, but a similar process for Microsoft CRM or Oracle CRM On Demand should also work.

The first step is to create a report that rolls up the individual lead scores of the contacts in an account to the account level itself. Note that to do this project, we're relying on you already having set up a good lead scoring process, with that data integrated into your CRM system.

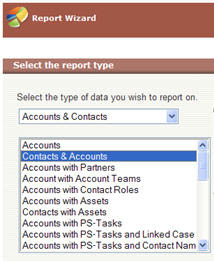
Build a report on "Accounts & Contacts" and select the "Contacts & Accounts" option to bring in data from both the contact (ie, their lead score), and the account (account name, etc).

When you are asked for a summary type, select a Summary report in order to allow us to aggregate the lead scores of each contact in the account into an overall lead score.

Although a sum of individual contacts' lead score is not the most perfect way of defining the exact score of an account, it does provide an excellent, directional view of which accounts are showing interest and should be contacted.

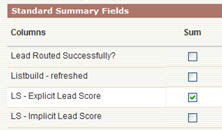
You will be asked to select your Summary Fields. Under Standard Summary Fields, select a Sum for your Explicit Lead Score field. This process can be repeated for Implicit Lead Score also, at a later point to build a second traffic light dashboard component based on buyer activity. Both implicit (how interested) and explicit (who) provided unique and valuable dimensions of lead scoring, and are worth dealing with separately.

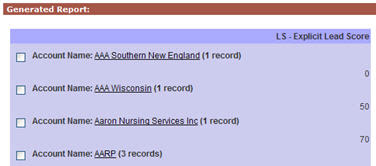
With this sum field selected, you will be asked to select how to roll up your data. We'll roll it up by Account Name in order to show the aggregate lead score for each account in a rep's territory. Note that this view provides an account level overview of which accounts to talk with, and very elegently complements the sales insights provided by Prospect Profiler to give you a good detailed view of an individual's area and level of interest.

The sort order of this column is not important as we will be changing this later for the dashboard.

The next step is to select the field that we are interested in. As we will be rolling up by account, the contact fields are not of interest and can be deselected. For account fields, select those that are of interest to you for a high level view, such as Account Name, Account Owner, and Industry.


Similarly, on the next step, the order of the columns can be selected in any way you would like. It will not affect the final dashboard, so order the columns as you wish.

Selecting your filter criteria now allows you to build a report that is unique to each salesperson for their territory. Whether you use account ownership, or more detailed data-level criteria to define an account ownership structure, you should be able to build an appropriate filter set to allow each salesperson to see accounts in their own territory.

The one thing you will want to do on the filter page, under advanced settings, is to hide report details. This hides contact level details, and allows the report to only show the account level rollup of the overall lead score.

The display options on the next step are also not relevant as we will be showing this report in a dashboard, which will determine its own display settings, so just click Run Report to generate the report and verify that you have a rolled up lead score for each account in the target territory.

Save this report as we will use it to generate a dashboard from. You may again wish to create a similar report based on implicit lead score, and you will likely see demand from each of your sales reps for a similar report in their own territory, so you will likely end up with a series of these reports.

Now that we have a report created, the next step to tackle is to create the traffic light dashboard based on that report.

The common way to do this is to create a new, three column dashboard, and add in each view as a component with that dashboard to give salespeople a territory map to work from.

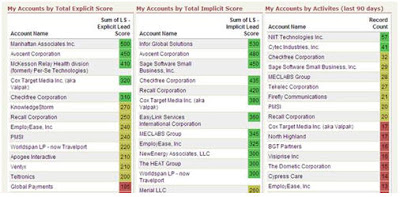
When you have created a dashboard, add in a component to represent this report. Make the component a "Table" component type, and give it an appropriate title such as "My Territory's Accounts by Explicit Score".

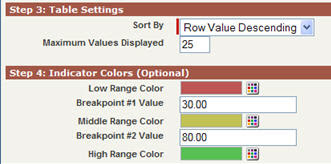
Select the report you have just created as a source report in order to bring in the data on accounts with rolled up lead score. You will likely want to set the Sort order to "Row Value Descending" in order to show the highest scored accounts first, and usually a maximum of 25 or 50 values displayed keeps the report manageable.

You can then set, based on your lead scoring ranges, where you want the traffic light colors to show. For example, if you have a 0-100 scoring range, you may want 0-30 as red, 31-80 as yellow, and 81-100 as green. You will find that this clearly shows why it is so important to define lead scoring caps and buckets so that scores do not get unweildy and are maintained within a workable range.

With that in place, you are ready to go. Save your dashboard, and work closely with your sales team to ensure that you have the right ranges identified, and the right way of defining territories to ensure that they are seeing the highlights of their own accounts.

Your sales team will be able to quickly discern which accounts are showing interested and should be called, and by doing so, will quickly become much more effective in their selling.

Thursday, April 30, 2009

Named Account Matching for Lead Scoring or Lead Routing


A frequently used process in lead scoring, lead routing, or even nurture marketing involves understanding whether an account is one of your named or strategic accounts. This usually involves a different sales team, a different level of urgency, and perhaps different rules. The challenge, however, is identifying, in real-time which accounts are your strategic accounts.

At first, this appears to be a very challenging problem as the way in which the names can be written varies widely. Being able to identify that an account is a strategic account involves accurately matching whichever way the individual chose to write the company name to a set of potential ways it could be written.

Luckily, to do this within Eloqua is relatively easy. It involves setting up a match rule to enable multiple ways of writing a strategic account name to be matched against the way chosen by each individual. This match rule is then used within Program Builder to identify each contact as they flow through the program and identify them as a named account. From there, they can be treated according to the appropriate rules or processes for named accounts.
For this example, we’ll look at a general technique for identifying a named account automatically in Program Builder. From this technique, you can build whatever business process you require, for example a lead scoring program that applies an additional score if the contact is in a named account, or a lead routing program that routes named account leads directly to the field sales team.

The first step is to build a match rule to identify the named account. To do this, we start with a list of the possible ways of writing the account name. You can often draw this from existing data in your database that shows the ways in which each strategic account name has been written historically.

With that starting list of names, upload them to a Company Group, which we’ll call “Named Account Master List”. These company records will usually only include, for each record, the alternative way of writing the account name, and the preferred way of writing the account name. We will use this as a reference list to match from and correct.

The next step is to build a match rule that takes the company name field from the contact record and matches it against the alternative name field of the company record. This rule, when applied against companies in the Named Account Master List, will allow us to identify if the contact in question is a named account.


With this match rule, we will also build Dedupe Handlers to define what we want to do when a match is found. First, we’ll want to mark the contacts with a flag that they are from a named account. To do this, we’ll use dedupe handler rules and update a field on the contact with a specific value. A specific contact field called “Is_Named_Account” can be updated to “Yes” for example. We may also want to update the company name to the preferred way of writing it if that is appropriate.

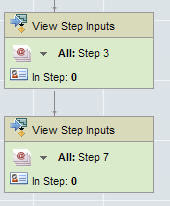
The third step is to use this match rule in a program to identify that the contact is from a named account. Add a step that runs our dedupe or match rule, and select our recently created match rule for Alternative Company Names. With the contact in the program as the source, and the Named Account Master List as the destination, we’ll be able to see whether our contact matches any of the spellings in the named account master list.


The dedupe handler set that we built can be run automatically by the program to immediately mark the "Is Named Account" contact field as "Yes" and update the company name with the correct spelling.

From here, the final step is to use the newly acquired information to route the contact down a path that is specific to named accounts. This can be done using a simple decision rule that looks at the value we have just updated in the "Is Named Account" field to check whether it is set to “Yes” or not.

This technique can be used for any time you need to identify named accounts for any purpose. Lead scoring is a very common situation in which to use it, but by no means the only situation.