Adobe Connect, part of the Adobe family, provides an excellent platform for hosting large or small events for marketing, education, or sales. They also provide a robust way to tie the data on who attended webinar events into your digital body language on each prospect within Eloqua.
Like any other Eloqua Cloud Connectors, the connectors act as steps within Program Builder's marketing automation workflows, so the first step is to whiteboard what you would like to have happen. With Adobe Connect, to ensure that the individuals are uniquely tracked (by email address), you'll want to register them for the event via Eloqua.

This creates a guest user account in Adobe Connect that allows you to see who is attending. After the event has taken place, you'll likely want to pull information on who attended into Eloqua. To do this, there is a Cloud Connector step to Query Attendance.

With the plan set out on the whiteboard, let's look at how to get these Cloud Connectors set up in your Eloqua instance. We looked at how to install a Cloud Connector into Eloqua recently, and you'll need to do that for the steps you are going to use. Find these connectors at cloudconnectors.eloqua.com:
Register Contact with Adobe Connect: to create a user account and register them for the webinar.
Unregister Contact from Adobe Connect: if you want to remove people from the event automatically.
Query Adobe Connect Attendance: to get information on who attended after the event has taken place.
and also
Feeder of Adobe Connect Attendees: to feed in all Adobe Connect attendees directly into Eloqua for nurture and follow-up (without using a program step to query from)
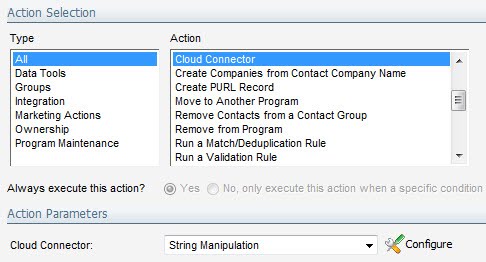
Install any of these connector types you wish to use and then you are ready to add them into your marketing automation program. To add a step, put the step in the program as you would normally, then select “Cloud Connector” as a step action. You’ll then see a drop-down of installed Cloud Connectors below (if you have installed the Cloud Connectors into your Eloqua instance). For this post, we’ll look at just one of the connectors, but the flow is similar for all of them. Select the Adobe Connect Query Attendance connector for the step that looks to see if people actually attended the event.

Click the Configure button to begin setting it up. You will be asked for your credentials, and it will confirm the Program Builder step you’re connecting to, and from there it will go straight into configuration. The Configuration tab asks you for some options on configuring the Adobe Connect side of the connector. Important: you’ll need an account that is part of the Administrator group for this integration as user accounts (just guests) are being created.
If the account you are using is your own, you should see your meetings with the “My Meetings” option selected, but if you are using a system administrator account, you’ll want to select “All Meetings” and save to see your meetings. Also configure where you want to store the information retrieved by Adobe Connect; you can either use fields on the contact record or, better, store the information in a custom data object.

Move to the field mappings tab and select the fields on the contact record and/or in custom data objects that you are interested in using.

That’s all that is needed in order to configure the connector. You can run it manually a few times under the “Run Step” tab or go to the Configuration tab to enable it to run automatically. Follow the same flow for the “Register with Adobe Connect” step, and you now have your Eloqua marketing automation fully integrated with your Adobe Connect web conferencing.

Enjoy, and please keep the feedback coming, we’d love to hear from you what about this integration is working for you, and what you’d like to see us add, change, or improve.