Today's post is a guest post from our own Amber Stevens, Marketing Programs Manager. In this post, Amber looks at ways of encouraging sharing that seamlessly complement the social sharing features of Eloqua.
Amber is focused on our SMB account base, and as such is always looking for new ways to help small and mid-sized companies get the most out of Eloqua and connect with their peers. Connect with her at amber.stevens@eloqua.com with ideas, suggestions, or comments.
Amber is focused on our SMB account base, and as such is always looking for new ways to help small and mid-sized companies get the most out of Eloqua and connect with their peers. Connect with her at amber.stevens@eloqua.com with ideas, suggestions, or comments.
==========================
Many marketers are enabling content sharing with Eloqua’s Social Sharing features - a great way to expand reach beyond traditional channels. But, did you know that Eloqua ‘Refer a Friend’ allows your prospects to share valuable content among their networks without requiring Twitter, Facebook, LinkedIn or any other active social media accounts? ‘Refer a Friend’ allows recipients to recommend content to a friend and automates a personalized request encouraging opt-in from the “referrals”. This is a great way to grow your database organically and ultimately drive more leads to the top of the sales funnel. The process works best when combined with internal contests or external incentives in order to increase the likelihood of friend referral.
You only need to complete the four step set up process once – then, you’ll be able to quickly add to any email header and start capturing new referred contacts. The amount of time to do this will vary depending on whether you use existing templates or create custom content. I used existing forms and layouts and was able to complete the process in about fifteen minutes on my first try.
Overview: in six steps, you’ll create a web profile field to capture the ‘Refer a Friend’ information, create the actual ‘Refer a Friend’ form (from an existing template), create a query string to capture unique email forwards, insert the form into a hypersite, insert the hypersite URL into an email header, and finally, insert the header into an email to put ‘Refer a Friend’ into action.
Here’s how it is done step-by-step:
First, you’ll need to create a *Profile Field to collect the Refer a Friend ID.
*This method requires the use of Web Profiling Fields to be created and modified, so check with an administrator to ensure you have access to these fields.
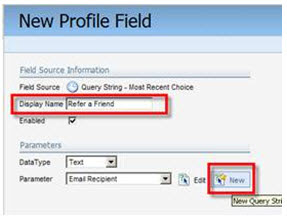
1) Navigate to Automate -> Web Profiling. Click on Profiling -> Profile Fields -> Expand Query Strings and then select the drop down next to Query String – Most Recent Choice, New Profile Field.

Enter a display name and under parameter, and make sure the ‘Force Profile Update’ is checked. Click on New. This will open the parameter detail window.
In Parameter Details, enter a display name, and set the parameter as “RAF”. Leave the rest other options as set by the default and save and close the window.
Next, create the Refer a Friend Form – there is pre-created form you can use to save time!
2) Navigate to Automate -> Forms -> Generic -> Refer a Friend (Save Referrer and Friend) -> Select Form Details.
From the task bar, select Fields and New Profile Field.
Enter a display name and select your Refer a Friend profile field that you created in the first step. Save and Close.
Then, publish the Refer a Friend Form to a hypersite
3) From the Layouts menu on the Task bar, select New Layout (Custom or Standard). (If using a New Standard Layout, in the bottom menu bar, select ‘Add Existing Form Field’ and then click All Existing Form Fields – this saves loads of time).

Enter a form layout name and then save the layout. Save and close the dialog box.
Select Layouts and List Layouts. Locate your saved layout, then click the arrow next to it and select “Publish Layout”.
Finally, choose the hypersite that you would like the form to be published on, enter the name of the page, the title that you wish to have display in the web browser and then click publish.
Create the Master ‘Refer a Friend’ URL with a query string
4) Your ‘Refer a Friend’ form is available for use immediately after you publish it. However, to ensure that each email can be forwarded from many users, you need to identify each unique email to be managed by the single form. To do this, you’ll create a query string.
Our sample ‘RAF’ form URL is:
http://trainingservices.eloqua.com/forms/02RH_RAF
A query string adds tracking parameters to a URL starting at a “?”, followed by identifying characteristics. Our query string is:
?RAF=elqReferFriendID
The complete URL for this example would be:
http://trainingservices.eloqua.com/forms/02RH_RAF?RAF=elqReferFriendID
NOTE: When adding this link to an email, do not make it a redirect link. This link is trackable.
Save this query string somewhere, we’ll use it in the next step.
Now that all of the set-up work is complete, we’ll add the ‘Refer a Friend’ functionality to an email header. This is the step that you will follow for all future uses of ‘Refer a Friend’ – the hard work is now done.
5) Navigate to your headers Communicate -> Email Marketing -> Email -> Tools & Content Components -> Headers and create a new or modify an existing header. Once you have identified your header, click “insert hyperlink” and select a “Text Link” as the type.
Set it to Send to Hypersite/Hosted Forms
Select Area Editor > Source Editor
After the first “?” in the URL, add the query string:
RAF=elqReferFriendID&
Click Save.
The last step is to configure the ‘Refer a Friend’ Details and Insert into your email
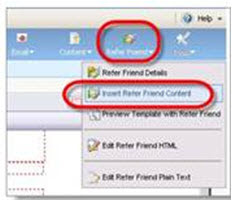
6) From within your email, select Refer Friend -> Refer Friend Details
The from email address and name will be auto-populated with the contact information of the person who is referring. However, in the event that their information is not available, you need to set default information. Save Details.
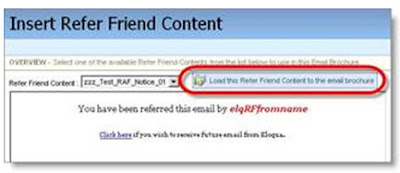
Insert Refer Friend Content into your Email from the Refer Friend menu.

Load the ‘Refer a Friend’ content into your Email. It will show you the preview, and no save is needed.

THAT’S IT! You’ve created the ‘Refer a Friend’ form, enabled unique tracking with query strings, and added the functionality into an email.
Note: The referred friends email is saved into a “friend” table, which is kept separate from the contact table so you cannot market to “friends” until after they’ve opted in. This allows you to remain CAN-SPAM compliant.
For more information and advanced tips on using ‘Refer a Friend’ forms as well as testing, reporting and tracking, view these related materials:
Subscribe to “Did You Know” for Eloqua How-To’s Like This One
Customer Central – How To Set Up Refer a Friend
Customer Central - Viewing Refer a Friend Reports


0 comments:
Post a Comment