In B2B marketing, this is even more important, as it has long been known that people buy from people they like and trust, so developing and growing a personal relationship with potential future prospects is key.
That leave us with a challenge, as marketers, how can we communicate efficiently, but still maintain and grow that relationship. One way that has worked very well (up to 30% higher clickthroughs in many Eloqua clients) is using Signature Rules that have an email coming from a salesperson and inserting personal content in the email according to the salesperson assigned to each recipient.
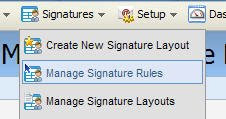
 In the email area, click on Manage Signature Rules, and create a new Rule. Signature rules have 3 parts:
- the Contact Field we're looking at to determine ownership
- the mapping of the values in that Field to appropriate salespeople
- the layout of the content (and content itself) to insert for each salesperson on the outgoing email.
 In creating the new Rule, pick the field you want to personalize based on - "Salesperson" is often a good one, but geography (state, country), or industry field can also be used. Click "Autofill Values" at the bottom of the screen to pre-populate the values of the mapping section with the most common values in that field, and map each of them to a User account (the appropriate salesperson).
Note that data quality here matters a LOT. If you have bad data, you will have far too many values to map (see comments on data quality here: http://digitalbodylanguage.blogspot.com/2008/12/contact-washing-machine.html)
 That then maps each email recipient to the right salesperson, but we still need to manage what content is dropped into the outgoing email when the email is sent on behalf of that salesperson. Click on Edit User, and at the bottom of the page, you'll see a section of Signature Fields. This gives you all the content on that salesperson that you can automatically insert (note, you can upload users if you have a lot, that's much more efficient if you have 100s of salespeople).
 The only remaining step is to define how that content will be inserted into the outgoing emails. Again from the top menu, choose Manage Signature Layouts, and create (or edit) a layout. This lets you define a block of HTML (or text) to insert with the fields from each salesperson in it.
Click Insert User Field to drop in each text field, or image, and then edit them in the WYSIWYG editor as you would normal email content. The email address and display name that the email comes from and the reply address for responses will be automatically added, this is just for the personal message content.
 You can send your emails using a specific Layout, or can have each salesperson's content managed in their own Layout, as you'd like. Use "Manage Layout Assignments" to map salespeople and Layouts.
With that in place, you're ready to drop the Signature Layout into your email content. You'll see an "Insert Signature Layout" button in the editor's bottom bar, which works like any of the insert tools, and lets you drop your content into  the right spot in your email. With this complete, make sure you test it, by clicking "Preview" on the content menu in your email. On the left side, you'll see a "Select Sender" option, and you can flip through the sender options to see how your email would look coming from each one, including their contact information, picture, and personal message.
 Here's mine, obviously I could have worked on my HTML a little bit more in the Layout Editor, but you get the idea.
Looking forward to your comments, and hearing about how you've been using Signature Rules in your marketing.


0 comments:
Post a Comment