 (Guest post from Leigh Oxley)
Working in Product Support, we often identify common requests from clients on certain topics; ideas that they’ve heard about at user groups, in our online Customer Central community, or know they should be able to do, but just aren’t quite sure how to implement. Many organizations want easy ways to ensure their teams are reaching the right audiences, and one way to do this in Eloqua is to use some quick (and easy to set up!) customization by configuring default distribution lists for your users. Today, we’ll walk through the concept of distribution list defaults in Eloqua, and quickly review how to set these up for your team. Keep in mind this is something that is only available for Customer Administrator-level users, so if you don’t have access, speak with your Eloqua administrator about implementing this idea for your team!
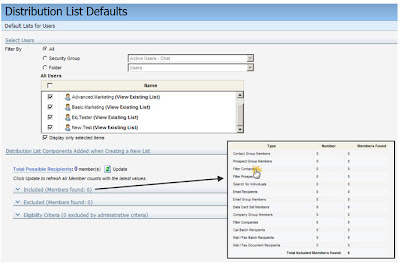
Default distribution lists were introduced in late 2008 to allow Customer Administrators to set restrictions on users sending batch emails. For example, if you want to be sure that your marketing team in Texas is only able to send batches to contacts in Texas, you can use distribution list defaults to configure this. These defaults can be configured by individual user, security group, or users within a certain folder. To access the interface where you’ll set these up, navigate to Setup > Management > User Management and use the “User Defaults and Settings” drop-down at the top to access “Default list for Users”. Here, you’ll be presented with a screen to choose which users you want to setup the defaults for, and the same distribution list configuration screen you’re used to seeing.

This looks somewhat familiar, but not entirely…
You will notice that the Included/Excluded criteria settings in this interface may be larger than what you will be used to when working with standard email distribution lists. This is because these default lists can be configured for all entities using lists – Eloqua PrintMail, Call onDemand, and Fax. This allows you to really customize your database to your requirements, and define who on your team can reach out to which prospect/client markets, across all possible outbound communications from Eloqua!
One part of this functionality that we often get questions about is the two options at the bottom of the page where you’d normally see a save button: “Add Defaults” or “Replace Existing Defaults”. If you’re unsure about what settings this user may currently have, we recommend building the settings you’d like, then using the “Replace Existing Defaults” button. You can, however, use the “View Existing List” link beside each user listing above to see what defaults are currently configured, and then simply add new settings to the current setup.
What will my users see, and how do I know if this functionality is right for our team?
When creating a new distribution list, your users will be presented with the defaults you’re now configuring for them. They can add to these settings, but cannot remove the defaults you set. For example, let’s set up the Elq.Tester user up to include the “State = NY or New York” contact filter as a default. That user can still add other components to their lists, like contact groups or other filters, but they cannot remove that “State = NY or New York” filter when creating new distribution lists. This is important to keep in mind, as any list this user now creates moving forward will be affected by this. When Elq.Tester creates a new distribution list, they will always have the above filter included in all emails.
Of course, the one thing we all want to know, if this is something that will be useful for our own team. Here are some scenarios to consider:
• If you have a team of people who should always be copied on every batch that is sent from Eloqua, you should be using default lists! Simply set them in the “Include” section for each user’s default lists.
• If you have your teams broken up into prospect and customer marketing teams, you should be using default lists! Simply create contact filters and user folders, and set the customer marketers up to always exclude prospects, and vice versa.
• If you want certain members of your team to only be able to send emails internally, you should be using default lists! Simply set your own internal domain in the eligibility criteria area!
• If you maintain a list of contacts who should only be contacted by your main power user, you should be using default lists! Simply drop those contacts into a contact group and set them in the Exclude section for all other users.
Don’t forget to check out Eloqua’s Customer Central user community for more information on default distribution lists and how this functionality can work for your team!


0 comments:
Post a Comment