Thursday, April 30, 2009

Named Account Matching for Lead Scoring or Lead Routing


A frequently used process in lead scoring, lead routing, or even nurture marketing involves understanding whether an account is one of your named or strategic accounts. This usually involves a different sales team, a different level of urgency, and perhaps different rules. The challenge, however, is identifying, in real-time which accounts are your strategic accounts.

At first, this appears to be a very challenging problem as the way in which the names can be written varies widely. Being able to identify that an account is a strategic account involves accurately matching whichever way the individual chose to write the company name to a set of potential ways it could be written.

Luckily, to do this within Eloqua is relatively easy. It involves setting up a match rule to enable multiple ways of writing a strategic account name to be matched against the way chosen by each individual. This match rule is then used within Program Builder to identify each contact as they flow through the program and identify them as a named account. From there, they can be treated according to the appropriate rules or processes for named accounts.

For this example, we’ll look at a general technique for identifying a named account automatically in Program Builder. From this technique, you can build whatever business process you require, for example a lead scoring program that applies an additional score if the contact is in a named account, or a lead routing program that routes named account leads directly to the field sales team.

The first step is to build a match rule to identify the named account. To do this, we start with a list of the possible ways of writing the account name. You can often draw this from existing data in your database that shows the ways in which each strategic account name has been written historically.

With that starting list of names, upload them to a Company Group, which we’ll call “Named Account Master List”. These company records will usually only include, for each record, the alternative way of writing the account name, and the preferred way of writing the account name. We will use this as a reference list to match from and correct.

The next step is to build a match rule that takes the company name field from the contact record and matches it against the alternative name field of the company record. This rule, when applied against companies in the Named Account Master List, will allow us to identify if the contact in question is a named account.


With this match rule, we will also build Dedupe Handlers to define what we want to do when a match is found. First, we’ll want to mark the contacts with a flag that they are from a named account. To do this, we’ll use dedupe handler rules and update a field on the contact with a specific value. A specific contact field called “Is_Named_Account” can be updated to “Yes” for example. We may also want to update the company name to the preferred way of writing it if that is appropriate.

The third step is to use this match rule in a program to identify that the contact is from a named account. Add a step that runs our dedupe or match rule, and select our recently created match rule for Alternative Company Names. With the contact in the program as the source, and the Named Account Master List as the destination, we’ll be able to see whether our contact matches any of the spellings in the named account master list.


The dedupe handler set that we built can be run automatically by the program to immediately mark the "Is Named Account" contact field as "Yes" and update the company name with the correct spelling.

From here, the final step is to use the newly acquired information to route the contact down a path that is specific to named accounts. This can be done using a simple decision rule that looks at the value we have just updated in the "Is Named Account" field to check whether it is set to “Yes” or not.

This technique can be used for any time you need to identify named accounts for any purpose. Lead scoring is a very common situation in which to use it, but by no means the only situation.

Tuesday, April 28, 2009

Emails, Blackberries, and Text-Only Sending


More and more of today's executives read their emails on their blackberries, or other similar devices. The challenge with these devices is that they will receive the HTML version of an email, if it is sent, but will not render the HTML correctly. This leaves us with a very poor recipient experience as the email is challenging, if not impossible to read.

Luckily, there is an easy way around this challenge within Eloqua if you are able to identify which of your recipients are likely to be reading your email on a blackberry. You can tag a group of recipients within an overall batch to only receive the text version of an email and by doing so present them with a more easily read option on their blackberry.

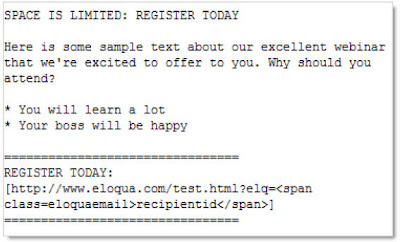
The first step is to create an aesthetically pleasing email in text. This is a very minimalist environment where formatting such as bold, italics, and colors are not supported, so make careful use of copy and spacing. You can use "+", "*", or "=" characters very judiciously to separate sections or provide highlights.

You can, of course, use dynamic field merges in your text version and the links are trackable as you would expect in a regular HTML email within Eloqua.

With the email content created in a text version, remember to test. You can do this as you normally would to test an email - in the QuickSend area, under the Testing tab. In that tab, you will see an option for selecting which version of the email to test.

Select the Text Email to only test that version, and run the test as you normally would.

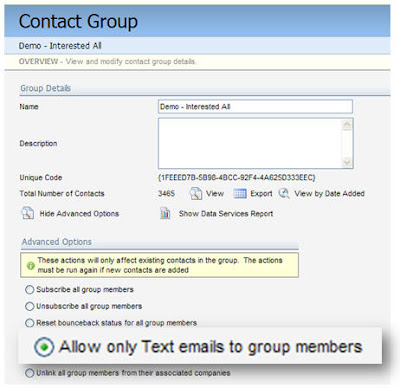
With great text content created, the next step is to define who in your audience should only receive text. This is done through the Contact Group interface's Advanced Options menu. With the intended recipients in the Contact Group, open the Advanced Options panel, select "Allow Only Text Emails to Group Members", and click "Apply Advanced Options".

This is a one-time setting, so if new members are added to the group, the option will have to be run again. When the contacts in that group are added to a campaign, they will only receive the text version of the content.

Please note that if you don't see the Advanced Options panel, it is because you do not have sufficient security access within your install, so you may need to
ask your administrator to grant you the needed access, or perform the task themselves.

Once you have sent the campaign, you may wish to switch the contacts in question back to receiving HTML emails if that is appropriate.

For slightly more detailed instructions, please feel free to download the guide featured here that walks you through in more detail.

I look forward to your comments on how this has worked in your marketing to executives carrying blackberries.


Thursday, April 23, 2009

Account Selling using an Activity Summary Report in Salesforce.com


In B2B marketing and selling, we are managing a delicate balance between selling to individuals and selling to the organizations they serve. At the end of the day, we are doing both, and being able to aggregate individual activities into an overall "radar" that helps us sell into an account is extremely valuable.

This is very easy with Eloqua, and you can present the account selling summary reports directly in your sales team's CRM system. With activity logging set up, you will be able to configure it quickly using your CRM system's reporting engine (in this example Salesforce.com).

What we'll be doing is creating a custom report that shows the response that people at each account have had to your marketing, rolled up by account, but showing the individuals and their activity.

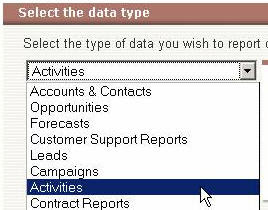
First, create a New Custom Report in Salesforce.com under the Reports tab. You will be asked what you would like to report on, and select "Activities", followed by "Activities with Contacts" as we'll be looking to see, and aggregate, the activities performed by contacts in each account.

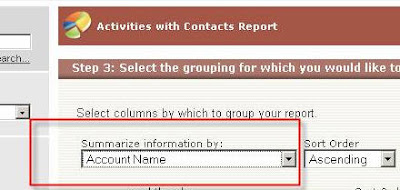
When you are asked what type of report you would like to create, select a Summary report as this will allow us to aggregate our data by account. To do this, when asked, choose to summarize the information by Account Name.

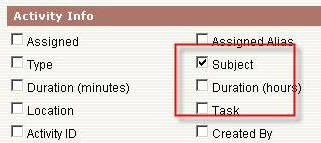
In the next step, we'll be asked to select which columns are of interest. There are a number that are critical for this exercise, and a number that are optional. Select "Subject" under Activity Info, as we'll use this field to determine whether the activity is an outbound marketing activity or a response.

Select Account Owner and Account Name, as these are the fields that will allow us to show this account radar based on an individual sales rep's accounts, and of course the Account Name field is what we are using to roll up the activities.

Similarly, we can select Contact Owner, First Name, and Last Name, under primary contact info, as this will allow us to see who the individual is who showed activity. We will also usually select Email, and perhaps Phone from the contact's connection information as this will make the final report more actionable.


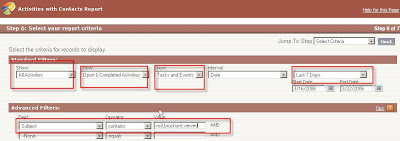
The next step is the criteria. You will want to define a timeframe, such as "All Activities" that have been "Open & Completed" in the "Last 7 Days" to keep things recent and relevant.

In order to ensure that you only see inbound/response activities, rather than all marketing activities, you will want to add a filter on the Subject field. Add a "Contains" criteria, and type "visit,brochure,viewed" in the Value field to limit this report to only the activities of interest.

You can also add criteria to limit this report only to a specific sales rep, or a specific territory if you are interested at this point.

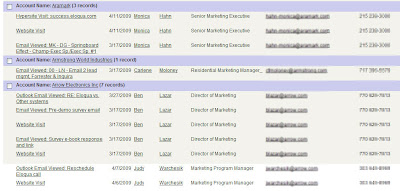
With this completed, you are ready to save and run the report. Click the image to the left to see what a final account radar report looks like.

This is a very useful report to construct for each of your field sales team members as it gives them an instantaneous view into their accounts, and they can see which of those accounts are showing buying activity.

Tuesday, April 21, 2009

Lead notifications by Territory


Quickly getting information about your inbound inquiries out to your sales team is critical to success. Each hour that goes by decreases the likelihood that you will be able to connect with the prospect.


In many cases, as we have talked about, there is a need to carefully and accurately score leads prior to handing them off to a field sales team. However, there are also situations where you will want all leads to go to a sales team (likely an inside sales team), and speed is the most critical factor.


In this case, with Eloqua, you can very easily do a quick, but effective lookup against a field in the incoming form. Perhaps you segment your inside sales team by geographic region, or perhaps by industry or even product line of interest. In each case, you can perform a simple one-step lookup to determine who to send the email notification to.

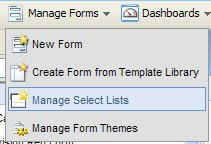
From the top menu in the forms area, choose "Manage Select Lists" to build (either manually or through an upload), a reference list that can reference incoming data values and provide an email address to notify.

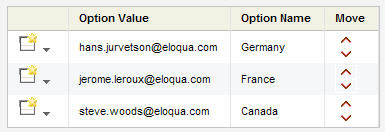
In our example, we'll be routing leads by geography, so we'll create a Select List that has the Country value in the Option Name field, and the email address we would like to notify in the Option Value field.

With this built, all we need to do is to create an email notification step for the form. When we are asked to configure the recipient's email address, whereas we would normally use a constant value, in this case, we'll select "Form Field" as a source type.

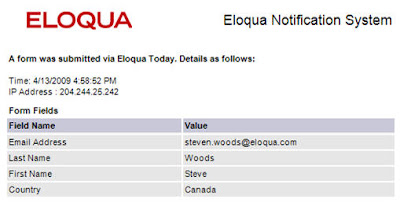
We'll select the value that we want to reference, and then check the "Lookup" option (*). The Lookup option will then provide a set of select lists, and we'll select our "Reps By Country" list that we just created. Now, as the form is submitted, the Country that the visitor chose is referenced against our select list, and from there, an email address to notify is selected.

The lookup technique is a very useful technique in general, as you are able to greatly expand the options available to you when a form is submitted through its creative use.


Note that in this case, if you wanted to send notifications by Country for certain areas of the world, but by State for other areas, you could easily build two similar processing steps, one for each scenario, and have them run conditionally.

(*) Note: The "Lookup" option is not enabled by default, if you require it, please contact your Customer Success Manager to have it enabled.

Friday, April 17, 2009

Closed Loop Reporting with Salesforce.com Campaigns


If you use a CRM system such as Salesforce.com, you can easily use Eloqua to map inquiries to campaigns, and from there understand the return on investment that the individual campaign produced. This gives you a quick and very useful approach to closed loop reporting in your marketing campaigns.

This works well in less complex buying cycles where a single campaign can reasonably be tied to a single purchase event. In those cases, tying the inquiries from a form or a landing page to a campaign in CRM, and using that tie to understang campaign effectiveness is all you need to do. In more complex buying cycles where you want to understand the influence of multiple campaigns over multiple months, you'll want to use Eloqua's campaign analytics module.

For the simpler case, however, it's easy to get started. I'll show an example with Salesforce.com campaigns, but this can just as easily be done using Oracle's Siebel on Demand product or Microsoft Dynamics CRM.

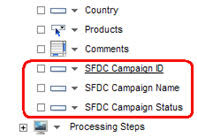
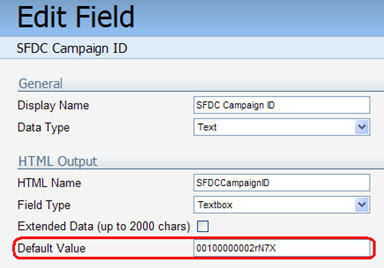
First, we'll add the key fields for the campaign to the form. They do not have to appear in the HTML of the form for the web visitor, but by adding them to Eloqua, we can then associate that form with the right campaign in Salesforce.com. Add a field for each of SFDC Campaign ID, SFDC Campaign Name, and SFDC Campaign Status.

With each field, edit the field properties by clicking on the field, and populate the values you require for each of the three fields. The campaign ID, for example can easily be discovered in Salesforce.com in the address bar of your browser when you have selected the campaign you are interested in associating leads with.

With that in place, you can then add the campaign information to the contact's record, so you can see at a glance what the last marketing campaign was that they were associcated with. This information is valuable to have associated with them for various analysis and reporting purposes, but we'll just use it for now to associate their record in Salesforce.com with the appropriate campaign.
To update the contact record, simply add the three fields we have been workding with to your update contact step as optional parameters. This will add the campaign information to the contact record within Eloqua.
With the information added to the contact record within Eloqua, and assuming that your CRM integration with Salesforce.com is set up normally, the only remaining step is to add this contact to your CRM update program.
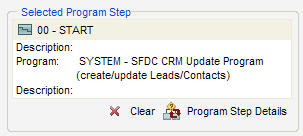
Add a form processing step to add the contact to a step in program builder, and select the System program for running the CRM update. Unless you have configured this program from the default, this will automatically pick up the values of those fields in the contact record, and make the necessary associations with the campaigns in Salesforce.com.
As you know, your business, and your CRM system configuration, guides you towards many potential ways to define how and when contacts and leads are associated with your Campaigns. Rather than be forced into a one-size-fits-all approach, by opening up how forms are linked with campaign data, how that is written into the contact record, and then how that contact is mapped to the CRM system, you should find that the resulting structure best maps to your business needs.
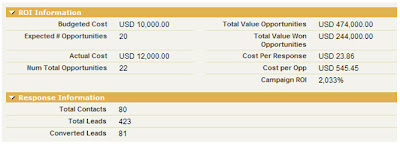
With the mapping in place, you can now see very quickly and easily which campaigns are performing, which are creating opportunities, which are driving revenue, and which have the highest overall performance in terms of marketing ROI.


Wednesday, April 15, 2009

Tracking Lead Sources through Query Strings


Where traffic comes from is always a topic of significant interest in marketing. We've talked about how to easily track this with Eloqua if you only know the website the traffic is referred from using Online Referrer campaigns, but there are many times that you have an ability to add a more detailed lead source code into the link that sends traffic your way.

If you do, in situations like PPC ads on search engines like Google, banner ads, or partner promotions, you can go one step further and track the exact source that brought the visitor.

The first step is to begin tracking the value of the code that will be passed through in a query string. This is the extension of the URL that looks like ?source=PPC&ad=Promo12.

To track this, go to the Query Strings tab under Web Profiling, and create a new Query String Parameter to be tracked. All you need to provide in most cases is the name that you are looking for in the query string, and Eloqua will take care of the rest. If you are working with a site that does not use the standard way of separating values with "&" and "=", you can also configure the rules for that setup in this area.

Once this is in place, you are automatically tracking the query string values that appear in each of the URLs your visitors visit, whether the first page in their visit or within a many page visit.
In the same manner as we did with online referral campaigns, we can set these query string value up in their profile to present as interesting data on the individual visitor. We can also pass this data into a web form quickly and automatically. Similarly, once it is available in the web visitor's profile field, we can display it to our sales teams in their CRM system so the can better understand the mind of each buyer.
With query string tracking set up well, it is easy to build a much clearer view of what is happening to drive traffic to your website and what each visitor does when they are on your site.


Monday, April 13, 2009

Lead source codes - capturing with Javascript


In a recent post, we talked about using form profile fields to capture the most recent lead source code, as seen in the URL's query string, into a form. If, however, you want to manipulate the lead source prior to placing it in the form, or in any way work with the data, you may wish to use javascript directly.

This is a slightly more technical route, but once you are comfortable working with the javascript behind the form, many options become possible in your marketing efforts.

The javascript file here has the code that you see to the left. Essentially, the script looks for query strings in the URL of your page. In this case, we are looking for a query string called "c", so it will appear as "&c=****" where **** is the lead source code we are looking to track.

The script then puts that value in the "Campaign_ID" field (likely a hidden field) within your web form. The web form in this example is called "WhitepaperForm_data". To configure this for your web form, just add the javascript into the page with your web form, and configure the form name, form field, and query string, and you will have the query string value automatically populate your form field.

This technique is a very useful one to know, as it can be extended to do all sorts of interesting things with your web forms, and the content on your pages, based on the values passed in in a query string.

Wednesday, April 8, 2009

Capturing Lead Source Codes in your Forms


Understanding where leads come from is critical in evaluating marketing efforts. Often this is as simple as evaluating a Query String that represents a source code for the web visitor as they submit a form on a landing page.


Typically, this has been done by marketers with javascript, and although that remains possible, it can also be done quickly and simply through the Eloqua application.


Form fields in Eloqua forms are usually used to grab data from the fields that a web visitor fills out on the landing page form, but they can equally be used to grab data from the web visitor's profile when the form is submitted.


To do this, create a new form field, but use the "New Profile Field" option. You will then be pulling information in directly from the web visitor's profile.

In advance of this, of course, you will have set up the web visitor's profile to track the query strings that reference the lead source code. In our case, we have a social media tracking code that is used in various social media efforts, that is in the URLs as "sc=****".


In the visitor profile, we'll add a field that is "Most Recent Choice" of the social media tracking code.


When we create our form field based on this, the most recent social media referral will be submitted in the web form just as if it was data that the user had typed in themselves. The data is then available to form processing steps, reporting, or conditional rules.


To set it up, select the profile field we just discussed as the source in the new field on the form. Nothing else is needed, and no configuration needs to be done with the web form. As the form is submitted to Eloqua, the value in the visitor's profile will be automatically brought in.


This technique is useful in bringing various web activity information into your form submits. Most recent search queries, most recent area of the website visited (based on content tags), most recent refering site, or even raw information such as total number of visits or total pages can all be brought into the form and used for some interesting marketing options.

Friday, April 3, 2009

CRM and LinkedIn Seamlessly Connected


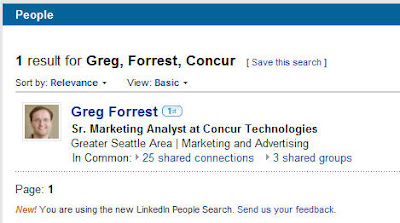
Thanks to Greg Forrest over at Concur for this tip.


A quick and easy tip today to link your CRM system and LinkedIn results to allow your sales team easy access to learn more about an individual or their background prior to a sales call. In addition to the background on their interest you can see through looking at their digital body language with Prospect Profiler, looking at each lead's career history is a great way to find talking points and common ground prior to an introductory call.

In your CRM system, in this case Salesforce.com, within the lead or contact record, structure a link that ties into LinkedIn's search results page. Format it as follows: http://www.linkedin.com/search?search=&company={!Lead.Company}&fname={!Lead.FirstName}&lname={!Lead.LastName}

The {} codes automatically pull in the data from the lead (or contact) record, as is appropriate, and structure a query against LinkedIn looking for that person based on their company, first name, and last name.

It's a quick win that can drive more value for your sales team when you pass them over a qualified lead, and worth doing today.

Thanks again for mentioning it Greg, and if anyone has any other tips on the demand generation tools we all use, and how best to tie them together to optimize our sales funnels, please share them in the comments or directly.

Wednesday, April 1, 2009

Email Reporting - Visual Clickthroughs


Understanding the performance of each of your emails is a key goal in marketing. In many of our emails today, where there are many articles, and numerous offers, analyzing email performance needs to go to the level of the individual link.

That can be daunting to wrap your head around if you are presented with a table of links and the number of clicks, as you'll have to refer back to the email at each step to understand which link was which.

A better technique is to do it visually. With the visual click-through overview, you can see and understand email performance at the level of the individual link quickly and easily.

Start with the standard email dashboard for the email you're interested in. From the top right menu in the dashboard, choose the "Visual Click-through Overview".

The report will show you a view of your original email with the data on number of clicks and percentage of clicks layered on it.

Using this report is a great way to get a better understanding of exactly what offers are driving interest. In combination with A/B testing, you can also understand how offer placement affects clickthrough rates very quickly and easily.

As always, comments are welcome and appreciated.