Friday, February 27, 2009

Quick Tip: Image Properties


If you are working with images in the Eloqua email editor, be sure that you're aware of the image properties dialog that lets you manage many of the key properties of your images.


In the WYSIWG editor, when you have highlighted an image by clicking on it, you will see an "Insert/Edit Image" button in the bottom button bar. With an image highlighted, this will give you access to the properties box for that image, and allow you to manipulate most of the relevant HTML properties of the image.


You can manipulate any of the following image properties:


  • Image dimensions

  • Text wrapping around image

  • Border size, style, and color

  • Alternate text to be displayed when the image is not displayed

Many of these are valuable editing properties, but the alternate text is worth paying attention to. Many, if not most, of today's email inboxes do not display images automatically. When the email first appears, only a placeholder for the image will be shown. Although the best idea is to ensure that your email design is not entirely dependant on images, if images are unavoidable, it can be useful to include alternate text that will show up in the mouse-over of many email clients.

Wednesday, February 25, 2009

Dynamic Dashboards with Groups and Programs


I wrote a little while ago about using Group Manipulation to set up very customized reports that show interesting cuts of your data. We used the combination of Activity-Based Filters and normal Contact Filters to find a list of Executives (Director, VP, CxO) who had shown a minimum level of web activity/interest in the last month. This was just an introductory example of the technique of using Group Manipulation to find, and report on, almost any cut or slice of your marketing data.

I was chatting with Nate Pruitt the other day who is a very smart Eloqua user, and VP Marketing at Asure software, and we were discussing the next level of this technique. How do you make a continuously update dashboard of this data rather than manually manipulating Groups to perform the analysis once.

The good news is that this is also easy to do. The overall philosophy is the same, using Contact Groups and multiple steps to perform the analysis and create the right set of members in a Group. However, instead of doing this just once, manually, we'll use Program Builder to perform the manipulation of Group members.

Step 1 is removing existing members from the Group in order to start from zero. This is simple, we'll just add a Program Step that removes Contacts from a Contact Group (our "Interested Exec" Group), and use the Group itself as a Feeder for that step in the Program. This lets us automatically empty the Group each time we start the process.

Next, we'll use our original Activity-Based Filter to feed the Program with any Contacts who have shown Web Activity of a certain amount in the last month. The rule for that is all built into the filter, so all we have to do is set up a Program Feeder to pull those members in on a daily basis.

Now we have members in the program who are showing the right level of activity, but we're not sure if they are Execs. In the static example we used a Group/Filter combination to determine this, but since we have the active contacts in a Program already, all we need to do is apply a Filter through a Decision Rule.

The Decision Rule will use our pre-existing "Is An Exec" Filter that looks for the appropriate titles, and uses a wildcard search to include execs from any line of business (sales, marketing, finance, etc).

Use the "Contact Is In Contact Filter" Decision Rule and select the existing Filter, and the Contacts flowing through the Program will be split based on whether they are in an executive role or not.

For those who are executives, one final step adds them into the "Interested Execs" Group, and for those who are not, we can just drop them from the Program. Now we have a continually updating list of executives who have shown a minimum level of web interest in the last month.

This is an ideal situation for creating a custom dashboard that shows the members of the group and can be accessed at a glance. It is also a general technique that can prove very valuable in tackling all sorts of interesting analysis and dashboard challenges.


I look forward to your comments on how you have applied this technique in your marketing analysis.

Monday, February 23, 2009

Program Builder Optimization - Batch Mode


Programs are used in different ways; some for lead nurturing, some for lead scoring, some for webinar invites, some for data manipulation. Each way of using Programs has with it a different goal of what matters and what is important in terms of program execution.

In normal run mode, Program Builder executes every 15 minutes, and Contacts will move through one step or Decision Rule per cycle. This is great for nurturing, free trial, and event campaigns as it has a very quick start (less than 15 minutes) and the delay between steps is governed by the marketing campaign itself (ie, emails at 30, 60, and 90 days).

For data-oriented programs, however, you have a very different dynamic. Programs that run lead scoring, data management, and lead routing algorithms need end-to-end processing. In these cases, especially for more complex Programs where there are numerous steps, running each step sequentially is not a great approach.

Instead, you can easily configure Program Builder to run in Batch Mode, in which it runs every two hours, and runs the entire Program end to end. All Contacts in the Program are evaluated through all Steps and Decision Rules.

Choose "Program Run Mode" from the Program menu, and click the "Batch Mode" button at the bottom. If you have Feeders in your Program you will be given a list of Feeders to enable at the same time.

Select the Feeders you wish to enable and click "Enable Program and Selected Feeders" at the bottom of the screen. The Program is now running in Batch Mode, and can be identified by a slightly different icon in the tree view. All Contacts will be processed through all steps every two hours.

Note that Batch Mode Programs do not appear in the Contact Activity Overview.

Friday, February 20, 2009

Quick Tip: Cleaning Up Your Contact Activity Overview


The Contact Activity Overview is a great spot to see exactly what has been happening with a particular Contact in Eloqua and get a good understanding of what they are interested in and what they are responding to - their Digital Body Language. It is also a great overview to share with your sales team as it can give them unique insights into prospect motivations and interests.

Unfortunately, it can also get cluttered with some records, such as Entry and Exit from Programs if you are doing anything like lead scoring or some forms of nurture marketing where Contacts are regularly brought into and out of Programs.

This can be easily fixed with a single check-box.

In the Program Details page for any Program that is cluttering your Contact Activity Overview, you can select the "Hide Program Entry..." option, and the Program Entry/Exit records will disappear. If you ever need to see them again, for analysis or debugging purposes, just uncheck the box and they will show up again (including all historical records).

Sales adoption of the insights you can provide them into their Contacts is often dependant on how simple and smooth the experience is. If you are showing them a Contact Activity Overview that is cluttered with extra data, they are much less likely to use it.

Wednesday, February 18, 2009

Inside Scoop: Prospect Profiler


I had a quick look at one of the upcoming products that the Eloqua development team is working on and it's definitely worth sharing. For anyone who has wrestled with getting sales on board, and having them understand how you are helping in their sales processes, and why they should care about lead scoring, this product will be of interest.

It's called "Prospect Profiler", and it will likely be available in beta just after the Feb 22nd release. Prospect Profiler takes the digital body language of each prospect and makes it even more digestible for each sales professional.

The team used Flex to create a graphically rich and highly interactive way to view the marketing (outbound) and response (inbound) activity of each prospect, including all the details of each email, form, and web visit.

It snaps into CRM systems such as Oracle's Siebel on Demand and Salesforce.com, with Microsoft Dynamics CRM coming very soon.

It's only in beta right now, with limited availability, so let your customer success manager know if it's of interest to you and your sales team, and we can get you on the list. I look forward to your comments on whether this is helping you build and deepen your relationships with your sales team.

Monday, February 16, 2009

New Ways To Think About Reporting - Group Manipulation


One of the most common reports we all want as Eloqua users is a list of Contacts where X and Y are true. It may be as simple as the list of people registered for the next event, or as complex as the list of East coast execs in manufacturing companies who have shown interest in the last month.

The good thing is that whether it is simple or complex, you can usually create the list quickly and easily. For the more complex requests though, the best place to start is with the manipulation of a Contact Group. Rather than trying to create one report that will provide exactly the set of Contacts you want to include or exclude in your report, start with a Contact Group.

For example, if we want to create a report that lists executive level contacts (VP, Director, or C-level) in any field who have show web activity in the last month, it would be a difficult report to put together. However, it is simple to put this report together with some group manipulation.

The reason this is an easier path is that you can break a complex report into steps, and deal with each step on its own. For this example, we'll start by creating a Group of we'll call "Interested - All". Using the "Add Contacts" option allows us to add Contacts to that Group, and we'll use a Filter to add them.

As the second step in our process, we'll create an Activity-Based Filter that identifies all Contacts who have had web activity (let's say greater than 3 visits) in the last month. Selecting this Filter in the Add Contacts step now gives us a Group with all Contacts who have shown web activity.

For the next step, we'll create a Filter that is called "Is An Executive" that uses wild cards to look for "*Vice Pres*" or "*Director*" or "C*O".

In a third, and final step, we'll create a second Group, "Interested Executives" and choose the "Add Contacts" option again. This time we'll use the "Contact Filter and Contact Group" option, and choose our "Is An Exec" Filter and our "Interested - All" Group.

Running this now adds all the Contacts who are executives and have also shown web interest.

From here, the reporting is simple, as you can use the regular reporting available on Contact Groups to provide you with lists, data profiles, or geographic views of the interested execs.

This example is a simple one, but it gives you a new technique that you can use in creating the right slice of your marketing database. By breaking it up into separate steps, and using the filtering, overlap, and activity-based tools available to you, you will find that a lot of new analysis options become possible.

In the next post on this general topic, we'll look at making this whole concept dynamic and continually updating: http://eloqua.blogspot.com/2009/02/dynamic-dashboards-with-groups-and.html


Friday, February 13, 2009

Looking at Interest - Activity-Based Filters


In many areas, interest is equally or more important than explicit data such as title, role, or industry. Whether you are targeting an outbound campaign or scoring leads, an ability to build rules on interest is critical.

That is easy to do in Eloqua with Activity-Based Filters. If you haven't tried them, they are worth getting familiar with as they are useful in so many scenarios. Activity-Based Filters work like the Contact Filters you are familiar with, but look at data on email, web, and form activity.

Again, similar to regular Contact Filters, you can use Activity-Based Filters in many areas, Distribution Lists, Program Decision Rules, Group manipulation, and reporting.

To create one, select "Activity-Based Filter" when you are presented with options in the first screen you see in creating a new Contact Filter. Select the type of filtering you want to do - Clicked through an Email, Opened an Email, Was Sent an Email, Submitted a Form, Visited Hypersite, or Visited Website. Each selection presents you with a further set of options where you can refine the amount of activity and the time over which you want to look.

In combination with tools such as Content Tags, which identify specific areas of a website, this becomes a very powerful tool. By tagging the pages on the Eloqua Artisan blog with a Content Tag, I can now define a Filter to identify people who have seen at least 3 pages on the Eloqua Artisan blog in the last 4 weeks in order to identify people showing interest in the blog.

The ways in which this can be used are numerous, so it is worth exploring to gain familiarity with it. Comments on how you've used it are greatly appreciated.

Wednesday, February 11, 2009

Wait Steps in Program Builder


As we have continued to make it easier to build nurturing and marketing programs in Eloqua, some smaller simplifications have made their way out into production without much fanfare. I'll try to use this blog to mention a number of the small simplifications that you might not have noticed, as they can often greatly simplify how you might have been used to doing a task.

One such capability is the ability to define a “Wait” step that pauses the members of your program for a specified period of time. This is very useful for simple nurturing programs such as a 30/60/90 day welcome program, or for invitations where you might wish to wait a week after an initial invite and then send a reminder invitation to those who did not respond.

Although it has always been possible to build in a time delay with a delay in the evaluation of a Decision Rule, using a Program Step to do so simplifies the layout and readability of your Programs. It is also a simpler and more intuitive way of adding a delay.

To create a Wait step, add a new step to your program as you normally would. For the action, select “Add Wait Step” from the list of options. Your configuration options are quite simple, you select the unit of time (days, weeks, months), and how long of a delay you would like.

As contacts move into the wait step, they will each be delayed by the amount of time you specify, based on when they each individually entered the step. When a program is active, you can easily see who is in the step, and when they entered using the normal Program Step options.

This small enhancement will make it easier to build your nurturing and marketing programs, and easier to read and understand them when they are built. I look forward to your comments on this feature or how you think it can be enhanced further.

Monday, February 9, 2009

Remote Data as a Routing or Segment Criteria - Part 1


In a significant number of the here's-what-I-want-to-do sessions on lead nurturing, lead scoring, or sales hand-off that I've seen whiteboarded, the data for at least one or two decisions comes from a source outside of Eloqua. It might be your customer data mart, it might be your CRM system, it might be any source of customer data in fact.

Using that remote source of data is actually quite easy, and is made up of two steps:

  1. Use the data import engine to automatically synchronize the data into Eloqua (usually to define a Contact Group)

  2. Use that Contact Group to make routing decisions or define a target segment
In this post, I'll go over the first step, getting the data from your remote source into Eloqua, and from there you'll have it in a Contact Group (automatically synchronized). I'll write a part 2 post about how you can use that Group to define routing rules or segments.

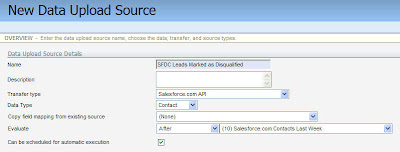
The first step is to create a new data source. You do this under Integration->Inbound, and you can create a new Data Source from the top menu. Note that you'll have to be an admin level user to have permissions to do this, as playing around with data sources can have far reaching consequences if not done correctly. When you create your new Data Source, this is where you'll set up the remote call that you're interested in. This can be API calls against your CRM system (Siebel On Demand, Salesforce.com, MSFT Dynamics, etc), or http calls against custom sources that are web accessible.


For this post, I'll use a Salesforce.com example where we target Leads that have been disqualified within the last 3 days, but the general idea is the same. You'll likely want to create a new External Call, and in this case, I'm going to create an API call. Select the action (Retrieve), the entity (Leads), and the External User to make the call as. (If you're targeting a web source, you will have a similar setup process, but with target URLs and login credentials).

You'll be shown a screen that allows you to select which fields to import, but as we're using this source just to define a contact group (assuming you have this data already synchronized), you can just bring over the email addresses of the leads that have been marked as disqualified.

The more interesting step in the setup wizard is the filter criteria, where you can specify how to filter the leads that are retrieved by the API call. In this case, as we are targeting leads in CRM that have been marked as disqualified within the last 3 days, we'll use a two part filter; Lead Action = Disqualify, and Last Modified Date is Greater Than or Equal To Today - 2 days. You'll customize this filter criteria to the 
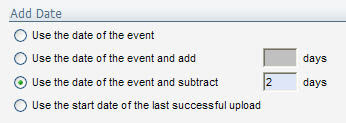
exact process you're trying to configure, but this example should give you a good sense of how it can be done.


For the dates, clicking the calendar icon allows you to set a wide variety of "Today - X" criteria.

From here, we've set up the data source. The next step is to walk through the Contact upload
wizard as you normally would, using this data source. Set up the upload to run automatically on a daily basis, and have it add the Contacts to a Contact Group.

Now you have a Contact Group that is automatically populated with the Leads that have been marked as disqualified in the last 3 days - data that is sourced remotely.


In part 2 of this post, I'll talk about how we can use that group to define routing and segmentation strategies, but for now, I look forward to your comments on how you're using remote data sources to bring information into your marketing ecosystem.

Thursday, February 5, 2009

Inside Scoop - Conditional Steps in Program Builder


There are lots of exciting things coming out February 22nd, our next release of the Eloqua platform. Over the next few posts, I'll give you a quick preview of some of the new capabilities.

One of the quick wins that will help you build yout programs more quickly, and keep them more manageable is the conditional step. It's a simple addition that allows you to build the conditional rule right into a step, rather than having a Decision Rule set up to bypass the step.

Not only is this quicker and easier to set up, but it leaves your programs looking neater and cleaner, and it is much easier to add later if you decide to make changes to a program to add a condition to an existing step.

Build your program as you normally would, but in the Action details for your step, you will now (or as of the coming release) see an Action Condition option. That is where you add the rule for whether the step is to be run or not.

Clicking "Add" brings up a configuration box for the condition. You have a full set of options here similar to your set of options in building a Decision Rule. You can look at data that is known about your contact in order to guide personalization, whether they responded to a prior marketing campaign, whether they have submitted a form or registered for an event, or whether they are a member of a specific group.

Once you decide how you want to define this condition, you have a set of configuration options, again similar to the options on Decision Rules. In our case, we're going to send Email 2 if Email 1 was not clicked on, so we select that option and choose the specific email we're looking at.

With that in place, you are all set. You can have the action execute only if the condition is met, or only if the condition is not met. Using this should allow you to simplify how you build your programs, and keep them even more manageble and clean.

I look forward to your comments on this feature once you've had a chance to try it after the February 22nd release.

Tuesday, February 3, 2009

Sanity Checks and Data Profiling


If you're doing almost anything in marketing, you need good data. Lead scoring, lead routing, personalization, segmentation, and many other processes are only as good as the underlying data. Profiling what you have in terms of data is the first step, as it tells you whether you need to cleanse your data. It may also tell you that your underlying data will not give you the insight you need to execute your scoring or segmentation strategy as you had intended.


The quick and easy way to profile your data is to get a sense of what is in each field. You can do this from any Contact, Prospect or Company Group, and it gives you an overall sense of the consistency and quality of your data.


First, create a group that contains the people you are interested in working with (one technique for defining group membership using overlap is talked about here: http://eloqua.blogspot.com/2008/12/defining-segments-using-group-overlap.html). From there, use the "Field Summary" option in the top menu. This brings up a window where you can choose the field that you wish to profile.


You can profile any field in your data model, and you will see a result that shows the values in that field and the frequency (ie number of contacts) in which that value appears.


Note that you will only be able to profile fields where there is some consistency of data - if there are over 1000 different distinct values, this method will not work.


It's a great habit to get into to do a quick sanity check of your data any time you build a process that relies on it. Data quality is a key foundation for many marketing processes and strategies, and the more you focus on it, the more you will build in processes to ensure that data quality remains high.


If you find that data profiling highlights some data issues, you might find the following useful; a common strategy that many marketers employ in handling their data quality is the Contact Washing Machine described here: http://digitalbodylanguage.blogspot.com/2008/12/contact-washing-machine.html