 (Guest post from Heather Foeh, Eloqua's Manager of SMB Customer Success.)
====================
In this 1-minute video featuring Paul Teshima, SVP of Customer Strategy and Success at Eloqua, explains the benefits of a Welcome Program and why you should consider creating one:
(if this does not load, click here for the video on using marketing automation to create a welcome program)
Now, let’s dig in and build a 3-step Welcome Program in Eloqua. Just follow the instructions below and you’ll be on your way.
Step 1: Build 3 Emails
If you’re not sure where to start with your content, think of Who, What and How:
• Who: Introduce your company. Set the tone for welcoming the prospect into your “home” - this is your chance to be friendly and inviting. Be sure the user has a way to contact you via phone, email and social channels. Also, let them know why they are receiving this communication.
• What: Introduce your products and services. Think of this as the “grand tour” you give someone new when they come to your home. You may want to link to a comparison chart on your website which explains your different product options. If you’re a service company, consider adding a testimonial quote from a happy customer. Highlight your flagship product through visuals and links.
• How: Give the prospect a way to educate themselves further. If you have a Top Ten checklist-type of document, this is a great time to share it. Or perhaps a document outlining “Five Things You Need to Know Before You Buy a _______”?
We recommend putting all three of these emails in their own Email Group in Eloqua so that you can easily report off of them.
(P.S. - Remember to keep it fresh. Add a reminder in your calendar to look at these emails at least once a quarter and make sure that they are still up to date.)
Step 2: Create Your Workflow in Program Builder
Create a new Program and in the setup screen un-check the box that says “Allow members to enter the program multiple times”. In the Default Member Type field choose “Contacts”.
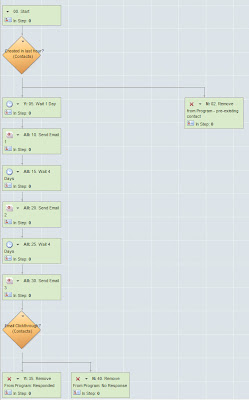
The simplest program will have this flow:
00. Start – entry step without an action, just a holding step
Decision Rule: Created in Last Hour? – This is a check to make sure that the contact is indeed new to your database:
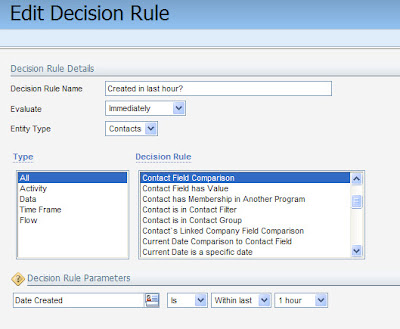
02. No Path/Remove from Program - pre-existing contact
05. Yes Path/Wait 1 Day – this is an optional step but you may want to wait 1 day (or more) before sending someone the first email in your series
10. Send Email 1 – point to the first email that you created
15. Wait 4 Days – the timing is up to you, but we recommend not waiting more than 1 week. Your goal is to engage with people while they’re newly interested in you, so don’t wait too long.
20. Send Email 2 – point to the second email that you created
25. Wait 4 Days – again, the timing is up to you.
30. Send Email 3 – point to the third email that you created
Decision Rule: Email Clickthrough? – Check to see whether or not the prospect has clicked through any of the emails in the Email Group (another reason why it’s nice to have all three lumped together in their own Group)
35. Yes Path/Remove From Program: Responded – by creating two separate Remove from Program steps you’ll be able to easily report on the success of your marketing program.
40. No Path/Remove From Program: No Response
Here’s what it looks like:
Of course, you can get much fancier with this program by adding in decision rules along the way to see what the prospect has already downloaded from your site and then send them different assets. Or you may want to include only prospects who have a low lead score or who have certain titles. But if you’re just looking to get a program up and running, start simple then add complexity after that.
Step 3: Add Contacts to Your Program
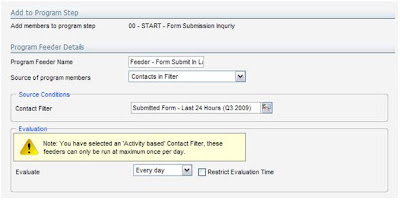
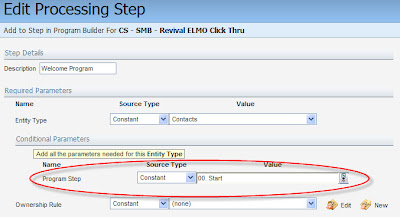
As you know, the beauty of Eloqua is building something once and then letting it run like a workhorse in the background. We lovingly call this “set it and forget it.” The best way to do that for this program is to edit your Forms to push people into it via a Form Processing Step. The Processing Step is called “Add to Step in Program Builder” and you’ll configure it to look for your Welcome Program and the first step (00. Start) in the program:
Another tip: If you are uploading a list and you’d like to drop those names into this Welcome Program, you can do this during Step 4 Upload Actions of the Upload Wizard in the “Add Contacts to Program Step” section.
That’s it! You now have a Welcome Program nurturing all of the new leads in your database. We’d love to hear from you… Drop us a note in the Comments section if you plan to implement this or if you have any ideas or questions.


