Thursday, August 27, 2009

Better Marketing Analysis Through Dynamic Filters


When you run a report within Eloqua, you will often want to understand a bit more about the data that you have within the report. Whereas you can easily export the data for secondary analysis in a tool like Excel, often the easiest thing to do is to dynamically filter the results of your report to get the view you want.

This is easy to do from most list reports (ie, a list of visitors, or a list of contacts).

In the top menu, under Filter, select "Filter these contacts" and you will be presented with a window that lets you define a filter. That filter is applied dynamically to the report you are looking at, letting you quickly see a subset of your data.

For example, if you had a list of contacts who had submitted a web form for a download, and wanted to understand how effective that marketing campaign had been at targeting CEOs, you might add a filter for "Title = CEO". Note, however, that the need for a contact washing machine becomes very clear in doing this. If we have not managed the data quality of our incoming title data, it will be hard to define a good filter. However, if the data has been standardized and normalized, we can work with a normalized Title field that can be easily filtered.

With the "CEO" filter layered on to our results, we can quickly see whether the campaign has been effective at generating responses from top execs. The filters can be quickly and easily removed or changed, which lets you work with any list report to get a better sense for the data it contains.

Dynamic filters on reports are a quick but powerful tool for getting better insights out of your marketing data.


Tuesday, August 25, 2009

Experts in the Field - Pedowitz Group's Sweet Platform for 2-way SMS


Many times when we're thinking of marketing automation, we're thinking of interacting with users while they are on their computers - email and the web being the main forms of interaction. However in some situations, your audience is not at their computers, and new approaches are needed.

The Pedowitz Group has developed their Sweet platform for just this purpose. It enables (among other things) 2 way SMS (text message) interaction, so if you have an audience at a tradeshow, a conference, a sports venue, or anywhere they are not at their computers, you can quickly and easily enable them to interact with your via their mobile device.

Quite simply, the Sweet platform allows you to promote a text message address (known as a short code) such as the following wherever you are at:

text TDGARDEN yourname@yourdomain.com to 37619

(Go ahead and try it if you are interested - US #’s only - and the campaign is no longer active so you won't win anything)

This can be promoted at your tradeshow booth, on the big screen at a game, or on a bill-board, however you decide to promote it, and with whatever offer you want to make.

What happens next is where Eloqua gets involved. The Pedowitz Group's Sweet platform captures the inbound messages, and processes them, handling all of the data and subscription management. It then passes those messages to Eloqua as standard web form submits.

Whatever you can do with Eloqua forms or a marketing automation program, you can now do immediately when a person text messages you based on your promotion. Outbound SMS messages can be handled via the Sweet platform, or via Eloqua's SMS capabilities within a marketing automation program - whichever is appropriate.
The possibilities are endless, and quite interesting. I look forward to hearing what campaigns you've run using mobile marketing and text messaging solutions.

Thursday, August 20, 2009

Address Validation and the User Experience


It’s challenging to optimize the forms on your landing pages to make sure that you maximize both your conversion rate and the quality of the data flowing into your marketing database. The more fields we require, the worse our conversion rates are.

Similarly, performing inline validation on form data that prevents a submit can be very dangerous if done incorrectly as it will prevent submissions or frustrate visitors. One area that offers great promise to optimize is in the realm of address correction. If you are collecting physical addresses, either to use for direct mail marketing or for management of sales territories, you want the addresses to be correct.

However, we have all had experiences with websites that attempt to force an inline correction of our address and end up frustrating us as visitors.

Luckily, there is an approach that balances data quality with customer experience. Using a built-in function within your marketing automation programs, you can leverage Pitney Bowes global address standards database to automatically correct your addresses. This allows you to let visitors to your website experience a very flexible free-form approach to entering their addresses, but allows you to quickly correct those addresses to ensure that your data is very accurate.

To do this, from your marketing automation program, create a step that is an "Address Correction" step, into which your contacts, prospects, or companies will flow. The action, available under the "Data Tools" set, is "Run Address Validation". Note that this is a paid service, but the per-hit fee is very reasonable.

Within the program builder step, that is all you need to configure. However, if you want to configure the fields that are sent/returned for correction, you can configure them in the Setup area.

Go to Setup->Management->System Management->Add-on Manager to manage the address validation add-on.

Select the Address Validation add-on.

Within the setup interface for the Address Validation add-on, you will see a Task menu in the upper right corner, under Tasks, select Set Field Mappings.


This then gives you the mapping interface for the set of fields that are sent out to the address validation service and returned in a corrected manner. Select the fields from your own marketing database that you would like to use, or use the defaults that are already set.


If you use an address validation service, rather than forcing the user to wrestle with an inline validation, you allow the 5% of new or unknown addresses to pass through without causing user frustration.

Tuesday, August 18, 2009

Insights on Data Quality from Contact Group Dashboards


Understanding your data is one of the most critical things to do as a marketer. Data is a foundation for everything you do; lead scoring, segment definition, content personalization, lead routing, and marketing analysis. Without good data, each of those tasks will be challenging if not impossible.

One of the most powerful tools in understanding your data is the contact group. It lets you build almost any cut of data that you want. Most simply, this can be done with simple group overlap rules that show people who are in group A, but not group B for example.

A slightly more advanced technique is to combine groups and filters to perform robust group manipulation to create a combination of activity and data as a driver for a group definition. This process can be further automated using a marketing automation program to dynamically create a dashboard based on group membership.

With each of these techniques, you are provided with a one-click dashboard of the group. By selecting "Contact Group Dashboard" from the menu, you get a full suite of interesting reports showing you what is happening with that group and the contacts in it.

One of the most interesting reports in this dashboard is the Contact Field Completeness report. This report shows you, based on a view, how complete the fields are in contacts within that group. Each field is shown as being between 0 and 100% complete, giving you good insight into whether you have data to work with for the set of contacts in your group.

However, more interesting than this, is the results you get by clicking on a field of interest. For example, if we click on the "Title" field (98.2% complete), we can see that the data within that field is from a manual text field as it is obviously free form.

A quick look at this data gives you a good sense of whether it is of sufficient quality to build rules upon.

Using this dashboard to quickly understand your data gives you a very quick sense of where you are at and what areas you need to work on in terms of data quality.

Armed with this understanding, you can quickly tune your contact washing machine to best optmize the data that you have and the data that you need. With cleansed and normalized data, building segmentation rules, lead scoring rules, content personalization rules, and marketing analysis becomes significantly easier.


Thursday, August 13, 2009

Lead Scoring for Sales Enablement - Visual Cues in Salesforce.com


We all know that sales people are visual people. We touched on that quite a bit in last week's post on sales enablement. Rather than interpret a list or a number, they would much rather quickly look at a picture to indicate whether a person was qualified as an individual, or hot or cold as a prospect.

This visual orientation is one of the main reasons for the popularity of Prospect Profiler among sales professionals, as it provides this quick, visual view of what is happening with a prospect.

However, even without Prospect Profiler, these visual cues can be extremely valuable to your sales team. Having a visual indication of whether an individual is qualified and/or interested, is something you can configure quickly and easily within salesforce.com or your CRM system of choice, without any additional cost.

To do this is very simple. Essentially, you are building custom formula fields, where the "formula" returns an image that represents what you are interested in displaying.

To get started, go to the setup area, and under Leads->Fields, scroll down to Lead Custom Fields, and add a New field.

From here, you will be guided through a quick wizard to set up the field. The type of field you want to create is "Formula" as we will be applying some logic to the image display, and the output type is Text.

Provide a field label for your field, such as if we are building an image of 0-5 stars to represent how qualified a person is as a buyer (explicit score), we might label the field "Explicit Rating Image".

From here, you are presented with a Formula screen - select the Advanced Formula tab to get started. Note that we are just creating a formula to look at the Explicit Lead Score (which is already present) and return an image. We are not building a formula to actually score the leads, which will have been done in Eloqua, based on the best practices for lead scoring, and passed into Salesforce.com.

There is a small amount of code being used here, but nothing to be overly concerned about, as you can edit an existing code sample in order to build the exact image you require.

When we are looking at the explicit score, it may vary between 0 and 100, so we'll return 0 to 5 stars based on where it sits in that range. The first thing we need to do, however, is to tell the formula which field it is looking at to find your lead's explicit score.


Click on "Insert Field" and a dialog box will give you a list of your fields. When you select it, the internal name for that field is inserted in your code. You'll need to replace the internal name in any of these examples with your own in order to have it work in your CRM system.

For this example, to look at an explicit lead score field called "LS_Explicit_Score" (replace this with your own), and display stars based on the range of values in the score field, the code would be as follows:

IF( LS_Explicit_Score > 80,
IMAGE("/img/samples/stars_500.gif", "5 star"),
IF( LS_Explicit_Score > 60,
IMAGE("/img/samples/stars_400.gif", "4 star"),
IF( LS_Explicit_Score > 40,
IMAGE("/img/samples/stars_300.gif", "3 star"),
IF( LS_Explicit_Score > 20,
IMAGE("/img/samples/stars_200.gif", "2 star"),
IF( LS_Explicit_Score > 10,
IMAGE("/img/samples/stars_100.gif", "1 star"),
IMAGE("/img/samples/stars_000.gif", "0 star")
)))))


You can see that this also takes into account the range of scores (ie 0-100) you have in your scoring, so it is important to make sure your lead scores don't grow with time more than appropriate, and that the right scoring caps are in place. This ensures that your scores remain cleanly between 0 and 100 as they should.

With this in place, you can then define who the field is visible to, and edit the Lead Layout to add in your field where appropriate. Generally, it is a good idea to drage the field for the images next to the number for the score so your sales team begins to get a feel for the underlying numbers.

This same process can also be followed for the other dimensions of lead scoring, such as implicit scoring (how interested a person is). Follow a similar process, but build your formula off of the implicit score. If you wanted a formula that would use a Consumer Reports style set of partially colored circles to represent the score, the following would work:

IF( LS_Implicit_Score > 80,
IMAGE("/img/samples/rating5.gif", "High"),
IF( LS_Implicit_Score > 60,
IMAGE("/img/samples/rating4.gif", "Med-High"),
IF( LS_Implicit_Score > 40,
IMAGE("/img/samples/rating3.gif", "Med"),
IF( LS_Implicit_Score > 20,
IMAGE("/img/samples/rating2.gif", "Med-Low"),
IF( LS_Implicit_Score > 10,
IMAGE("/img/samples/rating1.gif", "Low"),
IMAGE("/img/samples/s.gif", "no rating")
)))))


Again, you will want to replace LS_Implicit_Score with the name of the field in which you store your implicit score. Continue this process for any other fields you like.

If the field you are building a rule from has a ranking or stage such a Hot/Warm/Cold or A/B/C, rather than a score that comes in a range (0-100), you can use a slightly different way of writing the code, using a "Case" statement, as follows (again, in this example, replace "Rating" with your own field, and the A/B/C values with the values you expect in that field:

IMAGE(
CASE(Rating,
"A", "/img/samples/flag_green.gif",
"B", "/img/samples/flag_yellow.gif",
"C", "/img/samples/flag_red.gif",
"/s.gif"),
"status color")


With this in place, you can easily provide your sales team with the visual cues they need to quickly and easily understand which of their leads are qualified, which are interested, and which require follow-up.

Tuesday, August 11, 2009

Naming Conventions - A Simple Technique with a Big Payoff


Today's guest post is from Joel Rothman, one of our Senior Product Consultants. Joel spends a lot of time innovating new services and deploying our larger enterprise clients, so he has a lot of experience with how to make a marketing automation deployment successful.

Often, as Joel relates, it comes down to getting the basics right. In today's post, he talks about a simple thing - naming conventions - that can be put in place easily, but will pay many dividends in a larger organization's marketing efforts.


==============================


While not really as sexy as “Contact Washing Machines” or dashboards, a proper naming convention is a simple thing that can have great returns. Better to spend 5 minutes now thinking about it, then a few hours later trying to fix it.

Naming conventions can help you organize your assets within Eloqua to make it easier to find in select lists. It can also help with searching across the platform. And, if you are integrating things like Campaigns with your CRM system, it can help you get the most out of reporting in that system too! I would go as far as to recommend that you use consistent naming conventions across all your systems, if possible.


A solid naming convention could be used for consistency around the application, from Campaigns to emails and other channels.
There is no one size fits all naming convention. Best bet, make it as short as possible, while still be as descriptive as possible. Something like this would work well:

Region/Quarter/Initiative/Type/Name


So, you could end up with something like:

EMEA-Q109-LN-WP-NAME

OR

NA-Q209-LG-WB-NAME


Region/Initiative are things that are very specific to the way you do business, and I have seen them called various things. But, I would always recommend having at least a time frame and a type. For timeframe, it can be yearly or monthly, but I find quarterly usually works best. You also need to think through if it’s going to be the starting date of the planning or the execution. I would recommend the start date for the execution of a campaign. For type, things I normally see are webinar, seminar, tradeshow, whitepaper, direct mail, search engine etc…

Now, this is just an example, you would definitely need to choose a naming convention that fits your business. I have seen clients create spreadsheets that help generate the name for you, which is a good way to promote consistency.

If you are late to the naming convention party, I would say come on in, grab a party hat, it’s better late than never. Pick a date, and move forward with all assets after that date. Because naming conventions are about consistency, it’s not something I would roll out for a subset of assets (like emails, but not forms). Rather, it’s something you probably want to do with as much as you can. I haven’t seen any clients go back and change existing assets that were already executed on to line them up with a naming convention. However, assets that are still being used should probably be renamed.

Thursday, August 6, 2009

Getting Started with the Eloqua Web Services API


Aaron Riley joins us this week as a guest blogger. I'm very excited to have Aaron contribute a few posts as he is one of our senior product consultants, and spends a lot of time helping our clients and partner work with the Eloqua web services API.

I hope to feature a number of interesting extensions of the Eloqua platform here in the coming months. Some of the innovations I have seen that extend the marketing automation or multi-channel marketing elements of Eloqua, especially from our partner community, are quite exciting.

If you have been thinking about getting started with the API to build your own extensions, here's Aaron with a quick walk through of how to get started


===========================================


Web Services and Demand Generation


Tighter business alignment and decision making requires more integration, automation, and the ability to report across multiple systems. Using web services, you can connect back office systems, CRM systems, databases, social media sites, and other offline media with Eloqua.


At Eloqua, our web services API allows for:


1) Bi-directional integration between Eloqua's marketing automation platform and on-premise or custom CRM systems


2) Connecting marketing automation with social media, such as Facebook, Twitter, or Linked-In


3) Automating lead nurturing workflow in concert with other web services such as telemarketing or inbound SMS providers


4) Exporting your marketing data to a data warehouse for Business Intelligence (BI) and reporting for more advanced marketing analysis than what is native to Eloqua


The API gives access to the contact, company, visitor, groups, and data card entities, as well as marketing activities. We currently have over 100 clients using the API and have certified partners who can help.


Getting Started


1) Reach out to your Customer Success Manager (CSM) and ask for the API to be enabled. It won't be enabled by default in your instance, but we'd be happy to turn it on for you.


TIP: Access Customer Central for documentation and examples.


2) Create a user in Eloqua and add them to the API User security group.


TIP: Test your user and password.


3) Import the WSDL into Visual Studio 2008 as a service reference.


4) Run the following “Hello World” VB.NET snippet to get you started:


TIP: Customer Central has code samples in other development languages if you prefer

Public Class Test
Public Sub New()

Dim elqService As New EloquaAPI.EloquaServiceClient()
elqService.ClientCredentials.UserName.UserName = "COMPANY\API.USER"
elqService.ClientCredentials.UserName.Password = "********"

Try
Dim result As EloquaAPI.DescribeEntityTypeResult
result = elqService.DescribeEntityType("Base")

Dim entry As EloquaAPI.EntityType

For Each entry In result.EntityTypes
Console.WriteLine(entry.ID)
Console.WriteLine(entry.Type)
Console.WriteLine(entry.Name)
Next

Catch exS As System.ServiceModel.FaultException
Console.WriteLine(exS.ToString)
Catch ex As Exception
Console.WriteLine(ex.ToString)
End Try

elqService.Close()
End Sub

End Class

You are now connected and ready to integrate your marketing efforts with the rest of your business, update your data warehouse, or further your automated lead nurturing efforts.

Tuesday, August 4, 2009

10 Ways for Marketing to Enable the Sales Team


Marketing and sales often don't enjoy the best of relationships. The great news is that this situation has an amazing opportunity to change. Marketing can, right now, provide their sales team with insights that can make a tremendous difference in their lives and drive bigger commission cheques for them. Nothing changes a relationship with your sales team faster than a larger commission cheque.


Here are 10 things you can do, with Eloqua and your CRM system that will quickly deliver a lot of value to your sales team:

For Their Territories:

1) Territory Traffic Light Dashboard - For each sales person's territory, configure them a "traffic light" dashboard that gives them an instant view of which of their accounts are showing buying interest.


Here's how to build a Territory Traffic Light Dashboard


2) Territory-Based Email Alerts - configure for each rep, automatic email alerts for the accounts they own. This will give them a real-time indicator of buying interest, and let them manage the accounts proactively based on buyer interest.


Here's how to set up Territory-Based Email Alerts


3) Unknown Company Visitors - Show them which companies are on the website doing research who may not currently be known to your organization, give you a great opportunity to initiate a conversation as a buying process starts at that organization.


Here's how to configure a report on Unknown Company Visitors


For Their Accounts:


4) Account Insights and Key Players - Give each sales person a roll-up view that shows, for each of their accounts who the people are who are showing interest and what they are interested in. Armed with this insight, your sales team can quickly determine what the key conversations they need to have are.

Here's how to show sales a report that provides Account Insights and Key Players


5) Configure Your Social Media GPS - Identify social media activities and pass those through to your CRM system so that your sales team can understand which accounts, and which individuals are engaged in social media conversations. By presenting the prospect's social media activity within your CRM system, you enable your sales team to understand new context to the prospect interaction without leaving an environment they are comfortable with.


Here's how to Configure Your Social Media GPS


6) Find Sales the Right Contacts - Integration into role-based discovery services to drive real insight into who can make a purchase decision, not just a raw list of quasi-targeted and out of date names. Often, the person doing the bulk of the research is not the ultimate buyer, so discovering the names of the inviduals in the right role can be very beneficial to your sales team.

For Their Contacts or Leads:


7) Prospect Profiler for Sales Insights - enable Prospect Profiler in order to provide a rich, interactive, graphical view of each individual's interest. This allows your sales team to guide conversations and know who is showing the right level of buying interest.
Here's information on Eloqua's Prospect Profiler for Sales Insights

8) Show Areas of Prospect Interest - Configure your CRM integration to identify areas of your website that a person is showing interest in and highlight those within their concact or lead record in your CRM system. This enables sales to immediately know which topic of conversation will be most warmly received. Be sure to also use graphical imagery to more clearly highlight interest.
Here's how to Show Areas of Prospect Interest to sales in your CRM system

For Your Communications

9) Send-on-behalf-of-Sales - Have your marketing team send outbound email campaigns on behalf of your sales team. Not only does this drive a much higher response rate to the email campaigns, but it also builds upon the salesperson's relationship with the prospect and provides a great opportunity to start dialogs.

Here's how to set up your marketing campaigns to be Sent-on-behalf-of-Sales

10) Provide Sales with Content - provide marketing-created content to your sales teams in their Outlook desktop email environment so they can find great content, personalize it, and send it in a trackable way to their prospects quickly and easily.

Here's how to Provide Sales with Content within their Outlook environment


There are many ways that your marketing team can enable your sales team, and the 10 ideas above are great ones to get started with. In today's environment, it is possible for marketing and sales to have a much stronger relationship than they ever have had before, and it all starts with sales enablement.

Thursday, July 30, 2009

Enabling Sales with Eloqua for Microsoft Outlook


Your sales team will be communicating with your prospects. That is unavoidable. It is also the fear of almost all marketing organizations. Will they use the right messaging? Will they take advantage of the right tools and content? Is their grammar and tone appropriate?

Many marketing organizations have legitimate reasons to fear sales-created content, as it is often sloppy, off-message, and outdated. However, sales will complain that marketing content is not easily accessible to them, needs to be tweaked slightly to meet their exact needs, and feels too "marketing" in tone.

Eloqua for Microsoft Outlook is designed to be a balance for that. It allows you, as a marketing team, to provide content to your sales team that is:

- Centrally managed and updated, ensuring it is always up to date

- Available to your sales team where they work, in Outlook

- On message and on brand, but allowing your sales team to personalize as needed

In order to do this, there is a small plug-in for Outlook that is downloaded and installed into each salesperson's Outlook client. To get the plug-in, go to:

Setup -> My Settings -> Eloqua for Microsoft Outlook

and download the plug-in from there. Note that this is part of the sales toolkit, so you will have to have that module.

Download the plug-in, and walk through the installation wizard. You will be asked for you login credential with Eloqua, and once you have configured them, you will see a small toolbar at the top of your Outlook screen.

Clicking on the "Eloqua Templates" button gives you access to the marketing-supplied template library. As a marketing team, you can easily configure which emails you want accessible to sales through this interface by setting that up in the main application.

When the sales person selects a template and downloads it, they are within the normal, familiar Outlook email interface. From here, they can personalize the message as they see fit, and can add their own messaging.

Generally, what we have found is the most effective content for Eloqua for MS Outlook is very plain, natural content, as would be written by a sales person themselves. Highly graphical, rich content often does not end up being used by sales people as it feels less natural.

With the content selected, and edited, the sales person can send to one person, or to a list of people (marketing controls the size of the list they are allowed to send to, generally you want this to be only a few folks, 50 or 100).

When the email is sent, it is of course tracked through Eloqua giving immediate sales ingights into prospect interest levels and areas, unsubscribe preferences are respected, and the analysis is immediately available.

If sales edits marketing-supplied content, or creates content of their own, they can, of course, save those templates in their own personal library for later reuse. Marketing can relax knowing that sales is starting with well crafted, on brand, on message content. Sales can thrive now that they are able to get immediate access to the right content from their natural workspace.

A full suite of analysis is of course available for individual sales people to understand their own effectivenss, and for marketing to understand which sales people are adopting the marketing content and seeing success with it.

Tuesday, July 28, 2009

Optimizing your Marketing Automation: Tips from the Guru


This week's post is a guest post from Andrea Corey, our VP of Systems Architecture, and the guru of Program Builder optimization. She and her team are responsible for all the scale and speed initiatives behind Eloqua's architecture, and were the key folks behind the work that was highlighted in the recent Dell case study on Eloqua's marketing automation platform performing at one billion transactions per day.


In this post, Andrea offers a number of great tips on how to think about your programs so that they operate as smoothly as you need.
Enjoy,

Steve


====================================


Program Builder offers two main processing modes: Regular mode and Batch mode. Each can be effective at enabling many Marketing Automation needs; what follows are some helpful explanations and suggestions for optimizing your programs.

Regular mode, the default mode, is ideal for lead nurturing, free trial follow-ups, event follow-up and similar processes where you wish to send out communications or evaluate contacts over the course of a period of time. Regular mode programs process program members at 15-minute increments. In case you are new to Program Builder, this means that every 15 minutes, program members will move from one step to the following step in the program (assuming they are not waiting in a step due to a time-based rule).


Whether there are one or more decision rules between the two steps, all decision rules are evaluated in sequence in the same cycle. Therefore, to optimize your programs, you may wish to employ decision rules in sequences, rather than placing steps between the decision rules.
You will also want to avoid “empty steps” such as the first step in the program – many new users don’t realize that the first step in a program can in fact perform an action.

Now you’re wondering how to avoid that first empty step if your first operation is to run a decision rule in order to branch the records… A tip to consider is to have your members enter the program at different steps – based on what you know about the records when you add them to the program. For example, if your members are flowing into the program from a form, consider multiple conditional steps that push members into specific program steps.
Alternatively, you can establish several feeders, instead of just one, in order to optimize where the members start in the program. These are advanced configurations, and may require extra planning and design consideration, but they can be useful for decreasing the time it takes to run your automated processes.

If you find that program members are taking longer than you would like to progress through to the end of your program, you may want to consider doing your marketing automation in Batch mode. Batch mode is often suitable for lengthy or complex workflows and for bulk data processing such as data normalization. In this mode, members are fully processed from the start of a program through to the end of the program every two hours.
Even better, you can prioritize Batch mode automation programs such that they are evaluated in a specific sequence. Some customers have set-up several programs sequenced in batch mode – very complex and granular lead scoring, lead rating, lead assignment programs that are modular, yet process this entire set of processing every two hours. You can see how this enables far more complex logic to be efficiently leveraged.


I must add a disclaimer regarding Batch mode. When running in Batch mode, marketing automation programs do not maintain the detailed step-by-step history that can be useful when initially building and testing programs, so I recommend that you enable Batch mode once you are satisfied with your program’s configuration.

I’d love to hear feedback on how we can improve Program Builder to make you more effective in your marketing automation.

Thursday, July 23, 2009

Data Management, Deliverability, and Unsubscribes


At a recent Eloqua user group, there was a conversation around data management, cleansing, and permission management that led to a few key things being clarified, so I wanted to capture the general discussion here.

We’ve talked quite a bit about managing your active and inactive contacts in your database in order to keep your engagement levels high during a lead nurturing campaign. At a certain point, if you marketing database has grown large, and has been operating for a number of years, there may in fact be a number of contacts in your database that should be cleaned out entirely. This cleansing is a natural process, as people change jobs and with it change email addresses, or change personal email addresses, leaving their old email addresses dormant.

A large number of dormant email addresses in your list will decrease your overall campaign response rates, and may in fact cause a noticeable decrease in your deliverability rates as attempts to communicate with non-existant email addresses can cause you to be flagged as a potential source of spam. You will begin to see this in running deliverability tests against seed lists using the embedded testing tools within Eloqua.

The best technique in this situation is to cleanse these dormant addresses in bulk. You can do this from the Data Manipulation menu by selecting "Delete All Contacts in Group". Note that this deletes the Contact records entirely from the database.


The question, however, is what happens to those who have unsubscribed if their email address does end up back in your database again? Is that history of unsubscribing lost? Obviously, in order to stay compliant with both the spirit and letter of the law, you need to ensure that this is not the case.

The good news is that with Eloqua, the contact record and the subscription record are separate. If you have a contact, Jane.Smith@Acme.com, who unsubscribes, then is deleted, then is re-added, Jane.Smith@Acme.com will still be marked as an unsubscribed contact. The data on the contact (name, address, group membership, etc) is deleted when you select to delete the contact, and it will not return on re-adding the contact, but the record of their subscription status remains.

This is a critical point as it allows you to make your data management decisions without being unduly worried about losing contact unsubscribe data.

Tuesday, July 21, 2009

Marketing Analysis and the Lead Funnel


In thinking about B2B marketing analysis from the perspective of a top-down view of a balance sheet and income statement of lead metrics means that we need to look at the stages of the buying funnel a bit more objectively. A balance sheet view would give us a current (or past) point in time view of what leads are at what stage, and an income statement view would give us an indication of the transitions in stage that took place within the time period.


The first step is to define the stages of your buying process more explicitly. This can be as simple as the Sirius Decisions model of Inquiries and Marketing Qualified Leads, or it can be a unique mapping of the buying process stages of your business. The number of stages in your buying funnel will depend on your business and how your buyers buy.


With the stages defined, however, you can then begin to model them as part of your marketing analysis. Within Eloqua, this means defining the lead stages/ranks. In Campaigns, under "Inquiries & Leads", select "Lead Ranking Systems". You can define a lead ranking system to model your buyers buying process as you need.


Each leve you define has an order, a name, and a text value. The text value is what is written to the underlying contact or prospect when a lead is defined as being in this stage.


To indicate that a contact or a prospect is a lead at a certain stage of the buying process, you must build a lead ranking rule. Under Data Tools, build a lead ranking rule for each stage in your buying process.


With that in place, you can use a lead ranking rule whenever you want to define that a lead is at a particular stage. The text value for the lead rank/stage is written into the contact record, so existing processes that may be dependant on seeing data in the contact record are unimpacted.


The lead ranking rules can be run anywhere it might make sense; on groups that have been uploaded, such as lists from events or tradeshows, in form processing steps to indicate that anyone submitting a certain form is at a certain stage of the buying process, or within program builder.

Running a lead ranking rule from within program builder is done in a similar manner to how leads were ranked as being a certain stage using data update rules. Except that when done within a lead ranking system, the lead rank is stored historically, and forms a basis for all of your marketing funnel analysis.


With your lead funnel data flowing through as formal lead ranks, you will be able to easily represent it in funnel reports in the campaign analysis area. More importantly, when it is tracked in this way, a historical record of the lead rank for each person is kept. This allows you to view how each person's lead rank has changed over time, and begin to understand how your marketing campaigns have facilitated moving buyers through the lead funnel.


(*Please note that the capabilities described here are currently available only with Eloqua Team edition)

Thursday, July 16, 2009

Sales Enablement: Account Traffic Light Dashboards


Enabling your sales team to succeed based on your marketing automation investments means ensuring that you can show them insights into their accounts and territories that they might otherwise not have been able to see.

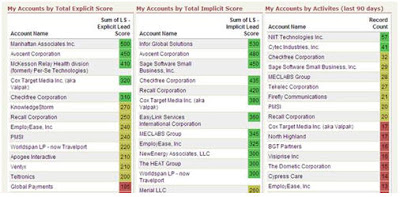
An excellent way to do this is through the use of a "traffic light" dashboard that shows each salesperson, for their own territory, the hot, warm, and cold accounts that they own.

The use of a "traffic light" dashboard, to do this in green, yellow, and red has proven an excellent tool in many sales organizations as it allows salespeople to determine, at a glance, which accounts are showing buying interest.
To set this up in salesforce.com is quite easy. I've included the salesforce.com instructions here, but a similar process for Microsoft CRM or Oracle CRM On Demand should also work.

The first step is to create a report that rolls up the individual lead scores of the contacts in an account to the account level itself. Note that to do this project, we're relying on you already having set up a good lead scoring process, with that data integrated into your CRM system.

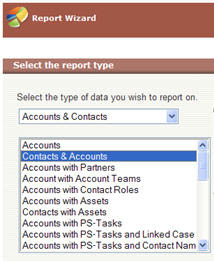
Build a report on "Accounts & Contacts" and select the "Contacts & Accounts" option to bring in data from both the contact (ie, their lead score), and the account (account name, etc).

When you are asked for a summary type, select a Summary report in order to allow us to aggregate the lead scores of each contact in the account into an overall lead score.

Although a sum of individual contacts' lead score is not the most perfect way of defining the exact score of an account, it does provide an excellent, directional view of which accounts are showing interest and should be contacted.
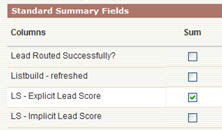
You will be asked to select your Summary Fields. Under Standard Summary Fields, select a Sum for your Explicit Lead Score field. This process can be repeated for Implicit Lead Score also, at a later point to build a second traffic light dashboard component based on buyer activity. Both implicit (how interested) and explicit (who) provided unique and valuable dimensions of lead scoring, and are worth dealing with separately.

With this sum field selected, you will be asked to select how to roll up your data. We'll roll it up by Account Name in order to show the aggregate lead score for each account in a rep's territory. Note that this view provides an account level overview of which accounts to talk with, and very elegently complements the sales insights provided by Prospect Profiler to give you a good detailed view of an individual's area and level of interest.
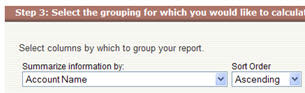
The sort order of this column is not important as we will be changing this later for the dashboard.

The next step is to select the field that we are interested in. As we will be rolling up by account, the contact fields are not of interest and can be deselected. For account fields, select those that are of interest to you for a high level view, such as Account Name, Account Owner, and Industry.

Similarly, on the next step, the order of the columns can be selected in any way you would like. It will not affect the final dashboard, so order the columns as you wish.

Selecting your filter criteria now allows you to build a report that is unique to each salesperson for their territory. Whether you use account ownership, or more detailed data-level criteria to define an account ownership structure, you should be able to build an appropriate filter set to allow each salesperson to see accounts in their own territory.
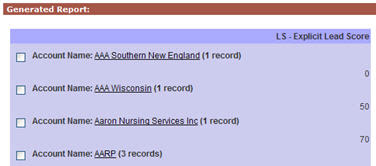
The one thing you will want to do on the filter page, under advanced settings, is to hide report details. This hides contact level details, and allows the report to only show the account level rollup of the overall lead score.

The display options on the next step are also not relevant as we will be showing this report in a dashboard, which will determine its own display settings, so just click Run Report to generate the report and verify that you have a rolled up lead score for each account in the target territory.

Save this report as we will use it to generate a dashboard from. You may again wish to create a similar report based on implicit lead score, and you will likely see demand from each of your sales reps for a similar report in their own territory, so you will likely end up with a series of these reports.

Now that we have a report created, the next step to tackle is to create the traffic light dashboard based on that report.

The common way to do this is to create a new, three column dashboard, and add in each view as a component with that dashboard to give salespeople a territory map to work from.

When you have created a dashboard, add in a component to represent this report. Make the component a "Table" component type, and give it an appropriate title such as "My Territory's Accounts by Explicit Score".

Select the report you have just created as a source report in order to bring in the data on accounts with rolled up lead score. You will likely want to set the Sort order to "Row Value Descending" in order to show the highest scored accounts first, and usually a maximum of 25 or 50 values displayed keeps the report manageable.
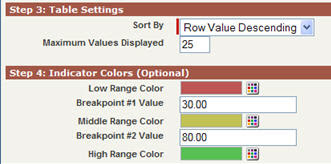
You can then set, based on your lead scoring ranges, where you want the traffic light colors to show. For example, if you have a 0-100 scoring range, you may want 0-30 as red, 31-80 as yellow, and 81-100 as green. You will find that this clearly shows why it is so important to define lead scoring caps and buckets so that scores do not get unweildy and are maintained within a workable range.

With that in place, you are ready to go. Save your dashboard, and work closely with your sales team to ensure that you have the right ranges identified, and the right way of defining territories to ensure that they are seeing the highlights of their own accounts.

Your sales team will be able to quickly discern which accounts are showing interested and should be called, and by doing so, will quickly become much more effective in their selling.

Tuesday, July 14, 2009

Perfecting Delivery and Viewing of your Emails


Ensuring that your emails are delivered as intended, are not flagged as junk, and appear correctly regardless of the recipient’s inbox is a critical thing to consider in managing your communications.

There are many critical things you should do in order to maximize your email deliverability, and ensure that your email content is highly relevant to your recipients. To understand where you are and where you need to make more progress on, however, there is no substitute for frequent testing.

To make this easy for you, Eloqua comes with a built in suite of tools to allow you to test and analyze a variety of these key areas. We talked about the analysis and reporting tools for email deliverability a few weeks back, but now we'll look at more proactive tools for understanding your email prior to sending.

For any email you are interested in analyzing, choose QuickSend Email to bring up the QuickSend interface and use the External Testing tab. This allows you to run a number of tests against that email to verify how it is delivered and presented to the recipients. For most clients, these tests are included in your subscription (up to a set number per month), talk with your customer success manager to verify.

The Inbox Viewer test shows you a preview of exactly what that email looks like in a particular inbox or email service provider. Many clients render images, layouts, backgrounds, or styles differently, which can alter the way your email appears, and hence its effectiveness. When you run the inbox preview tests, you are given a report which displays exactly what the recipient will see.


Whereas we would all like it if there was a single standard for what content can be displayed in an email client, and how it should be rendered, the reality is that there are significant disparities. The combination of browser and email service provider for web-based providers adds a new dimension as Gmail under IE may render differently than Gmail under Firefox.

On top of this complexity, rendering images may be prevented by the email client, by being offline, or by not being supported on a mobile device. Viewing how your emails render with and without images is crucial to ensuring that they connect with your recipients.


The Email Content test analyzes the content of your emai looking for known issues in your content, the format of your HTML, or your writing that will cause issues with recipient systems.

This is a very deep and powerful test, very much worth looking at. It analyzes your content for potential viruses (even embedded forms can be seen as viruses by some filters, due to credit card scams), and then looks for known triggers of spam flags as well as using common Bayesian (adaptive) filters to look for common flags.

Also included within this report are a variety of accreditation and authentication tests to ensure that your IP address is properly identified as yours. As this is managed by Eloqua, you are unlikely to see any problems in this area, but should any arise, be sure to notify your customer success manager.


The Domain Deliverability seed list tests will attempt to send your email to a pre-defined list of email inboxes on a variety of service providers. You can select from a seed list that is focused on B2B, B2C or International email inboxes. The test results will display whether the email was delivered, whether it was flagged as junk, or was blocked entirely. Results will also show an indication of why any problems are taking place, which gives you a good indication of where to look in order to fix any discovered problems.


The report will show a number of ISPs, the time of receiving emails (some ISPs will throttle suspect emails), and the percentage of emails that are delivered, missing, or flagged as spam.


All three types of tests are worth running a few times each month or before any major campaign in order to understand whether there will be any issues that can be easily avoided.

Note that the tests may take up to 2 hours to return results as they are actually sending emails and retrieving results from a variety of system, each of which may have delays, so give yourself time for the results to be delivered.